Sample page rendered in a browser
Chapter 1:
Introduction
Hi, and welcome to Intermediate CSS and XHTML. I'm Alan Simpson, and I'll be your instructor. I got my start with computers long before the PC, Mac, and public Internet. Since that time, I've written over 100 books on the topic, taught many courses, and consulted to many organizations both large and small. Today my passions are Web development and teaching online courses like this one. You may also know me from Introduction to CSS and XHTML.
In this course, we will build on your knowledge of CSS and XHTML so you can create bigger and better Web sites that are easy to grow and maintain. Before taking this course, you should have completed Introduction to CSS and XHTML or have an equivalent level of knowledge.
You should already know how to create style sheets and Web pages. Feel free to use whatever tools you're accustomed to. For example, if you're a Dreamweaver developer, use Dreamweaver. It doesn't really matter what tool you use, because CSS and XHTML are the same no matter what program you use to create your pages. But you should already be comfortable with whatever authoring program you decide to use.
What You'll Learn
In this course, you'll learn to understand the concepts of CSS cascading and inheritance, and how to leverage it to simplify Web development and maintenance. You'll use advanced CSS selectors to streamline and simplify Web development. You'll create flexible table-less page layouts with minimal effort and custom drop-down menus. You'll follow Web Content Accessibility Guidelines (WCAG) to make your Web site accessible to people with disabilities. You'll move from traditional HTML to CSS and XHTML—the Web technologies of today and tomorrow.
CSS and XHTML
CSS and XHTML exist because of an organization called the World Wide Web Consortium (W3C). They created CSS and XHTML and defined what they are. They are the source from which all Web developers, Web browser creators, search engine creators, and everyone else in the Web business get their information.
The information in the official W3C specifications is very terse and technical. There are many terms and concepts they assume you understand. For this first lesson, we'll focus on those terms and concepts. These will help you gain a better understanding of CSS and XHTML from a big-picture point of view. Let's start with some basic terminology.
Author, User, and User Agent
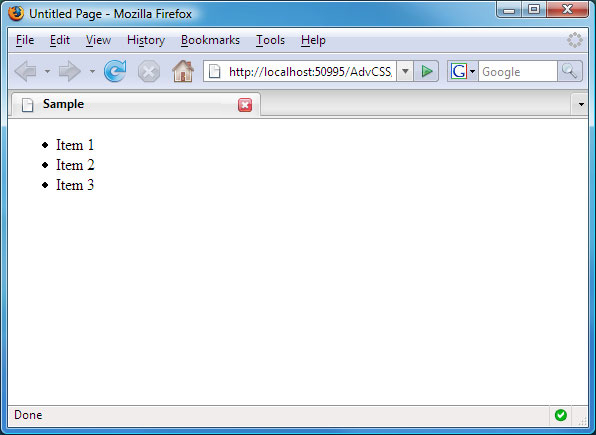
You are a Web author, a person who develops Web sites and Web pages. You do this by creating source code, which consists of XHTML tags, some content, and maybe some CSS styles. The source code defines how the page will look in a Web browser. Here is an example of an XHTML page that contains tags and content. The tags are items enclosed in angle brackets (<>).
<!DOCTYPE html PUBLIC "-//W3C//DTD XHTML 1.1//EN"

"http://www.w3.org/TR/xhtml11/DTD/xhtml11.dtd">

<html xmlns="http://www.w3.org/1999/xhtml">

<head>

    <title>Sample</title>

</head>

<body>

    <ul>

         <li>Item 1</li>

        <li>Item 2</li>

         <li>Item 3</li>

    </ul>

</body>

</html>
A user is any person who views your Web page through a user agent (UA), which is anything that can interpret CSS and XHTML. By far, the most common user agent is a Web browser. The Web browser renders your source code into what the user sees on screen. The rendered page shows only the content, organized and structured as indicated by the tags. For example, the image below shows the code above rendered in Firefox. The content is structured as a bulleted list because the <ul> and <li> tags say that's how it's supposed to look in the browser.
Sample page rendered in a browser
A Web browser is a visual UA (visual user agent). There are also nonvisual UAs that don't actually see the page like a person does. The programs that search engines use to index your page are examples of nonvisual UAs. So are screen readers that read your page aloud to the blind.
XHTML stands for extensible hypertext markup language. It's a set of tags you use in Web pages to define what each element in the page is—for example, a heading (h1), paragraph (p), list item (li), or image (img). CSS is separate and defines the element's style. Stylistic properties are about how the element looks, such as its size, position, color, and font.
We'll get into all of that in more detail later. For now, let's head over to Chapter 2 and talk about a concept that may be new to you: the document tree.
Chapter 2:
Meet the Document Tree
Every XHTML Web page consists of content that is organized into elements. An element is anything that you define with XHTML tags. Though you wouldn't know it just from looking at a page, each element is a little box on the page. These boxes form an invisible document tree.
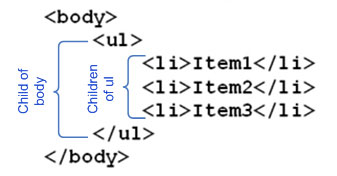
Referring to the simple tags shown below, the <body> and </body> tags form the body element. Next in that page is the <ul> and </ul> tag pair. These create an unordered list element within the body of the page. The unordered list is exactly one level below the page body in the document tree. That's because the <body> and </body> tags are the only tag pair outside the <ul> and </ul> tags.
<!DOCTYPE html PUBLIC "-//W3C//DTD XHTML 1.1//EN"

"http://www.w3.org/TR/xhtml11/DTD/xhtml11.dtd">

<html xmlns="http://www.w3.org/1999/xhtml">

<head>

    <title>Sample</title>

</head>

<body>

    <ul>

        <li>Item 1</li>

        <li>Item 2</li>

        <li>Item 3</li>

    </ul>

</body>

</html>
Within the unordered list element are three list item elements. Each list item element is defined by a pair of <li> and </li> tags. These three elements create a new level in the document tree because they are contained within the <ul> and </ul> tags.
If you could see the borders around all of those elements, you'd see that, indeed, they form boxes within boxes. Below, the body element has a green border around it. The ul element has a red border. Each li element has a blue border.
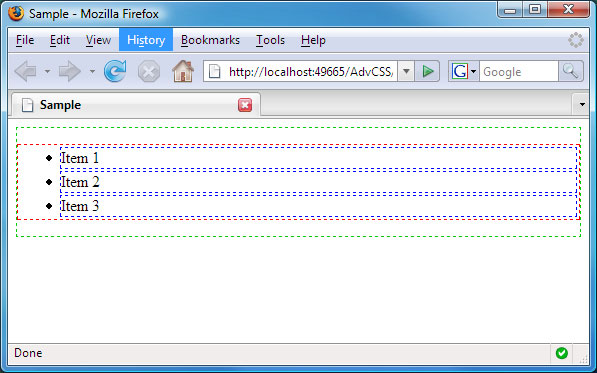
Dashed borders around page elements
A document tree is a conceptual diagram that shows the relationships among elements in a hierarchy rather than as boxes within boxes. You'll never see a document tree on your computer screen, because you don't need to. It's just a means of illustrating element relationships in a hierarchical fashion. It's a lot like how you'd use a hierarchy to illustrate relationships among individuals in a family tree. The document tree for the sample page shown above looks like this.
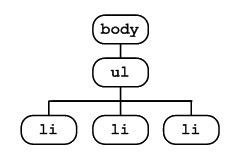
A sample document tree
The different levels in the tree reflect levels of containment. For example, all the boxes are under the body box because all of the visible elements on the page are contained within the body element, defined by the <body> and </body> tags in the page. All of the li boxes are under the ul box because all of the li elements are contained within the ul element, formed by the <ul> and </ul> tags.
The reason why the document tree matters is because elements get their style (appearance) from elements that are above them in the tree. In other words, styles cascade down the document tree. This is where cascading style sheets (CSS) get their name. The styles you create cascade down the document tree.
In CSS, we use the same terminology to describe relationships among elements in the document tree that you'd use to describe relationships among relatives in a family tree.
Ancestors and Descendants
The term ancestor refers to any element that is above other elements in the tree. It doesn't matter how many levels higher the element is. For example, in our document tree, the body element is the ancestor to all other elements in the tree.

Body is ancestor to all other elements
The body is the ancestor to all other elements because the tags that define all those other elements are contained within the <body> and </body> tags that define the body element, as below.
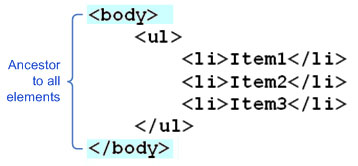
Why the body is ancestor to all other elements
The term descendant refers to any element that's below some element in the document tree. It doesn't matter how many levels below it is. It just has to be lower in the tree to be a descendant. In the image below, all of the yellow elements are descendants of the body element.
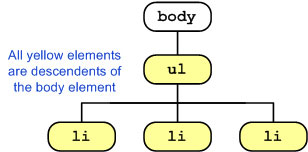
Elements under the body are the body's descendants
Looking at it from the perspective of the source code, all the other elements of the code are descendants of the body tag because they are contained within the <body> and </body> tags that define the body element.
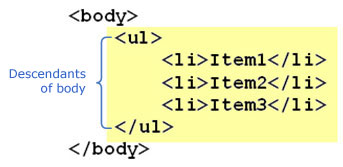
Why all other elements are descendants of the body element
Parents and Children
The term parent refers to an element that is connected to, and exactly one level above, some other element. An element might have many ancestors, but it only has one parent. In our sample document tree, the body element is the parent to the ul element (only). The ul element is the parent to all of the li elements.
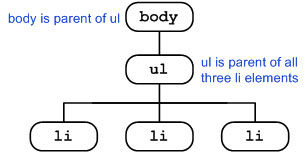
Parent elements
Looking at it from the point of view of the source code, the body element is parent to the ul element because the ul element is contained directly within the <body> and </body> tags. There isn't any other tag between <body> and <ul>. Likewise, the ul element is parent to all of the li elements because those li elements are contained within the <ul> and </ul> tags that define the ul element.
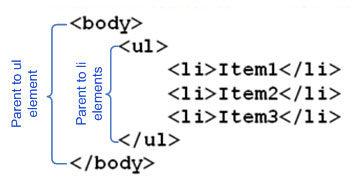
Parents from a source code perspective
A child element is one that is directly connected to, and exactly one level below, its parent. In our sample document tree, the ul element is child to the body element. The li elements are children of the ul element.
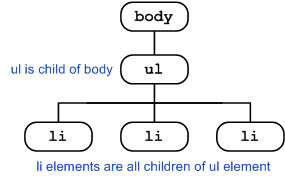
Child elements
Again, from the source code point of view, the ul element is child to its parent, the body element. The li elements are all children of their parent, the ul element, because of the way the tags are nested.
Child elements from the source code point of view
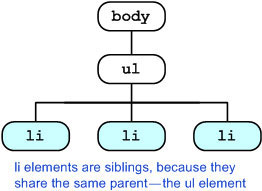
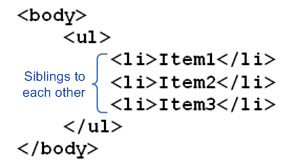
Siblings
Elements that share the same parent are siblings. In our document tree, the li elements are siblings because they share the same parent, the ul element.
Siblings share a common parent
From the source code point of view, the li elements are siblings because they're all nested within the <ul> and </ul> tags that define their common parent.
Siblings from a source code point of view
As mentioned, the style of any element on a page depends, in part, on its ancestors in the document tree. As you'll discover in the next chapter, those cascading styles can come from several different sources.
Chapter 3:
Cascading Style Sheets
When you look at a Web page in a browser, the appearance of any element on the page can be the result of combining styles from several different sources. In this chapter, you'll learn what those sources are and how they work.
Browser Default Styles
Every Web browser has within it a browser default style sheet. That style sheet defines how elements look when no styling is applied. For example, a Web page with no styling shows as black text against a white background because that's the browser default style for every Web browser on the market.
The companies that create Web browsers have some leeway in defining their style sheets. This is one of the main reasons why any Web page you create might look different in various Web browsers.
Author Styles
Author styles are styles that you create as the Web site's author. There are three different places in which you can create styles:
You'll see many examples of each later in this lesson and throughout this course because those are the styles over which you have total control.
User Styles
User styles are defined by the user. These are commonly used to aid with visual impairments. For example, the user styles might make text very large, increase the contrast between colors, or alter colors to which the user is color blind.
Generally, the user doesn't create an actual style sheet. Rather, options and dialog boxes within the Web browser allow the user to make selections for fonts, color, and such. The image below shows the Fonts, Colors, and Accessibility dialog boxes from Microsoft Internet Explorer 7.
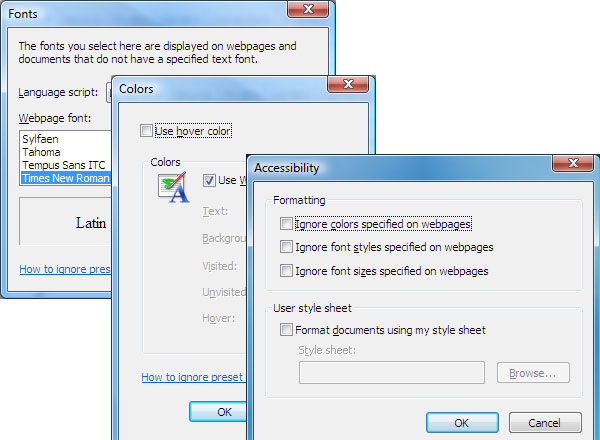
Sample user styles
|
|
CSS styles not only cascade down the document tree, they also cascade down through the various style sheets. Occasionally, there may be conflicts, like the browser default styles might state that all text is black against a white background. You might create an author style that says all text is dark blue against a light blue background. When such conflicts occur, the style that's closest to the actual element wins. How "close" a style is to an element is a conceptual thing that you can envision as shown below.
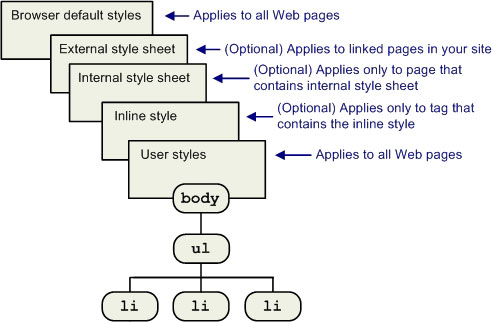
Cascading style sheets
So, in the(unlikely) event that the browser default styles say text is black, the external style sheet says it's red, the internal style sheet says it's green, the inline style says it's purple, and the user styles say it's yellow, the text will be yellow. That's because user styles are "closer" (conceptually) to elements than all other styles.
Of course, it's never really that complicated, because user styles are generally neutral and play no role. Browser styles are so far from the elements, they only apply if you don't specifically create your own author styles. The author styles are entirely up to you.
In the long run, you are in complete control of the stylistic look and feel of every Web site you create. Let's head over to Chapter 4 now and see why.
Chapter 4:
Using Style Sheets
In this chapter, we'll take a look at the document tree and CSS cascading in action. The goal here is not to create a Web site nor to actually produce something practical or pretty. So, there's no need for you to create any Web pages or style sheets right now. The goal in this chapter is simply to illustrate some concepts and review some CSS basics.
We'll start with the simple Web page below. I'll refer to this page as cascading.htm.
<!DOCTYPE html PUBLIC "-//W3C//DTD XHTML 1.1//EN"

"http://www.w3.org/TR/xhtml11/DTD/xhtml11.dtd">

<html xmlns="http://www.w3.org/1999/xhtml">

<head>

  <title>Cascading Demo</title>

</head>

<body>
  <p>

   I am a paragraph with some

    <em>emphasized</em> text.

  </p>
  <ul>

   <li>We are list items...</li>

   <li>...in an unordered list.</li>

   <li>We're <em>siblings</em>.</li>

  </ul>


</body>

</html>
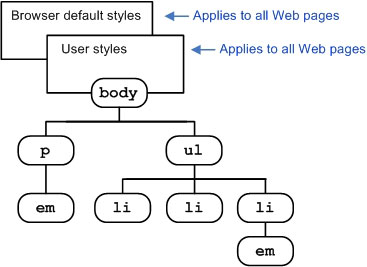
Here is the document tree for that sample page. As always, the body element is ancestor to all other elements because all other tags on the page are contained within its <body> and </body> tags.
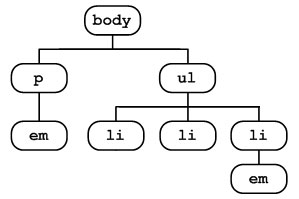
Document tree for cascading.htm
Of course, the document tree is purely conceptual. It just shows the relationships of the elements to one another. In a Web browser, the cascading.htm page looks like this.
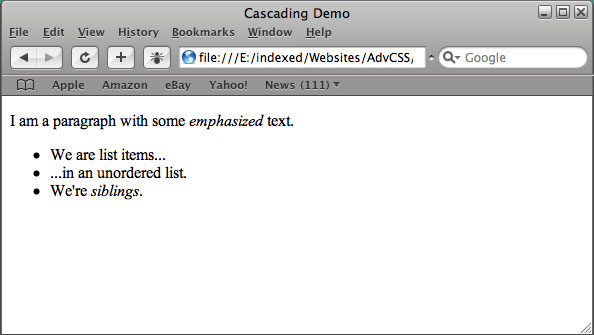
Cascading.htm in a Web browser
The page looks the way it does because only the default browser styles are applied. Those styles say that text is black, the background is white, and em elements are italicized. I haven't done anything to the user styles in my Web browser. So, those are neutral and have no effect on the page. Here's what's going on behind the scenes to describe why the page looks the way it does in the Web browser.
Where cascading.htm gets it styles
Using External Style Sheets
Now, let's suppose we're creating a Web site, and for consistency, we want every page to show red text on a light blue background. Admittedly, that's not particularly pretty or practical. But, again, we're not really building a Web site right now; we're just reviewing some concepts. We'll get into "pretty" and "practical" later in the course.
External style sheets are ideal for defining styles that you want to apply to two or more Web pages within your Web site, because if you ever decide to change that style, you need only do so in the style sheet. That saves you from having to dig through all the tags in every page trying to figure out where you need to make a change.
An external style sheet consists of style rules that define the styles. (You don't put any XHTML tags in style sheets.) As you may recall, the syntax for defining a style rule is:
selector{

  property:value;

  ...;

}
The selector basically "selects" (defines) the elements to be styled. The property:value pairs define the style. The property can be any valid CSS property. The value can be any valid CSS value that applies to the property. The … indicates that the style rule can contain as many property:value pairs as you like, so long as you separate each pair with a semicolon.
For the sake of example, let's say we want to create a style rule
that says all elements will show as red (#ff0000) text against a light
blue (#e0ffff) background. Since we said all elements, we'll use body
as the selector. The body is the ancestor to all other visible elements
on the page, and its style will cascade down through all of its
descendants.
So first I'd create a new, empty style sheet. In it I might put a couple of descriptive comments (text that starts with /* and ends with */). Then, I'd put in my body style rule, as below:
/* Style sheet */
/* Body style rule */

body {

  background-color: #e0ffff;

  color: #ff0000;

}
A style sheet can contain as many style rules as you wish. And a Web site can contain any number of style sheets. But for now, let's just stick with this one style rule in this one style sheet. For the sake of example, let's suppose I save that simple style sheet as cascading.css.
External style sheet rules apply only to Web pages that link to that
style sheet. So, for our external style sheet to apply to our sample
page, we need to put in an appropriate link tag. That tag must be placed
within the <head> and </head> tags. The href=
attribute of that tag must be a valid relative reference to the style
sheet. Assuming the page and style sheet are in the same folder, the
relative reference is simply the style sheet's filename. The code below
shows the appropriate link tag to put into the cascading.htm page.
<!DOCTYPE html PUBLIC "-//W3C//DTD XHTML 1.1//EN"

"http://www.w3.org/TR/xhtml11/DTD/xhtml11.dtd">

<html xmlns="http://www.w3.org/1999/xhtml">

<head>

  <title>Cascading Demo</title>
  <!-- Link to external style sheet -->
  <link href="cascading.css" rel="stylesheet" type="text/css" />
</head>

<body>
  <p>

   I am a paragraph with some

   <em>emphasized</em> text.

  </p>
  <ul>

   <li>We are list items...</li>

   <li>...in an unordered list.</li>

   <li>We're <em>siblings</em>.</li>

  </ul>


</body>

</html>
Conceptually, we've inserted an external style sheet into the styles that cascade down through the document tree. We can envision that, conceptually, as below.
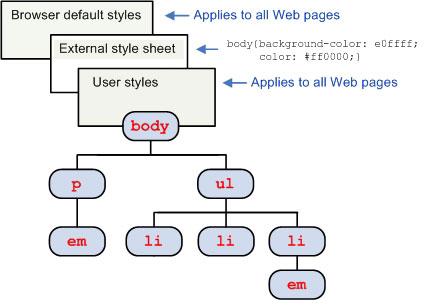
External style sheet rule applied
The style rule that makes the page body light blue and the text color red takes precedence over the default browser styles. And that style cascades down the document tree. Thus, the Web page now looks like this in the Web browser.
|
|
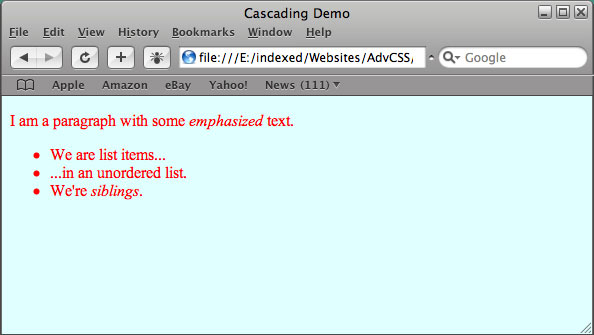
Cascading.htm with external style sheet applied
Using Internal Style Sheets
In some situations, you may want to create styles that apply to multiple elements in the current page only, not other pages in your site. That's what internal style sheets are for. Of course, they are entirely optional. You should use them only for their intended purpose of creating style rules that apply to just the current page.
An internal style sheet must be placed within the <head> and </head> tags of the Web page (.htm or .html file) to which the styles apply. Use a <style type="text/css"> tag to mark the beginning of the internal style sheet, and use </style> to mark its end. Style rules in style sheets follow the exact same syntax as style rules in external style sheets.
Now, let's suppose that, for whatever reason, I want all bulleted lists (ul elements) in the current page (only) to show as green text (#00aa00) rather than red text. It wouldn't make sense to put a style rule in the external style sheet for this, because I only want the style applied to the current page. So, I could use an internal style sheet, like this:
<!DOCTYPE html PUBLIC "-//W3C//DTD XHTML 1.1//EN"

"http://www.w3.org/TR/xhtml11/DTD/xhtml11.dtd">

<html xmlns="http://www.w3.org/1999/xhtml">

<head>

  <title>Cascading Demo</title>

  <!-- Link to external style sheet -->

  <link href="cascading.css" rel="stylesheet" type="text/css" />
  <!-- Internal style sheet applies to this page only -->
  <style type="text/css">
  /* Use green text in unordered bulleted lists */
  ul{
   color:#00aa00;
  }
</style>
</head>

<body>
  <p>

   I am a paragraph with some

    <em>emphasized</em> text.

  </p>
  <ul>

   <li>We are list items...</li>

   <li>...in an unordered list.</li>

   <li>We're <em>siblings</em>.</li>

  </ul>


</body>

</html>
Notice that the page still links to the external style sheet, cascading.css. That's because I still want to apply those general external styles to the current page.
Conceptually, we've added an internal style sheet to the chain of styles leading up to the page. So, we can envision what's going on now as below.
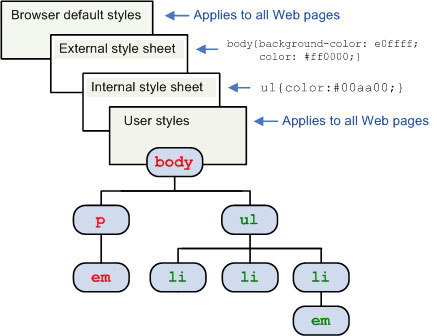
Internal style sheet added to the cascade
Here's how the cascading.htm page looks after adding the internal style sheet. The unordered list element, defined by the <ul> and </ul> tags, and all of its descendants, now show green text.
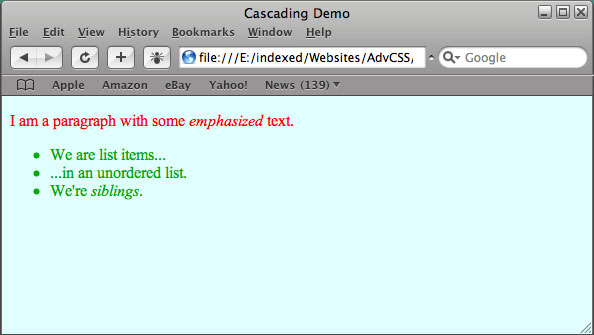
Internal style sheet makes ul text green
In the image above, some browser default styles, like the general size and appearance of text and italicizing of em elements, still come through because there's nothing stopping them.
The light blue background from the external style sheet still comes through too. Again, that's because there's nothing stopping that background color. The red text is still applied to the paragraph because there's nothing that says it shouldn't be. The internal style sheet only says that ul elements show as green text. And so, only the ul element and its descendants show as green text.
When creating your own Web site, keep in mind that you want to use an external style sheet to define styles that apply to multiple pages within the site. These allow you to define styles that determine the overall look and feel of your site. And if you ever change your mind about a style, you need only change the style in the external style sheet, not in every page of your site. Use internal style sheets to define styles that apply to elements in the current page only.
Let's head over to Chapter 5 now and discuss the third type of style you can create: the inline style.
Chapter 5:
Using Inline Styles
Style sheets are a great way to define style rules that apply to multiple elements in a single page or multiple pages throughout your site. But once in a while, you may want to style one instance of an element in a unique way. For that kind of styling, you use inline styles.
You don't use curly braces in inline styles. Instead, you enclose everything to the right of the style=
attribute in quotation marks. You can still use multiple property:value
pairs separated by semicolons, as in style rules. So, the general
syntax of an inline style is:
style="property:value;..."
The properties and values are the same as you'd use in a style rule. The only difference is that they're in the tag rather than in a style rule.
As an example, let's suppose that (for whatever reason) we want only the second bulleted item in the current page to be purple (#ff00ff). We need to put the inline style right inside the <li> tag for that second list item, as below:
<!DOCTYPE html PUBLIC "-//W3C//DTD XHTML 1.1//EN"

"http://www.w3.org/TR/xhtml11/DTD/xhtml11.dtd">

<html xmlns="http://www.w3.org/1999/xhtml">

<head>

  <title>Cascading Demo</title>

  <!-- Link to external style sheet -->

  <link href="cascading.css" rel="stylesheet" type="text/css" />
  <!-- Internal style sheet applies to this page only -->

  <style type="text/css">

   /* Use green text in unordered lists */

   ul{

    color:#00aa00;

   }

  </style>
</head>

<body>
  <p>

   I am a paragraph with some

    <em>emphasized</em> text.

  </p>
  <ul>

   <li>We are list items...</li>

   <li style="color:#ff00ff">...in an unordered list.</li>
   <li>We're <em>siblings</em>.</li>

  </ul>


</body>

</html>
Conceptually, behind the scenes, we've added another level of styles to this page, as illustrated below.
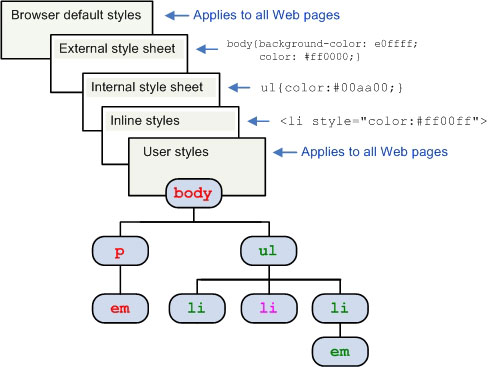
All styles and document tree
Here's how the page looks in a Web browser.
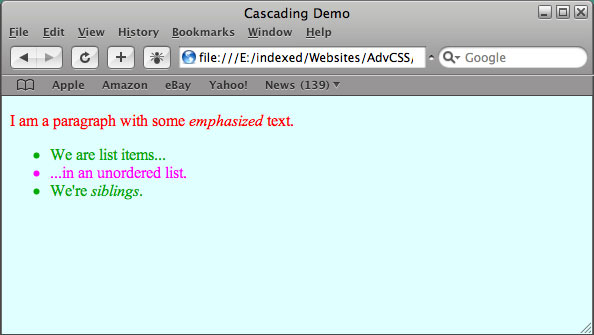
Final page with all styles applied
Only the second bulleted list item is purple. That's because an inline style applies only to the tag to which it is applied (as well as any of that tag's descendants). The second <li> element in our page has no descendants. But if there were, like some boldface or italicized text in that second bulleted list item, that text would be purple as well.
All the other styles are still cascading down the chain as before. Every element is still inheriting the correct and appropriate styles from the chain of styles above it.
Conclusion
You've accomplished a lot today, opening the doors to a better future in Web development. The important things to understand are that CSS and XHTML are not nearly as arbitrary and disorganized as most people treat them. Both are carefully planned technologies specifically designed to make it relatively easy to create large, complex Web sites that are easy to build, maintain, modify, and grow. Let's recap some important points.
Remember that every Web page is a document tree of elements within other elements, and every element in a Web page gets its stylistic attributes from its ancestral elements. All Web browsers have a built-in style sheet containing default browser styles. Those styles are applied to elements in a page unless you create your own styles. Use external style sheets to define style rules that apply to multiple pages within your Web site. Use internal style sheets to define styles that apply to multiple items within a single Web page. Use inline styles only for situations where the style applies to only one tag in one Web page. Web browsers contain user styles that people with visual impairments generally use to make Web pages readable. The exact appearance of any element in your Web page is the result of the cascading of all styles that precede that element.
As you'll see throughout this course, you can use all of these basic facts in clever and creative ways to build bigger and better Web sites that are easy to debug, modify, and maintain.
In Lesson 2, you'll learn how to create advanced selectors to target your styles to very specific elements in the document tree. Get ready to discover the secrets advanced professionals use to keep their Web pages lean, clean, and easy to debug and modify. But before we move on, there are a few more things I'd like you to do.
After every lesson in this course, you can test your knowledge by taking a short, multiple-choice quiz. To access your first quiz, click the word Quizzes at the top or bottom of any page in this classroom. When the quiz form comes up, select Lesson 1 Quiz. Once you've taken the quiz, apply what you've learned by doing this lesson's assignment. While the assignments that accompany every lesson in this course are optional, they will reinforce and expand your learning. To access your first assignment, click Assignments at the top or bottom of any page in the classroom. Then, scroll down to the section for Lesson 1.
Also, since learning something new usually raises questions, every lesson in this course comes with an FAQ section. You'll find the link that goes to this lesson's Frequently Asked Questions by clicking the Resources link at the top or bottom of any page in this classroom. Within the Resources link, you'll also find the course index, which many students like to print and use as a detailed table of contents. Also, you'll find book recommendations that I've found very helpful and would like to pass along to you. These aren't required, but they're excellent sources for further learning. |
||
Supplementary Material
|
Cascading Style Sheets, Level 2 Revision 1 http://www.w3.org/TR/CSS21/cover.html |
| This link takes you to the World Wide Web Consortium's official documentation for CSS Level 2.1. This is the resource that defines what CSS 2.1 is and how it works. We'll be using CSS 2.1 throughout this course. |
|
W3C CSS 2.1 Index http://www.w3.org/TR/CSS21/indexlist.html |
| This link takes you to the complete index for the W3C's CSS 2.1 documentation. CSS properties are generally shown in single quotation marks like 'background', 'background-attachment', and so forth. |
|
Cultured Codes' CSS 2.1 Properties Reference http://www.culturedcode.com/css/reference.html |
| Here's a reference to CSS properties without all the jargon and technical details. This one is very compact. Click a section in the left column, then a property in the second column, to see facts in the Details column. |
|
guiStuff CSS 2.1 Reference http://www.guistuff.com/css/ |
| Here you'll find yet another handy reference to CSS 2.1 properties. |
|
HTML Dog CSS Properties http://www.htmldog.com/reference/cssproperties/ |
| Here's another quick reference to CSS properties. |
|
CSS 2 Reference http://www.w3schools.com/css/css_reference.asp |
| You guessed it: another online reference to CSS properties. Add all these CSS 2 references to your bookmarks or favorites, and you'll never again need to guess what's available or which values work with which properties. Just pick whichever one you like best as your favorite resource. |
|
W3C Index of Elements http://www.w3.org/TR/REC-html40/index/elements.html |
| Here's a page you'll probably want to add to your bookmarks or favorites. It provides a quick index to all HTML tags. Note that items with D in the Depr (Deprecated) column, or an L or F in the DTD column are either deprecated or on their way out in XHTML. So, you should avoid using those tags in your Web pages. |
|
W3C Index of Attributes http://www.w3.org/TR/REC-html40/index/attributes.html |
| Attributes are text you put in XHTML tags, like src= in an img tag. This page provides a quick reference to all of them. Again, those with a D, L, or F in the Depr. or DTD column are deprecated and best avoided. |
|
Conformance: Requirements and Recommendations http://www.w3.org/TR/1998/WD-css2-19980128/conform.html |
| If you've ever wondered why so few Web developers seem to know about the document tree, check out this page at the W3C site. This is their official page on the matter. |
|
12 Lessons for Those Afraid of CSS and Standards http://www.alistapart.com/articles/12lessonsCSSandstandards |
| Click this link for some good advice on why making the switch from the old way of doing things to the new way is a good idea—despite the new learning curve. |
FAQs
Assignment
 |