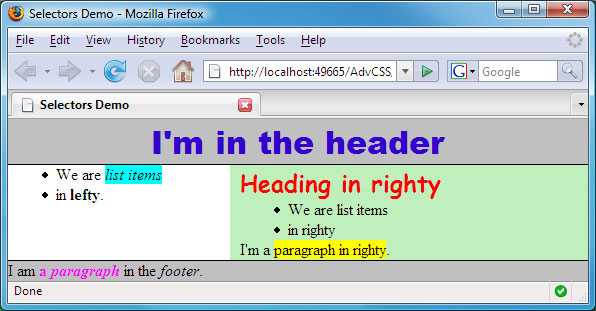
Sample selectdemo.htm page in Firefox
Chapter 1:
Creating Style Rules
In Lesson 1, you learned how styles cascade down through various style sheets and down through the document tree of a Web page. We also talked about external style sheets, internal style sheets, and inline styles. In this lesson, you'll learn advanced techniques for creating CSS style rules.
We'll use the following Web page, which I'll refer to as selectdemo.htm, as a working example. Here is the XHTML source code.
<!DOCTYPE html PUBLIC "-//W3C//DTD XHTML 1.1//EN"
"http://www.w3.org/TR/xhtml11/DTD/xhtml11.dtd">
<html xmlns="http://www.w3.org/1999/xhtml">
<head>
<title>Selectors Demo</title>
</head>
<body>
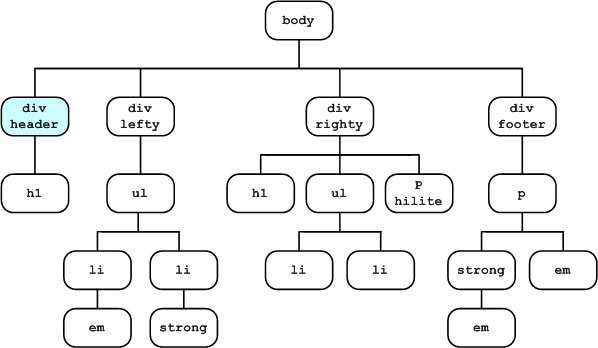
<div id="header">
<h1>I'm in the header</h1>
</div><!-- End header div -->
<div id="lefty">
<ul>
<li>We are <em>list items</em></li>
<li>in <strong>lefty</strong>.</li>
</ul>
</div><!-- End lefty div -->
<div id="righty">
<h1>Heading in righty</h1>
<ul>
<li>We are list items</li>
<li>in righty</li>
</ul>
<p>I'm a paragraph in righty.</p>
</div><!-- End righty div -->
<div id="footer">
<p>I am <strong>a <em>paragraph</em></strong> in the <em>footer</em>.</p>
</div><!-- End footer -->
</body>
</html>
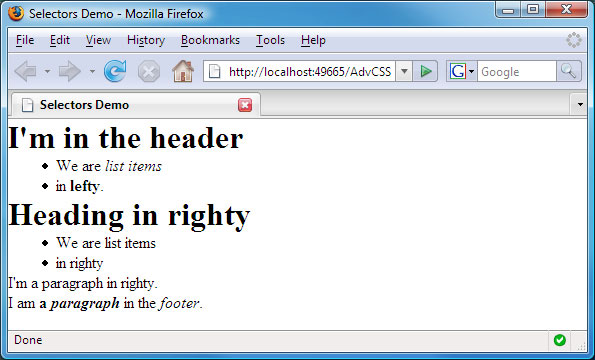
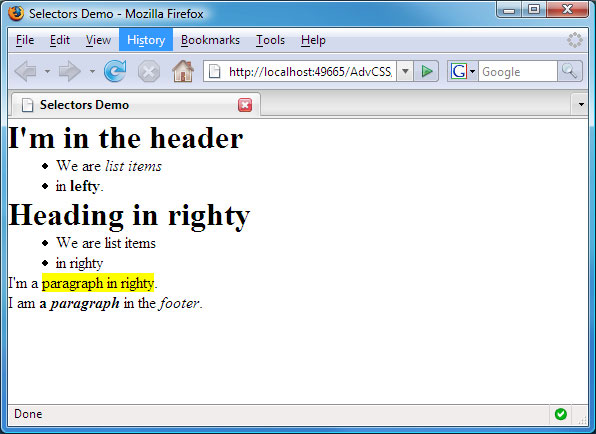
Here's how the page looks in a browser with only the default browser styles applied.
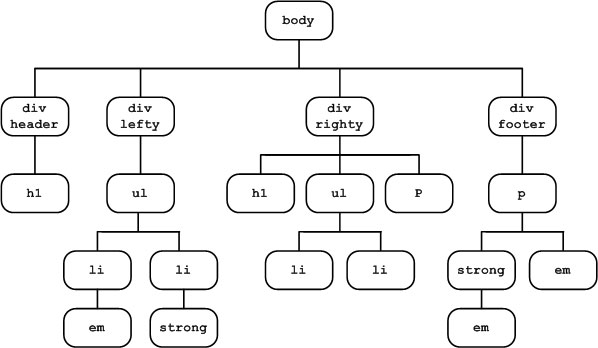
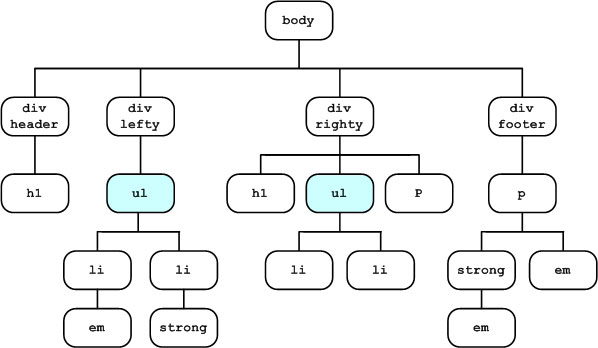
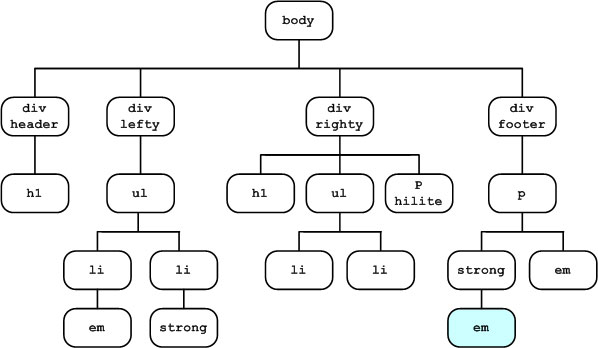
Here is the document tree for the selectdemo.htm page.
Before we start adding style rules, understand the syntax of a style rule shown below.
selector {
property:value;
...;
}
That syntax applies whether you're putting the style rule in an internal style sheet or an external style sheet.
The selector at the start of the style rule plays a very important role. It selects (specifies) the elements to which the style applies. As you'll learn, there are many different kinds of selectors you can use. Let's start with the universal selector.
Universal Selector
The universal selector (*) applies to every element in the document tree, which means it applies to every element in your page. In other words, if we use the universal selector to create a style rule for our sample selectdemo.htm page, every element in the document tree will get that style, as indicated by blue tinted boxes below.
Many professional Web developers use the universal selector to create a style rule that removes the default margins and padding from every element in a page. That's because browsers vary slightly in their default margins and padding. As you get into more complex designs, those subtle differences between browsers can start to drive you crazy.
Adding a style rule like this to your site's external style sheet removes the browser default margins and padding from every element in the page.
/* Universal selector */

/* Remove all default margins and padding */

* {

margin:0;

padding:0;

}
Here's how selectdemo.htm looks with the universal selector above in its style sheet.
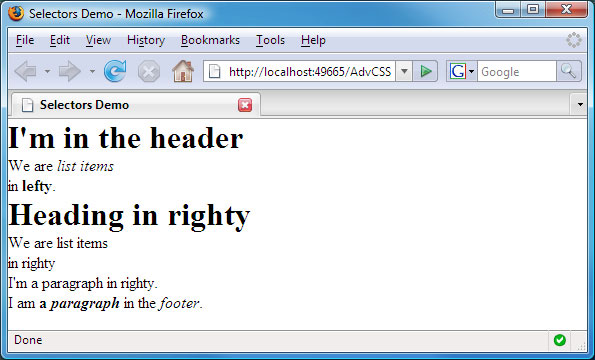
The lists in our page have lost their bullets. That's because lists rely on some left margin space to place the bullet. All the margins are gone, now that we've universally removed them. But that's nothing to worry about, because we can define our own margins, as you'll see in a moment.
Element (Type) Selectors
Element selectors (also called type selectors or tag selectors) apply their style to all matching elements in the page. You can create a style rule for any tag that has a visible presence on the page in a web browser, such as those listed in Table 1.
| Table 1: XHTML tags and element selectors. | |||||
| a | abbr | acronym | address | b | big |
| blockquote | body | button | caption | cite | code |
| col | colgroup | dd | del | dfn | div |
| dl | dt | em | fieldset | form | h1 |
| h2 | h3 | h4 | h5 | h6 | hr |
| i | img | input | ins | kbd | label |
| legend | li | noscript | object | ol | optgroup |
| option | p | pre | q | samp | select |
| small | span | strong | sub | sup | table |
| tbody | td | textarea | tfoot | th | thead |
| tr | tt | ul | |||
|
|
As an example of a type selector, suppose we want to get the bullets back into our unordered lists. To do that, we need to put some left margin space back into the ul elements. To create a style rule that applies to all ul elements, use ul as the selector. For example, the style rule below sets the left margin of all ul elements to 3em.
/* Element (type) selector */

/* Applies to all ul elements */

ul{

margin-left:3em;

}
An element selector applies to all selected elements in the page. So, in our selectdemo.htm page, the ul style rule applies to two elements, shaded in blue below.
In the Web browser, we see that the two unordered lists now have enough left margin space to show their bullets.
In Chapter 2, we'll look at other kinds of selectors you can use when creating your style rules.
Chapter 2:
Class and ID Selectors
In this chapter, you'll learn about class selectors and ID selectors. These don't apply to any tags automatically. They apply only to tags that specifically refer to the name you put in the selector. That name is one you make up yourself, not one that matches an XHTML tag.
Class Selectors
Class selectors let you create styles that you can apply arbitrarily to any number of tags in any page. In your style sheet, you type a dot (.) followed by a name of your own choosing. The name must begin with a letter and can't contain any blank spaces. The names are also case-sensitive.
It's to your advantage to give your classes meaningful names that reflect the purpose of the style. Generic names like style1, style2, and so forth aren't good, because they don't tell you anything about what the style does.
Here is a class selector named hilite that sets the background color of its styled element to yellow (#ff0).
/* Sample generic class selector */

/* Applies only where class="hilite" */

.hilite{

 background-color:#ff0;

}
By itself, the class selector has no effect on a page. That's because a class selector only applies to tags that have class="name" in them (where name is the class name without the leading period). So, to apply this element, we need to add class="hilite" to one or more tags in the page.
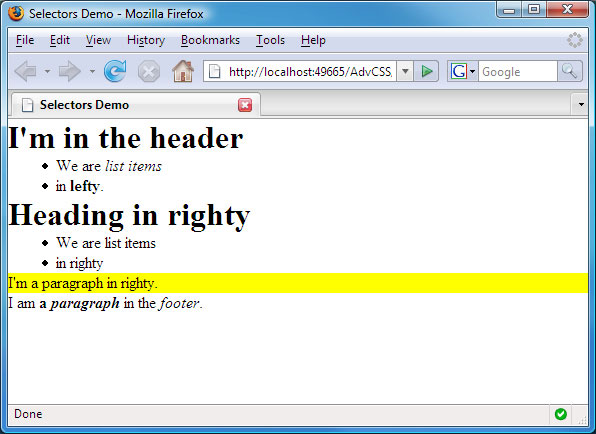
To apply a class to an existing element in a page, add class="hilite" to the tag that defines that element. For example, suppose we add class="hilite" to the paragraph in the righty div, as below.
<div id="righty">

 <h1>Heading in righty</h1>

 <ul>

 <li>We are list items</li>

 <li>in righty</li>

 </ul>

 <p class="hilite">I'm a paragraph in righty.</p>

</div><!-- End righty div -->
The hilite style class is now applied to that one paragraph, as below.
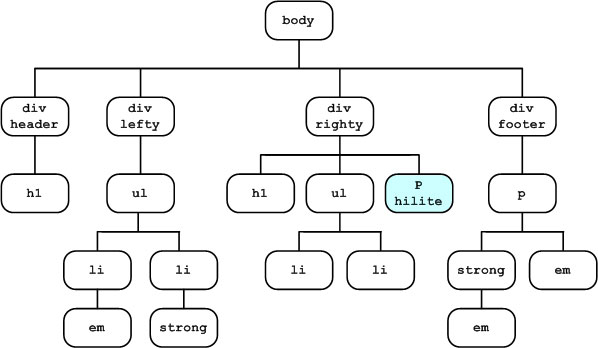
In the document tree, a generic style class applies to all elements in which you add class="name" (where name is the class name without the leading period). In this example, we added that attribute to only one element. So we can envision that it applies only to that one element, it is colored blue in the image below.
As an alternative to applying a class to an entire element, you can use the <span> and </span> tags to apply it to any span of text you like. Let's suppose that rather than applying the hilite class to the entire paragraph, you want to apply it only to a few words. Enclose those words in <span class="hilite"> and </span> tags.
<div id="righty">

 <h1>Heading in righty</h1>

 <ul>

 <li>We are list items</li>

 <li>in righty</li>

 </ul>

 <p>I'm a <span class="hilite">paragraph in righty</span>.</p>

</div><!-- End righty div -->
The hilite class now applies only to the new span element.
|
The .hilite style is an example of a generic class selector, so named because you can apply it to any tag. You can combine an element selector with a class selector to define a class that applies only to that element. This allows you to use the same class name for different situations.
What if you want the highlight color to be light blue when applied to italicized text? You could create a style rule that combines the em element with the .hilite class name, like this:
/* This style applies only to */
/* em class="hilite" tags */
em.hilite{
background-color:#0ff;
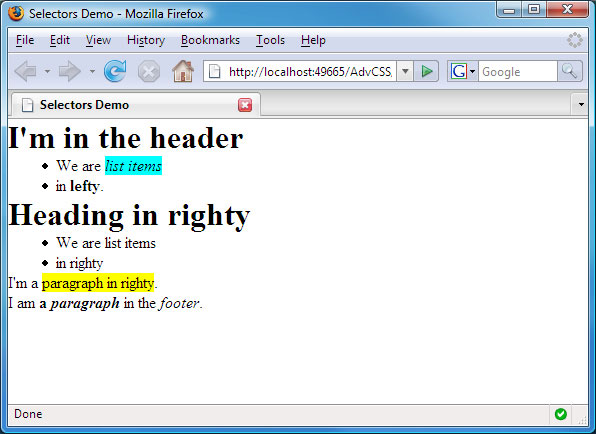
}Now, suppose we add class="hilite" to the em tag shown below:
<div id="lefty">

 <ul>

 <li>We are <em class="hilite">list items</em></li>

 <li>in <strong>lefty</strong>.</li>

 </ul>

</div><!-- End lefty div -->
The image
below shows how that change looks when viewing the page in the Web
browser. The background color for the em is different than the
background color for the span because we have two different hilite
classes. The em.hilite style applies only to <em class="hilite"> tags. The .hilite generic class applies when you put class="hilite" in any tag other than an em tag.
Class selectors give you a lot of flexibility. You can apply them to any elements you wish, or even to arbitrary spans of text using <span> and </span> tags. Next, we'll look at ID selectors, which serve a different purpose.
ID Selectors
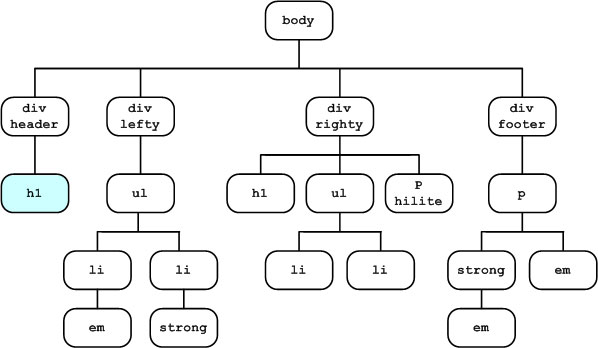
An ID selector (also called an identity selector or identifier selector) applies only to the tag in a page that contains id=name, where name matches the selector name. I say "the tag" because identifiers must be applied to one, and only one, element on a page. In our sample page, we have four such named elements: header, lefty, righty, and footer.
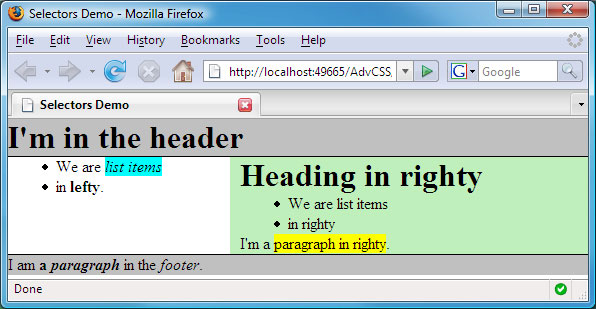
To define an ID selector, precede the identifier name with a pound sign (#) in your style sheet. For example, here's a style rule that applies only to the element named header.
/* Applies to id="header" */

#header{

 background-color:#c0c0c0; /*silver */

 border-bottom:solid thin #000;

}
That #header style applies only to the element highlighted in blue in the document tree below.
Here is a style rule that applies only to the element named lefty (the box labeled div lefty in the document tree).
/* Applies to id="lefty" */

#lefty{

 width:35%;

 float:left;

}
This next style rule applies only to the element named righty (the box labeled div righty in the document tree):
/* Applies to id="righty" */

#righty{

 width:60%;

 float:right;

 background-color: #bfefbb; /*light green */

 padding-left:10px;

}
And, of course, this style rule applies only to the element named footer (the box labeled div footer in the document tree):
/* Applies to id="footer" */

#footer{

 clear:both;

 background-color:#c0c0c0; /* silver */

 border-top:solid thin #000;

}
Here's how the page looks in a browser after adding all those style rules. The other styles we've created in this lesson still apply too because I haven't taken them out.
Let's move on to Chapter 3 now and look at some more advanced selectors you can use to create CSS style rules.
Chapter 3:
Descendant Selectors
In addition to the kinds of selectors you've seen so far, you can create style rules with descendant selectors. These offer a subtle yet powerful method of defining style rules that apply to elements based on their location in the document tree.
A descendant selector always consists of two or more names separated by a space. Consider the following style rule.
/* Sample descendant selectors */

/* Applies to h1 in header only */

#header h1{

  font-family:'Arial Black', Helvetica, Sans-Serif;

  font-size: 2em;

  text-align:center;

  color:#30c;

}
Notice that the selector includes both the #header and h1. That selector means to apply the style only to h1 tags that are descendants of the element named header. Thus, in our document tree, the style applies only to the element colored.
#header h1 style appliesIn our page, only the heading in the header div is styled, as below. It uses the sans-serif font, is centered, and is a shade of blue (#30c).

#header h1 style applied to the page
We didn't have to put anything in the <h1> tag to make the style rule apply. The selector, #header h1,
says all that needs to be said: "Apply this style to h1 tags that are
descendants of the #header element". This makes it easy to style
elements for different parts of your page without adding more text to
the page's XHTML code.
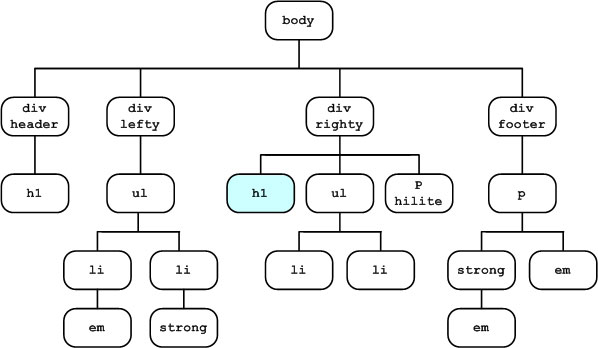
Let's look at another example. Here's a style rule that applies only to h1 tags that are descendants of the righty element:
/* Applies only to h1 in righty */

#righty h1{

font-family:'Comic Sans MS', Cursive;

font-size: 1.5em;

font-weight:bold;

color:#f00; /* red */

}
In the document tree, the style rule applies only to the h1 tag that's a descendant to the righty element.
#righty h1 style appliesIn the Web page, you see the style applied to the heading in the righty div.

#righty h1 style rule applied
The first item in a descendant selector doesn't have to be an ID. It can be an element selector or a class. Here is a style rule that applies only to strong elements that are descendants of paragraphs. It makes their text color purple (#f0f).
/* Applies only to strong elements */

/* that are descendants of p elements */

p strong{

color:#f0f; /* purple */

}
In our sample document, only one element meets the criterion—the strong text in the bottom paragraph.
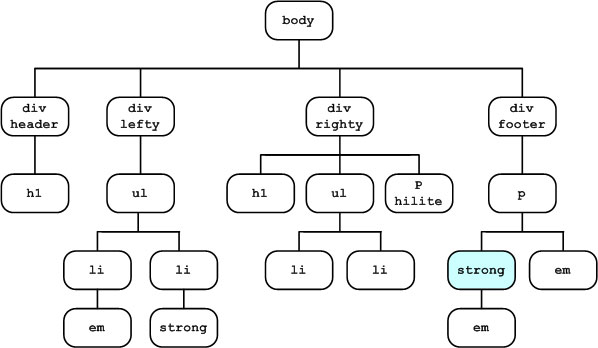
p strong style applies in our sample document treeHere's how the page looks after adding that style rule. Note the purple (#f0f) text in the paragraph at the bottom of the page.
You're not limited to two items either. You can put in as many as you wish. Here's a style rule that would apply only to li elements that are descendants of ol elements that are descendants of div elements:
div ol li{

property:value;

...;

}
We'll be using quite a few descendant selectors later in this course. So, you'll see plenty of real-world examples later. For now, the key thing to remember is that descendant selectors allow you to write styles that apply to elements based on the elements' position in the document tree rather than on a specific tag or a name you type in a class= or id= attribute. That can save you from having to type a lot of class= attributes in your tags. And that, in turn, keeps your source code lean, clean, and easier to work with.
Let's head over to Chapter 4 and look at still more advanced CSS selectors.
Chapter 4:
Child, Sibling,
and Attribute Selectors
In this chapter, we'll get into the most advanced CSS selectors. You won't see these used often, because browser support for them has come only recently. Nor is it always easy to find situations where they are the best solution. But we'll discuss them in this lesson so you understand all of the selector types available to you.
You may recall that a descendant is an element that is any number of levels below some other element. A child, on the other hand, is exactly one level below its parent. If you want to apply a style rule only to elements that are a child of some other element, use the following syntax in your selector.
parent>child
The parent or child can be an element type (tag), class, or ID. For example, here is a style rule that applies only to em elements that are children of strong elements.
/* Sample child selector */

/* Applies only where em is child of strong */

strong>em{

 text-decoration:underline;

}
In our sample document tree, the em element that's the child of a strong element is shaded blue.
In our page, that element is now underlined because our style rule says it should be underlined.

<strong>em style rule
|
Adjacent Sibling Selectors
Siblings in the document tree share the same parent element. Adjacent siblings are elements that are siblings and also right next to each other. Consider the following paragraph (which isn't in our sample page; it's just a general example):
<p>She <strong>sells</strong> sea <em>shells</em> by the <em>seashore</em>.</p>Here's the document tree for that small chunk of code:
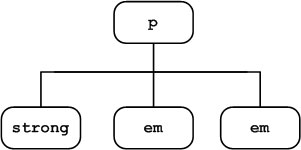
To specify an adjacent sibling selector, separate the left sibling from the right sibling with a + sign. Look at the following style rule.
/* Sample adjacent sibling selector */

/* Applies only where em is adjacent to strong */

strong+em{

 color:#f00;

}
The style rule says, "When the sibling element to the left of an em is a strong element, make the em element's text red." Here's how that would look in a Web browser.
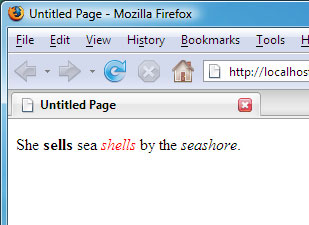
The first em is red because its adjacent sibling element (immediately to the left) is a strong element (the word sells in boldface). The style doesn't apply to the second em element because the element to the left of that one is an em, not a strong element.
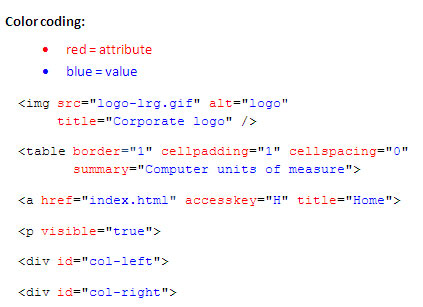
Attribute Selectors
Attribute selectors allow you to target styles to tags based on attributes and values in those tags. Attributes (sometimes called parameters) and values are the items you add to tags to further define the appearance or behavior of the tag. The image below shows some examples with attributes shown in red and values shown in blue.
Our selectdemo.htm page isn't large or complex enough to illustrate the use of attribute selectors. So, these I'll illustrate with more general examples.
There are four ways you can use attribute selectors. All involve using square brackets ( [] ) in the selector.
If you want to target all tags that have a
particular attribute, regardless of the value of the attribute, follow
the element name with the attribute name in square brackets. The style
rule below puts a border around all images that have a title= attribute. It has no effect on img tags that don't have a title= attribute.
img[title]

{

 border:thin solid #00f

}
If you want to target tags that have a specific value in a specific attribute, use attribute=value in the square brackets. The following style rule applies to all img tags that contain alt="logo":
img[alt = "logo"]

{

 border:none;

}
You can use ~= to isolate any word
in an attribute's value. You might think of ~= as meaning "contains."
The style rule below targets every table that has the word measure somewhere in its summary= attribute:
table[summary ~= "measure"]

{

 background-color:#c0c0c0;

}
Use |= to match items that are separated by hyphens. Think of |= as meaning "starts with this word followed by a hyphen". Take a look at the following two divisions named col-left and col-right:
<div id="col-left"><div id="col-right">
Here is a style rule that applies to both of those divisions:
 div[id |= "col"]

 {

 display:none;

 }
That style rule matches both division because id |= col means "where the id value contains the word col followed by a hyphen."
That about wraps it up for the many different kinds of selectors you can use when creating style sheets. Needless to say, you have much flexibility there. You'll see practical examples of applying these concepts creatively and productively in upcoming lessons.
For now, I'd like to wrap this lesson up with some tips, tricks, and shortcuts in Chapter 5.
Chapter 5:
Tips, Tricks, and Shortcuts
Let's wrap up this lesson with some quick general tips, tricks, and shortcuts. I think you'll find these a bit more straightforward and easier to grasp than some of the more abstract concepts described in the previous chapters.
Styles With Multiple Selectors
Each of the sample style rules you've seen so far has a single selector. But you can actually create several styles from one rule. Just separate the selectors with commas. Notice the style rule below sets the font of h1, h2, h3, and h4 tags all to a bold sans-serif.
/* Four separate selectors, one style rule */

h1, h2, h3, h4{

  font-family: Tahoma, Geneva, Sans-Serif;

  font-weight:bold;

}
That's a handy shortcut alternative to writing each style rule separately, like this:
h1{
font-family: Tahoma, Geneva, Sans-Serif;
font-weight:bold;
}h2{
font-family: Tahoma, Geneva, Sans-Serif;
font-weight:bold;
}
h3{
font-family: Tahoma, Geneva, Sans-Serif;
font-weight:bold;
}
h4{

  font-family: Tahoma, Geneva, Sans-Serif;

  font-weight:bold;

}
Don't forget the commas when putting multiple element types in a selector. If you forget the commas, the selector will be treated as a single descendant selector rather than four separate selectors.
Using Three-Digit Color Codes
Modern CSS and XHTML prefer the use of hex color codes over color names. The hex code defines a color as a mixture of red, green, and blue. For example, this is all red (no green or blue):
#ff0000This is all green (no red or blue):
#00ff00This is all blue (no red or green):
#0000ffBlack is no colors (#000000), and white is all colors in full strength (#ffffff).
When a color description consists of three matching pairs of hex numbers, you can type each digit just once. For instance, #f00 is short for #ff0000, #0f0 is short for #00ff00, and #00f is short for #0000ff. Similarly, #000 is short for #000000, and #fff is short for #ffffff.
You're not limited to 0 and f. It works with any characters, so long as all the digits are matching pairs. For example, #3cf is short for #33ccff, and #fc6 is short for #ffcc66.
Of course, it doesn't work with all colors. For example, there's no way to reduce the code #c0c0c0 to three digits, because it doesn't consist of three matching pairs (#ccc is #cccccc, not #c0c0c0). So, there will still be plenty of instances where you must use the six-digit code to express a number.
Using Shorthand Properties
CSS provides several shorthand properties that let you specify multiple values with a single property. For example, the margin, padding, and border-width properties allow you to specify for widths starting at the top and going clockwise, like this:
property: top right bottom left
But you're not required to specify all four widths independently. You can use some shorthand, if you specify only one width, that applies to all four margins. For example, the style below sets all four margins around h1 elements to zero:
h1{

  margin:0;

}
If you specify two values, the first applies to the top and bottom margins. The second value applies to the left and right margins. You must use a single blank space to separate the values. For instance, this style sets the top and bottom margins for img elements to zero, the left and right margins to 4em:
img{

  margin: 0 4em;

}
|
Specifying three values sets the top, side, and bottom margin values. The style rule below sets the top margin to 1em, the left and right margins to 3em, and the bottom margin to 2em.
p{

  margin: 1em 3em 2em;

}
The border and font properties are also considered shorthand properties, but not for setting widths. The border property lets you set the style, width, and color of all four borders around an element in a single statement. For example, this style rule says that all div elements will show solid, thin, black borders (around all four sides):
div{

  border: solid thin #000;

}
The syntax for the font shorthand property is a bit more complex:
font: font-style font-variant font-weight font-size/line-height font-family
You can omit any value to use the default value. Consider this style rule that sets the default font for the page body (and all other elements that don't specifically define a different font):
body{

  font: 0.85em/2em 'Times New Roman', Times, Serif;

}
The style rule states that the default font size will be 85% of the default font size for the browser, with line height at twice the default line height. (In practice, that makes the font size about 10 points with double spacing.) The font will be Times New Roman (where available) or Times (if Times New Roman isn't available) or the user's default serif font if neither of the other two fonts is available. Since it omits the font-style, font-variant, and font-weight values, those values keep their default settings.
Applying Multiple Style Classes
You can apply multiple generic classes to an element just by separating the class names by a space in the class= attribute. Notice the following two style rules, each of which is a generic class:
/* Yellow background */

 .hilite{

  background-color: #ff6;

}
/* Blue text */
.bluetext{
color:#00f;
}
Now take a look at the following paragraph.
<p>

Round the rugged <span class="hilite">rock</span><br />

the ragged rascal <span class="bluetext">ran</span>.<br />

He <span class="hilite bluetext">ran and ran and ran</span>!

</p>
Here's how that looks in a Web browser.
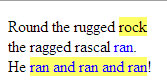
The last few words are blue text against a yellow background because both the hilite and bluetext style rules apply to that span of text.
Conclusion
Whew, we've covered many subtle concepts in this lesson. The main thing to understand is that you have a lot of flexibility in how you define your style rule selectors. Understanding your options will help you to create better, more highly targeted style rules. That, in turn, can make the time you spend developing Web sites much more productive and much less frustrating. You'll see many practical and creative examples of using these concepts in upcoming lessons.
In the assignment for this lesson, I'll ask you to read a couple of articles that cover much of what we've discussed in Lessons 1 and 2. Often, reading the same things explained a different way in a different context is all it takes for the lightbulb to go from dim to bright.
Remember that all the sample styles we discussed in this lesson are in the selectdemo.htm, and it's located in the FAQs for this lesson.
Don't forget to take the Lesson 2 Quiz to test your knowledge of the terms and concepts we discussed.
In
Lesson 3, we'll get away from all this theory and concepts and start
applying them in a project. This will help with creating better Web
sites of your own. See you there!
Supplementary Material
|
Selectutorial http://css.maxdesign.com.au/selectutorial/ |
| This link takes you to a wonderful tutorial on CSS selectors at Australia's Max Design Web site. |
|
W3C Selectors http://www.w3.org/TR/CSS21/selector.html |
| This is the official W3C page on CSS style rule selectors. |
|
XHTML Reference http://xhtml.com/en/xhtml/reference/ |
| Here's a quick reference of XHTML tags. |
|
CSS 2.1 Selectors http://www.456bereastreet.com/archive/200509/css_21_selectors_part_1/ |
| This is a good tutorial on CSS selectors. |
|
Use Class With Semantics in Mind http://www.w3.org/QA/Tips/goodclassnames |
| Click the link above for some excellent advice on naming style classes, straight from the folks who brought you CSS. |
|
Span and Div http://en.wikipedia.org/wiki/Span_and_div |
| This is a quick encyclopedia description of the <span> and <div> tags. |
|
CSS Shorthand Properties http://mezzoblue.com/css/cribsheet/ |
| Here you'll find some good general tips and techniques for getting the most from CSS. |
|
CSS Tips and Tricks, Part 1 http://www.456bereastreet.com/archive/200503/css_tips_and_tricks_part_1/ |
| Here is a page of good general CSS tips and tricks. You'll find the link to Part 2 under "To be continued" at the end of the article. |
|
Web Development Mistakes, Redux http://www.456bereastreet.com/archive/200408/web_development_mistakes_redux/ |
| As the title implies, this site covers the most common Web development mistakes and how to avoid them. |
FAQs
 <!DOCTYPE html PUBLIC "-//W3C//DTD XHTML 1.1//EN"
"http://www.w3.org/TR/xhtml11/DTD/xhtml11.dtd">
<html xmlns="http://www.w3.org/1999/xhtml">
<head>
<title>Selectors Demo</title>
<style type="text/css">

/* -- Universal Selector -- */
/* Remove all default margins and padding */
* {
  margin:0;
  padding:0;
  }

/* -- Element (Type) Selector -- */
/* Applies to all ul elements */
ul{
  margin-left:3em;
  }

/* Sample generic class selector */
/* Applies only where class="hilite" */
.hilite{
  background-color:#ff0;
}

/* This style applies only to */
/* em class="hilite" tags */
em.hilite{
  background-color:#0ff;
}

/* ID selectors apply only where */
/* the id= attributes matches selector */

/* Applies to id="header" */
#header{
  background-color:#c0c0c0; /*silver */
  border-bottom:solid thin #000;
}

/* Applies to id="lefty" */
#lefty{
  width:35%;
  float:left;
}

/* Applies to id="righty" */
#righty{
  width:60%;
  float:right;
  background-color: #bfefbb; /*light green */
  padding-left:10px;
}

/* Applies to id="footer" */
#footer{
  clear:both;
  background-color:#c0c0c0; /* silver */
  border-top:solid thin #000;
}

/* Sample descendant selectors */
/* Applies to h1 in header only */
#header h1{
  font-family:'Arial Black', Helvetica, Sans-Serif;
  font-size: 2em;
  text-align:center;
  color:#30c;
}

/* Applies only to h1 in righty */
#righty h1{
  font-family:'Comic Sans MS', Cursive;
  font-size: 1.5em;
  font-weight:bold;
  color:#f00; /* red */
}

/* Applies only to strong elements */
/* that are descendants of p elements */
p strong{
  color:#f0f; /* purple */
}

/* Sample child selector */
/* Applies only where em is child of strong */
strong>em{
  text-decoration:underline;
}

</style>
</head>
<body>

<div id="header">
<h1>I'm in the header</h1>
</div><!-- End header div -->

<div id="lefty">
  <ul>
  <li>We are <em class="hilite">list items</em></li>
  <li>in <strong>lefty</strong>.</li>
  </ul>
</div><!-- End lefty div -->

<div id="righty">
  <h1>Heading in righty</h1>
  <ul>
  <li>We are list items</li>
  <li>in righty</li>
  </ul>
  <p>I'm a <span class="hilite">paragraph in righty</span>.</p>
</div><!-- End righty div -->

<div id="footer">
  <p>I am <strong>a <em>paragraph</em></strong> in the <em>footer</em>.</p>
</div><!-- End footer -->

</body>
</html>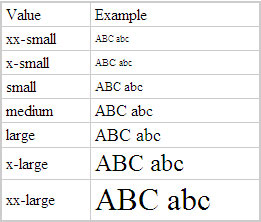
<p>A <font color="red" size="6">Really Big</font> Sale!</p><p>A <span style="color: #f00; font-size: xx-large">Really Big</span> Sale!</p>.bigred{
color: #f00;
font-size: xx-large;
}class="bigred" in the <span> tag, like this:<p>A <span class="bigred">Really Big</span> Sale!</p>Assignment
 Tip:
The XHTML Reference link in the Supplementary Material section provides
a handy reference to all of the XHTML tags listed in the table above.
Tip:
The XHTML Reference link in the Supplementary Material section provides
a handy reference to all of the XHTML tags listed in the table above.