![]() Note:
Don't forget that we used href="#" in many links. The # is just a
placeholder for an actual page in your site. You must replace all of
those with the names of pages in your site.
Note:
Don't forget that we used href="#" in many links. The # is just a
placeholder for an actual page in your site. You must replace all of
those with the names of pages in your site.
Chapter 1:
Applying Content to Multiple Pages
Throughout this course, we've used a layout page as a general working example to try out many CSS styles and XHTML tags. Of course, that was just an example. You can apply every tag, property, and technique you've learned to every page and style sheet you ever create. There's no rule that says you can only use certain techniques in layout pages.
You typically use layout pages to define content that's the same on every page in your site. In this lesson, we'll explore a couple of different ways you can use all those styles and tags in multiple pages of a Web site. Let's start with the big picture and some review.
Style vs. Content
Virtually all modern Web sites use external CSS style sheets to style their Web sites. The reason for this is simple. It allows you to create one set of styles that apply consistently across all of the Web pages in your site. If you ever decide to change a style, you don't need to go digging through every page in your site trying to figure out what you need to change and where. You simply open the style sheet, make your change, and you're done. All pages that link to that style sheet will automatically take on the new style.
That's a good thing. But it only applies to CSS styles. It doesn't apply to content. Content is the actual text and pictures that show up in the Web browser. You determine the content of a page by the text and tags you put into the page (the .htm or .html file, not the style sheet). You can't put text or tags in a style sheet. You can only put CSS style rules in a style sheet.
So, what if you want every page in your site to show the same branding bar, navigation bar, sidebar column, and footer? You're not completely out of luck. There are ways to make that happen.
|
For a small site, you can simply use layout.htm as the starting point for every page within your Web site. For example, every site has a home page. This is the first page to appear in a user's Web browser when they visit your site. Virtually all Web hosting services require that you name this page index.htm or index.html. It usually doesn't matter which name you use. But the only way to know for sure if it matters is by checking the tech support page at your hosting provider's Web site.
To
create an index.htm or index.html page that contains your site's
branding, navbar, leftcolumn, and footer divisions, simple copy your
layout.htm page to a file named index.htm or index.html. Then, open up
that page in your favorite editor. Remove all the placeholder text
between the <div id="content"> and </div><!-- End content --> tags, and put in the tags and text that you want your home page to show.
Remember that, in an earlier lesson, we added a feature to our navbar to show the user which page they're currently viewing. You do this by adding class="selected" to whichever link matches the current page. For example, in your home page, you put class="selected" in the link to the home page, as shown below.
<li class="selected"><a href="index.htm">Home</a>
You
can do the same for all other pages in your site. For example, let's
say you have an About page. You copy layout.htm to a file named
about.htm. Then, open that page and remove class="selected" from the link for the home page. Put it in the link to your About page, like this:
<li class="selected"><a href="about.htm">About</a>
There's no way to automate that process. You'll just have to remember to do it for each page in your site that has a navbar link.
|
Basically, you start every page in your site by copying layout.htm to a file that has the same name as the name you intend to give to the page. Make sure you put class="selected" in the navbar link for that page. Then, replace the generic text in the content division with the actual text and tags for that page.
There are two advantages to that approach. For one, you can customize the branding, leftcolumn, navbar, or footer div for any given page. For another, it's relatively easy. You just need to know how to copy and rename files.
There's only one disadvantage to that approach. If you want to change the content of a common element, you have to do so in every page in the site individually. Sure, you can still make a stylistic change to all pages via your external style sheet. But there‘s no single file that contains content (text and tags) that appear on every page. This isn't a big deal with a small site, but it's a major headache in sites that contain dozens or hundreds of pages.
If you want to control the content that appears on all pages in your site, you can't rely on CSS or XHTML alone. You need to use server-side technologies.
That's an important buzzword; so, let's head over to Chapter 2 and discuss what it means.
Chapter 2:
Clients and Servers
There are two sides to Web development, the client side and the server side. The client side is the side with which we're all familiar. The Web browser (or other assistive technology) is the client. It receives Web pages from the Internet and displays them on the screen.
The server side has to do with how those pages get to your Web browser in the first place. Here's how it works. When you type a URL like http://www.google.com, your computer sends a message out to the Internet saying, Send me the Web page at google.com. The Internet gets that message to Google's Web server. Google's Web server then sends the desired page back to your computer.
Just as there are different brands of cars, shampoo, and everything else, there are different brands of Web servers. The two most common Web server products are Apache and Microsoft IIS (Internet Information Services). Of course, you don't need to own a Web server to create Web sites. You can create your Web site right on your own PC. But to make the site available to the public, you need to upload the site to a Web hosting service. When you do, that service's Web server program will serve up your pages to the world at large.
As its name implies, the Web server is a program on a computer that serves up Web pages to whomever requests those pages. The client makes the request, the Web server receives it and sends the page to the client, and it displays the page on the screen.
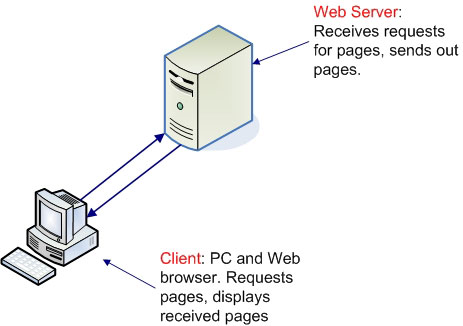
CSS and XHTML are client-side technologies, because the client (your Web browser) converts the CSS and XHTML code sent by the server to the text and pictures you see on your screen. As you've learned, you can do a lot with CSS and XHTML. But you can't do everything. One thing you can't do is automatically merge content into multiple pages of your site.
Server-side technologies pick up where CSS and XHTML leave off. These provide the database access and other high-end capabilities that membership sites, online stores, and social networks use. But that's beyond the scope of this course.
Most Web servers also support SSI (server-side includes). This relatively simple server-side technology allows you to define content that appears in all pages of your site in a separate file. It's like a CSS external style sheet, only for content rather than just for style. If you want to change content across all pages in your site, you can do so from one file. There's no need to change text or tags in each individual page in your site.
Come on over to Chapter 3, and I'll show you how it works.
Chapter 3:
Introducing SSI
As we've discussed, CSS lets you define the style of elements on multiple pages in your site. However, neither CSS nor XHTML provides any means of creating content that appears on multiple pages in a site. For that, you need a server-side technology like SSI.
SSI isn't for everyone. To use it, your hosting service must offer it. Not all do. So, if you already have a hosting service, you have to find out if they allow SSI. If they don't, and you feel you really need SSI, you may have to switch to a hosting provider that supports SSI.
Hosting providers that offer SSI aren't all the same. The exact rules for using it vary slightly from one hosting provider to the next. So, there's nothing in this lesson that we can all try out in a hands-on manner. The best I can offer is a description of SSI and some general guidelines on how it works. If you decide that this is something you need or want, you'll need to refer to your hosting provider's technical support page for specifics.
Here's the basic idea. Any tags and text that are to be the same on every page go in separate include files. Each include file contains text and tags for content that's to be the same on every page in the site.
Typically, you need two include files. One include file contains tags and text for elements that come before the main content in the Web page. The second one contains tags and text for content that comes after the main content. The main content is the stuff that's unique to each page, between the header and footer, and outside any sidebar columns.
Let's look at an example. In Lesson 11, we left layout.htm with the tags that make up our layout arranged like this. As always, I've used … to indicate all the text and tags inside each division.
<!-- Wrapper sets the layout width -->

<div id="wrapper">


<div id="branding">

.

</div><!-- End branding -->
<div id="content">
.
</div><!-- End content -->
<div id="footer">
.
</div><!-- End footer -->
<!-- Absolutely positioned left column -->
<div id="leftcolumn">
.
</div><!-- End leftcolumn -->
<!-- Absolutely positioned navbar -->

<div id="navbar">

.

</div><!-- End navbar div -->

</div><!-- End wrapper -->
To make the wrapper and branding division apply to every page in a site, we need an include file that contains the tags that define the branding division, as well as the starting tags for the wrapper and content division. In other words, one include file, which I'll refer to as top.htm, needs to contain all these tags (including all the tags inside the branding division represented by …).
<!-- Wrapper sets the layout width -->
<div id="wrapper">
<div id="branding">
.
</div><!-- End branding --><div id="content">
Then, we need a second include file that contains everything starting with the closing tag for the content division down to the closing tag for the wrapper. I'll refer to this second include file as bottom.htm. Its contents will be all of what you see below. Again, I've used . to represent all the stuff inside each division. You don't use . in your code, ever.
</div><!-- End content --><div id="footer">
.
</div><!-- End footer -->
<!-- Absolutely positioned left column -->
<div id="leftcolumn">
.
</div><!-- End leftcolumn -->
<!-- Absolutely positioned navbar -->
<div id="navbar">
.
</div><!-- End navbar div -->
</div><!-- End wrapper -->
|
Notice that neither file contains any of the mandatory tags like <!DOCTYPE.> or <html.> or <body>. Nor does either file contain the closing </body> or </html> tag. You'll why see in a moment.
When you create a new page for your site, you start with all the usual mandatory tags for your site, like this:
<!DOCTYPE html PUBLIC "-//W3C//DTD XHTML 1.1//EN"

"http://www.w3.org/TR/xhtml11/DTD/xhtml11.dtd">

<html xmlns="http://www.w3.org/1999/xhtml">

<head>

   <title> </title>

</head>

<body>
</body>
</html>
As with any page, you'll want to put this page's title between the <title> and </title> tags. You'll also want to add a link to your external style sheet, as in the example below.
<!DOCTYPE html PUBLIC "-//W3C//DTD XHTML 1.1//EN"
"http://www.w3.org/TR/xhtml11/DTD/xhtml11.dtd">
<html xmlns="http://www.w3.org/1999/xhtml">
<head>
<title>Your page title there</title> <link href="layoutstyles.css" rel="stylesheet" type="text/css" />
</head>
<body>
</body>

</html>
Next, you'll want to add a couple of SSI directives
to the page. The rules for typing directives vary slightly from one
hosting provider to the next. So, this is something you need to research
on your own. But the usual format is to define each as an XHTML comment
containing #include file= and the name of an include file
in quotation marks. Put the directive for top.htm right under the
opening <body> tag, and the directive for bottom.htm just above
the closing </body> tag, like this:
<!DOCTYPE html PUBLIC "-//W3C//DTD XHTML 1.1//EN"
"http://www.w3.org/TR/xhtml11/DTD/xhtml11.dtd">
<html xmlns="http://www.w3.org/1999/xhtml">
<head>
<title>Title For This Page</title>
<!-- link to external style sheet -->
<link href="layoutstyles.css" rel="stylesheet" type="text/css" />
</head>
<body>
<!--#include file="top.htm" -->
<!--#include file="bottom.htm" -->
</body>

</html>
Below, I've used a simple h1 and paragraph element to show where all content that's unique to this page goes. But that's a very simple example. You can put in any tags and content you want. There are no restrictions.
<!DOCTYPE html PUBLIC "-//W3C//DTD XHTML 1.1//EN"
"http://www.w3.org/TR/xhtml11/DTD/xhtml11.dtd">
<html xmlns="http://www.w3.org/1999/xhtml">
<head>
<title>Title For This Page</title>
<!-- link to external style sheet -->
<link href="layoutstyles.css" rel="stylesheet" type="text/css" />
</head>
<body>
<!--#include file="top.htm" --><h1>This page title</h1>
<p>All content that is unique to this page goes here, between the directives.</p>
<!--#include file="bottom.htm" -->
</body>

</html>
For the sake of example, let's say you name this page index.htm because it's your site's home page.
When you double-click the icon to view index.htm on your own computer, you see no merged-in content at all. That's because when you view a page that way, there's no Web server to process the SSI directives. Your Web browser just sees those as comments and ignores them.
However, when you upload the page to a Web server, it works much differently. When you browse to the page like any other user, the Web server puts all the tags and content from top.htm above this page's unique content. Then, it puts all the text and tags from bottom.htm below the unique content. It does this before it serves the page. So, what the Web browser receives is the complete page with all the tags and text required to show the branding, navbar, leftcolumn, and footer divisions.
Should you decide to change something in one of those common divisions, you simply make the change to the top.htm or bottom.htm file. Then, upload that file to the Web server. From that moment on, the Web server will serve each page with the new content in the file you uploaded. There's no need to go digging through every page in your site to make a change.
It's a pretty neat trick and not too difficult to do. But once again, I must caution you. Not all Web hosting servers offer SSI. And those that do vary in how they offer it. The general example will work on some Web servers. But the only way to know if you can use SSI, and exactly how you use it, is by consulting your hosting provider's technical support. There's no one-rule-fits-all approach I can give you.
A small challenge that you might have to overcome concerns showing the page the user is currently viewing in the site.
There's a way around this, and I'll show you that trick in Chapter 4.
Chapter 4:
Showing the User Where
They Are, Take Two
When we first created our navbar back in Lesson 7, we came up with a strategy for indicating the current page in the navbar. Put class="selected" in the <li> tag for the link that goes with the page that the user is currently viewing. That won't work if you use SSI to merge the navbar tags automatically at the moment the page is served.
There's a solution to the problem, though. In your layout page (or include file), remove class="selected" from whatever tag currently contains it. Then, give each link in the navbar a unique name using the id= attribute. Here's an example. Note that if you have drop-down menus, you don't need to do this in the drop-down menu tags, only for the tags that represent the options that appear across the navbar.
<div id="navbar">

<ul>

<li id="nav-home"><a href="index.htm">Home</a></li>

<li id="nav-about"><a href="about.htm">About.

<li id="nav-links"><a href="links.htm">Links.

<li id="nav-portfolio"><a href="portfolio.htm">Portfolio.

</ul>

</div><!-- End navbar div -->
Close and save the page. Next, you need to change and create some style rules in your style sheet (layoutstyles.css). Locate the style rule that currently applies to selected elements, like this:
/* Navbar hover, active, and current page links */

#navbar a:hover,

#navbar a:active,

#navbar li.selected a:link,

#navbar li.selected a:visited{

   background:#ddd url(images/navhover.jpg) repeat-x center;

   color:#000;

}
Remove the selectors that contain .selected.
/* Navbar hover, active, and current page links */

#navbar a:hover,

#navbar a:active,

{

   background:#ddd url(images/navhover.jpg) repeat-x center;

   color:#000;

}
Now, put in the selectors. Note that every selector except the last one must end with a comma.
/* Navbar hover, active, and current page links */

#navbar a:hover,

#navbar a:active,

.homepage #nav-home a,

.aboutpage #nav-about a,

.linkspage #nav-links a,

.portfoliopage #nav-portfolio{

 background:#ddd url(images/navhover.jpg) repeat-x center;

 color:#000;

}
Save the style sheet. At first, this has no effect.
Now, each time you create a new page for your site, put in all the things we described before. But add to the body tag class="currpage" but replace currpage with one of the class names in the new style rule: homepage, aboutpage, linkspage, or portfoliopage. (The class names are the names that begin with a dot, not the names that begin with #).
For example, the <body> tag for the home page should look like this:
<body class="homepage">
The <body> tag for the About page should look like this:
<body class="aboutpage">
The <body> tag for the Links page should look like this:
<body class="linkspage">
The <body> tag for the Portfolio page should look like this:
<body class="portfoliopage">
To see why this technique works, consider just one selector. I'll use the .homepage #nav-home selector as an example. This style applies only to the element named nav-home and only when that element is contained within a larger outer element that has class="homepage". Let's strip out the irrelevant tags for a closer look. Consider the page that has the following tags:
<body class="homepage">

.

<li id="nav-home"><a href="index.htm">Home</a></li>

.

</body>
The selector .homepage #nav-home a
applies to this page because the nav-home element is contained within
the larger body element that contains class="homepage". Hence, the Home
link in that page has the selected look.
So, what we've accomplished is the ability to determine which navbar item has the "selected" look by using a class name in the <body> tag rather than class="selected" in the <li> tag. This is good for SSI, because each page you create will have its own <body> tag, and you can put anything you want in that <body> tag.
So, when you create a page for your SSI-enabled site, you just have to remember to put class="something" in that page's <body> tag. And make sure you replace something with one of the class names from your style rule, depending on which navbar item should have the selected look.
Like I said at the start of this lesson, SSI isn't for everyone. It makes sense in a larger site where you want to show the same content on all (or most) of the pages in the site. But it only works if your Web hosting service offers SSI. Furthermore, hosting services that offer it don't all play by the same rules. So, to get the full story, you need to be able to find the appropriate information in your hosting service's technical support.
Let's head over to Chapter 5 now and wrap up all we've learned over the last six weeks.
Chapter 5:
Course Completion
As you discovered in Lesson 12, there's a whole other side to Web development—the server side. Don't let it trick you in understanding the importance of CSS and XHTML. All modern Web sites are built on CSS and XHTML. Server-side technologies are optional additions that aren't appropriate for everyone. And they're certainly not a replacement for a thorough understanding of CSS and XHTML.
A key thing to keep in mind is that CSS and XHTML are tools for creativity. How well you're able to apply those tools depends on your understanding of the tags and properties available to you, your ability to find information when you need it, and plain old-fashioned practice and experience.
I hope you'll use the many resources provided through the Supplementary Material section for this course. Remember, if you add useful sites and pages to your browser's favorites or bookmarks, the answers to many questions will just be a mouse click or two away.
Thank you so much for attending and participating. I appreciate all of your contributions to our lively Discussion Area. I hope you feel more confident in your abilities. I trust that you will feel encouraged to let your creativity soar.
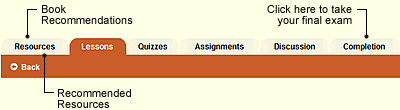
| You
still have a quiz and an assignment for this last lesson, so before
diving into the final exam for the course, please allow some time to do
those first. Also, if you haven't already checked out the book
recommendations under the Resources link, I would
encourage you to do that as well. One of the exciting things about
Intermediate CSS and XHTML is that there is always something more to
learn!
When you feel you're ready to take the final exam, click the Completion link at the top or bottom of any page in this classroom. The exam is open-book, so feel free to print your notes or have the classroom open in another window for easy reference. Also, you may print the final exam before taking it for additional study. Please take your time, because you get only one chance at the final. When you finish, be sure to print your completion letter. Last, I would appreciate it very much if you would take some time to evaluate this course. I pay close attention to my students' feedback; your input helps me tremendously as I continually fine-tune and improve this course material. So if you have any suggestions, comments, or concerns, please include those in your evaluation. If you'd like a response, please also post your comments or questions in the Discussion Area for this lesson. | ||
If you enjoyed this course, here are a few other ed2go online courses you might be interested in: Designing Effective Web Sites | ||
Supplementary Material
|
Free Web Hosting http://www.free-webhosts.com/ |
| You'll find hosting providers that support SSI here. |
|
Web Server http://en.wikipedia.org/wiki/Web_server |
| This is Wikipedia's encyclopedic description of Web servers. |
|
Apache HTTP Server http://en.wikipedia.org/wiki/Apache_Web_server |
| Here's a description of the Apache Web server. |
|
Internet Information Services http://en.wikipedia.org/wiki/Internet_Information_Services |
| This link takes you do a discussion of Microsoft IIS, a widely used Web server. |
|
World Wide Web http://en.wikipedia.org/wiki/World_wide_web |
| Wikipedia's information on how the World Wide Web works. |
|
How Web Servers Work http://computer.howstuffworks.com/web-server.htm |
| Here you'll find more information about how Web servers work. |
|
Server-Side Includes http://en.wikipedia.org/wiki/Server_Side_Includes |
| Click this link for Wikipedia's encyclopedic description of SSI technology. |
|
Server-Side Includes (SSI) http://www.smartwebby.com/web_site_design/server_side_includes.asp |
| This is another page on SSI with some information on using it with Dreamweaver. |
FAQs
Assignment
 Caution:
Some hosting servers may require that you name your files using a
.SHTML extension. Remember, this is just a general example. The
specifics can vary from one hosting service to the next. Only your Web
hosting service can provide you with those specifics.
Caution:
Some hosting servers may require that you name your files using a
.SHTML extension. Remember, this is just a general example. The
specifics can vary from one hosting service to the next. Only your Web
hosting service can provide you with those specifics.