Lesson 2: Building Your First Mobile App

Lesson 2: Building Your First Mobile App

Introduction

In this class, you're going to build mobile apps for a fictitious startup company named WatzThis.com. Like the employees of so many Web startups, the people at WatzThis.com aren't sure yet what they do, but they know that it has to be mobile, and they're willing to try anything.

Imagine that you're the new Mobile Web Developer for WatzThis.com. Your first task is to design and build a mobile app that will help someone answer the question, "WatzThis?"

After thinking long and hard about what situation might prompt someone to ask that question, it dawns on you what the perfect mobile app for WatzThis should be. You quickly write a description of your idea:

People who walk around their house barefoot in the dark sometimes step on things. They're not close to a light switch, but they do have a smartphone handy. It would be great if they had an app that would cause their phone to display as much light as possible, so they could examine the object they just stepped on and answer the question, "WatzThis?"

Turn your mobile device into a flashlight!

You feel confident that your idea is the perfect mobile app. In fact, you're pretty sure there has never been an app that meets the four mobile design principles as well as this one.

  • It's uniquely suited to the strengths of mobile devices—namely, you'd use it while you're mobile.
  • It's simple. What could be simpler than lighting your way?
  • It's user-centric. This app helps real people do something useful.
  • It's cross-platform. Every smartphone has a way to light up the screen!

You send the following email to your boss (making sure, of course, to speak his language):

Boss—I've been heads-down noodling on how WatzThis will create a paradigm shift in the "known unknown" space. I'm going to lay the foundation and do some rapid prototyping, and then I'll loop back with you.

A few minutes later, the boss gives you a thumbs-up and a high-five as he walks to a meeting with the investors. After the meeting, he informs you that he just told the investors that you've developed the next killer app. It looks like you've got the go-ahead to work on your app—and the pressure is on.

Setting Up Your Mobile App Kitchen

So now you have an app to develop. Let's get cooking, so to speak.

The cooking term mise en place means "everything in place." It refers to the ingredients a cook needs, neatly and efficiently organized before the actual cooking.


Getting organized before starting to cook

Similarly, app development is much easier when you have the right tools for the job and when you're in the right place. Your code editor, testing and debugging tools, and so forth are your development environment. In this chapter, I'm going to help you set up and configure your mobile app development environment.

Note

You may also hear the term integrated development environment, or IDE. This is like the Swiss Army knife of app development—a single, integrated piece of software that helps with many functions, including code editing, testing and debugging, and project management.

Downloading and Installing a Web Browser

In Lesson 1, I told you about the browser engine that powers the mobile Web: WebKit. Now it's time to install a WebKit-based browser.

Hundreds of programmers and organizations (including employees of Google, Apple, Research in Motion, Nokia, and other companies and organizations that benefit from WebKit) contribute their time and effort to its constant development and improvement. In the Supplementary Material section of this lesson, you can view a list of everyone who contributes to WebKit.

The collective name for the people who work on WebKit is the WebKit Open Source Project. Every night, the contributors post a new version of the WebKit source code to WebKit.org.

Browser makers may integrate the latest version of WebKit into their browsers from time to time and gain new features, bug fixes, and other improvements in the process.

For this class, we will be using Google's Chrome browser for testing our apps. We decided on Chrome because it features great HTML5 support and it runs on both Mac and Windows.

If you don't have Chrome installed, follow these steps to download and install it:

  1. Go to www.google.com/chrome Opens in new windowwith your current favorite Web browser (such as Firefox or Internet Explorer).
  2. Click Download Chrome. The appropriate version for your computer will automatically download.


    Downloading Google Chrome

  3. Open the downloaded file, and follow the instructions to install Chrome.

Now that you have a modern browser installed, let's take it for a test drive and confirm that it meets the minimum requirements for this course. Open your Web browser, and navigate to www.html5test.com Opens in new window. You'll instantly see a result that will hopefully be similar to the picture below.

The HTML5 Test result page showing a score of 526 out of 555 points. Open full size version
Scoring your Web browser

The higher your browser scores, the better is its support for HTML5. A score of higher than 350 generally indicates that your browser is ready for the rest of this course!

Setting Up Your Code Editor

A source code editor, or code editor for short, is a text editor with additional functionality that helps you write and edit programming code. Code editors have autocomplete and bracket-matching functions that make it easier and faster to write error-free code. The one we'll be using in this class is Komodo Edit, from ActiveState Software.

I like Komodo Edit because it's free, has a nice set of features, does a good job of project and template management, and is available for Mac OS X and Windows. It's powerful, yet easy to use.

Plenty of other code editors are available, and you may find that you prefer another one. My choice varies based on the type of code I'm writing or the operating system I'm using. Examples of other code editors include Dreamweaver, BBEdit, Eclipse, NetBeans IDE, Notepad++, PHPEdit, TextPad, and HomeSite. If you already have a favorite code editor and wish to use that for this course instead of Komodo Edit, please do.

Follow these steps to install Komodo Edit:

  1. Go to www.activestate.com/komodo-ide/downloads/editOpens in new window, and click Download Komodo Edit.

    Open full size version
    Downloading Komodo Edit

  2. Choose the right version for your computer (Windows, Mac, or Linux), and download it.
  3. Find the file you just downloaded, and double-click it.
  4. Follow the instructions and click through the various screens in the installation process.
  5. Once the installer has completed, launch Komodo Edit. You should see a screen similar to the image below.

Open full size version
Komodo Edit

For the most part, Komodo Edit is ready to go as soon as you install it. There are a couple of things I like to customize, however, that will make your life a little easier.

  1. Select View > Tabs & Sidebars > Places from Komodo Edit's main menu. The Projects sidebar will open in a new pane on the left of your window.
  2. Select Edit > Preferences from the main menu (on Windows) or Komodo > Preferences (for the Mac).
  3. In the Category list on the left, choose Web & Browser.
  4. Under Which browser should Komodo use when opening URLs? choose the Web browser that you installed or tested earlier in this chapter. If it's not in the drop-down list, use the Browse button to locate it.
  5. Under Preview in Browser on the right, choose Preview in external browser (specified above). The default setting in Komodo Edit is to preview Web pages in a split view, but this just won't do for mobile Web app development; we want to view our apps in our modern, HTML5-ready Web browser.

Setting the Web & Browser preferences in Komodo Edit

Once you've changed this setting, click OK to exit the Preferences window. Then head over to Chapter 3 to start creating your first app.

Your First App

A mobile Web app may contain many files of different types, including HTML, JavaScript, CSS, and images. You'll organize all the files that make up each Web app you create into a group called a project. To get started with your first project, follow these steps:

  1. Select Project > New Project.
  2. Choose a location for your new project that'll be easy for you to remember, such as inside your My Documents folder.
  3. Create a new folder inside this folder called WatzThis, and save your project inside it with the name WatzThis.
  4. After you save your project, you'll notice that the Projects sidebar changes to display it.

Open full size version Sidebar displaying a view of your project

Now that you have your project, it's time to create your first HTML5 file.

  1. Select File > New > New File From Template. A New File window will appear.
  2. In the New File window, go to Categories and select Web. Then go to Templates, and select HTML 5.

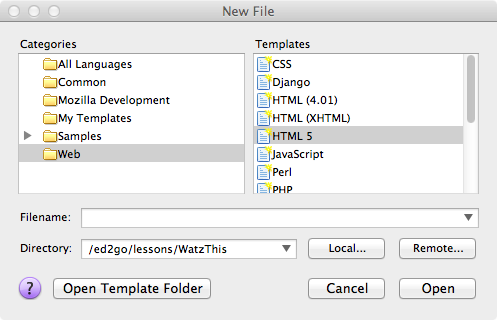
    Options in the New File window

  3. Type in index.html into the Filename field, and click Open. An icon representing a new file called index.html will appear inside the Projects sidebar, and the new file itself will appear in the main editing window.

    Open full size version Your new file, ready for you to work on

  4. Notice the text between <title> and </title>. This text will display at the top of your desktop browser window. Change this text to WatzThis?, as shown below:
    <title>WatzThis?</title>
  5. Insert the following three lines right after this title code to turn this webpage into a mobile webpage.
    <meta name="HandheldFriendly" content="True">
    <meta name="MobileOptimized" content="320"/>
    <meta name="viewport" content="width=device-width, initial-scale=1.0">
    
  6. Save your file by clicking on the disk icon in the toolbar.

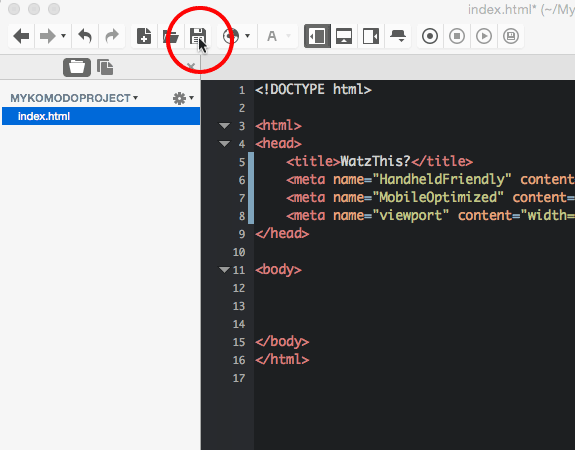
Toolbar and disk icon

How does your first Web app look? Click View > Browser Preview (or Preview in Browser, depending on your operating system) to find out.


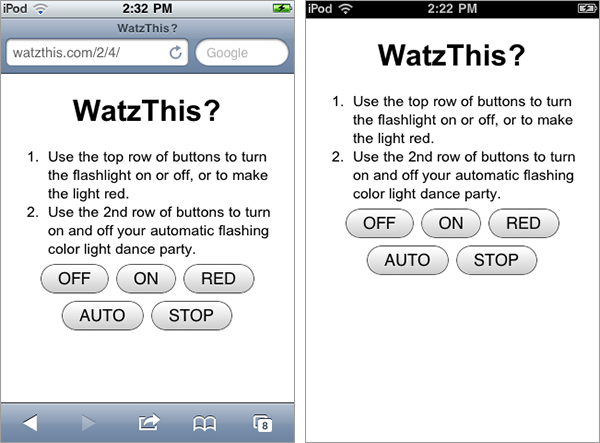
Here's your first mobile Web app! Yes, it's just a white page.

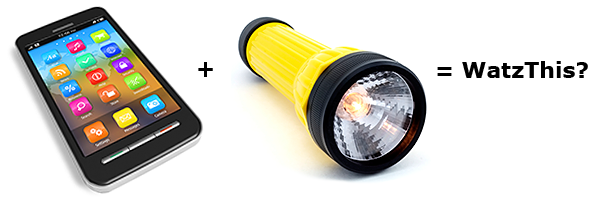
So there you have it! It's a perfect flashlight app! It loads quickly, it displays a whole lot of white screen, it'll work the same on just about any mobile device you try it on, and it uses the next generation of HTML.

If you have your own Web hosting space, you can upload your app and then try it out with a smartphone—or any mobile phone with a browser, for that matter. If you don't have Web hosting, try it out on my server—I've included a link to it in the Supplementary Material.

Note

In order for your mobile Web app to be accessible to mobile devices, you have to post it to the Internet, so people can download it. You can view and test the demonstration app in this lesson without an Internet connection or a mobile device, however.

One way to simulate the experience of using mobile Web apps on a mobile device is to resize your browser window to about the size of a mobile phone screen. (Don't worry about being precise—you can just eyeball it for now.)

Adding Some Functionality

You go back to the boss and say, "Hey, boss: I'm working on the killer app. It works on every mobile platform under the sun, it uses the latest Web technologies, and it loads extremely quickly."

He's almost giddy with excitement—and you haven't even revealed what it does yet!


The boss approves!

"I want to do some testing before I show it to you," you add. "How many days do I have to work on it before the demonstration for the investors?"

"Yes! Sounds great!" he exclaims, "I want to demo it at the shareholders' meeting tomorrow. Can you give me four or five slides demonstrating how this thing works and how to use it?"

Ugh. You hadn't considered that it might need to be something that people use. "Using" implies that it'll actually need to have some sort of interactivity.

What sort of interactivity does a flashlight have, though? Eureka! You need an On/Off button.

We'll create the button with just a little bit of JavaScript and CSS. Remember that JavaScript is a programming language that adds interactivity to Web apps. CSS is a language that adds formatting, or style, to Web apps.

By adding interactivity and style to our app, we're about to make it much more impressive.

To add your On/Off button, follow these steps:

  1. Start up Komodo Edit, and double-click index.html to open it.
  2. Insert a blank line after the three meta tags that you added earlier.
  3. Copy and paste the following code:
<script>
var light = new Array();
light[0] = 'black';
light[1] = 'white';
function flip(whichway){
  document.body.style.backgroundColor = light[whichway];
}
</script>

(By the way, if you ever need to add curly brackets like these { } to your document, just type [ or ] while holding down the SHIFT key.)

Now insert a blank line after the <body> tag, and copy and paste the following code:

<input type="button" value="OFF" onclick="flip(0);">
<input type="button" value="ON" onclick="flip(1);">

The completed app should now look like this:

<!DOCTYPE html>

<html>
<head>
    <title>WhatzThis?</title>
<meta name="HandheldFriendly" content="True">
<meta name="MobileOptimized" content="320"/>
<meta name="viewport" content="width=device-width, initial-scale=1.0">

<script>
var light = new Array();
light[0] = 'black';
light[1] = 'white';
function flip(whichway){
document.body.style.backgroundColor = light[whichway];
}
</script>

</head>

<body>

  <input type="button" value="OFF" onclick="flip(0);">
  <input type="button" value="ON" onclick="flip(1);">

</body>
</html>

Save your file, and then preview it in your browser. You can also try this out on my server—I've included another link in the Supplementary Material.

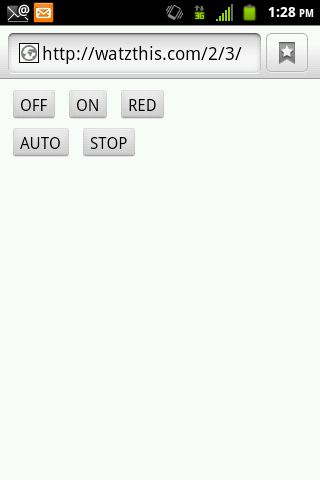
Click the OFF button, and the screen should turn black. The screen will turn white again when you click ON. If this isn't what happens, go back to your code and make sure everything is exactly as you see above. You can recopy and repaste the whole thing to save time.

The following figure shows this app running inside a resized desktop browser.


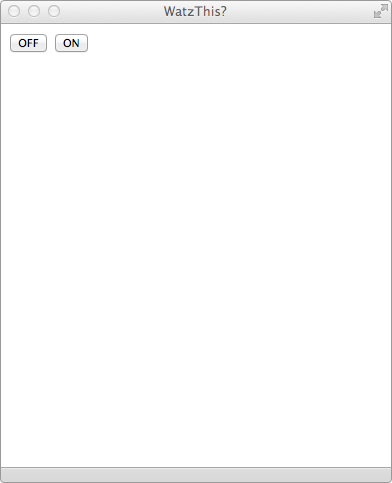
Flashlight app with on/off switch

Not bad, right? If you're like me, you've probably already spent several minutes playing with this little gadget.

But, alas, this is hardly worth four or five slides in the boss's presentation. What good is an app if it doesn't have some advanced features?

In the next chapter, you'll add some advanced functionality to the app, and then you'll optimize it so that it looks and works better.

Adding Advanced Features and Formatting

Let's start by adding some more colors. This way, the previous simple flashlight app might also be useful in other situations . . . such as on the dance floor.

Remember, mobile apps are for people who aren't at their desktop computers. Who is more mobile than a person who is disco dancing the night away and needs a little extra color to make the mood just right? WatzThis.com will give people the colors they need for disco dancing!

To add more colors to your app, follow these steps:

  1. Look for the line of code that reads:

    light[1] = "white";

    The light currently has two modes, or "states." It can be "on" (represented by the number 1) or "off" (represented by the number 0). In this line of code, the color of the "on" state of the light is set to white. When you click the ON button, it sets the background color of the HTML document to white.

    In the next two steps, we'll add a third option to this light switch.

  2. Add another line under the light-switch code:

    light[2] = "red";
  3. Add another button under the two existing buttons with this code:

    <input type="button" value="RED" onclick="flip(2);">
  4. Save your file, and preview it in a browser.

Here's what this app looks like on my iPod Touch after I click the RED button:

The app displaying a red background. Screen of iPod Touch

Okay, now we're really getting somewhere! For a quick and fun exercise, try out some different colors or adding additional buttons. Check out the Supplementary Material section for a list of colors that you can use in your app.

Automating Your App

After playing with the app for a while longer, you realize it would be handy to have some sort of automatic mode where the colors changed by themselves. That would free up people's hands for dancing!

For now, let's skip the details of what you do to enable the dance-party mode (we'll cover that in the next three lessons) and just get to the party. After you've added all the new features, the finished code should look like this:

<!DOCTYPE html>  
<html> 
<head>    
<meta charset="utf-8">
<meta name="HandheldFriendly" content="True">   
<meta name="MobileOptimized" content="320"/>   
<meta name="viewport" content="width=device-width, initial-scale=1.0">        
<title>WatzThis?</title>  
<script> 
var light = new Array(); 
var t; 
var color=0; 
var flipping=0; 
var speed;  
light[0] = 'black'; 
light[1] = 'white'; 
light[2] = "red"; 
light[3] = "blue"; 
light[4] = "green"; 
light[5] = "orange";  
function flip(whichway){   
   document.body.style.backgroundColor = light[whichway];   
   stopFlip(); 
}      
function autoFlip() { 
   document.body.style.backgroundColor = light[color];
   if (color < light.length-1) {         
     color++;     
   } else {         
     color=0;     
   }     
t = setTimeout("autoFlip()",speed); 
} 
function doAutoFlip(changespeed){     
 if (!flipping){         
   flipping=1;   
   speed=changespeed;      
   autoFlip();     
 }    
} 
function stopFlip() {     
 clearTimeout(t);     
 flipping=0; 
} 
</script>    
</head>  
<body>     
<div id="container"> 

<div id="flashlight">
<input type="button" id="OFF" class="bigButton" value="OFF" onclick="flip(0);"> 
<input type="button" id="ON" class="bigButton" value="ON" onclick="flip(1);"> 
<input type="button" id="RED" class="bigButton" value="RED" onclick="flip(2);">     
</div> 
<div id="danceparty"> 
<input type="button" id="AUTO" class="bigButton" value="AUTO" onclick="doAutoFlip(500);"> 
<input type="button" id="STOP" class="bigButton" value="STOP" onclick="stopFlip();"> 
</div>     
</div>
</body> 
</html> 

Warning!

Pressing the AUTO button will cause the colors to change rapidly onscreen. If you've ever had seizures, please skip this part of the lesson for your own safety.

Once you've entered all this code, fire it up by clicking the Preview button in Komodo, and get ready to boogie down! You can also view this app online at the link I've included in the Supplementary Material.

If you don't quite follow all the code yet, don't worry about it. At this point, I'm just getting you up and running with your first app. If you're up to the challenge, however, see if you can add in functionality that allows the user to control the speed of the automatic flipping.

Here's how the app looks now on an Android smartphone.


WatzThis on Android

Enhancing the User Experience

The WatzThis app is starting to come together, but it still lacks a few things. For instance, it has no branding or documentation. Let's fix that right now.

Open index.html in your project, and insert a couple of blank lines right under <body> but above the buttons. Then insert this code:

<h1>WatzThis?</h1>
<div id="directions">
<ol>
  <li>Use the top row of buttons to turn the flashlight on or off, or to make the light red.</li>
  <li>Use the 2nd row of buttons to turn on and off your automatic flashing color light dance party.</li>
</ol>
</div>

Save your work. Then put your cursor above the line that reads </head>, and paste the following CSS code:

<style>
body {
  font-family:arial, helvetica;
  text-align: center;
}
#container {}
#directions, #flashlight, #danceparty {
  margin:4px;
}
 ol {
  display: inline-block;
  margin: 0 auto;
  text-align:left;
 }
 .bigButton {
    font-size:18px;
}
</style>

We can make a couple more tweaks that will make your Web app really sparkle on the iPhone and iPod Touch. Add these two lines near the top of index.html, but after <head>:

<meta name="apple-mobile-web-app-capable" content="yes">   
<meta name="apple-mobile-web-app-status-bar-style" content="black">

These will make your app look like a native app when a user adds it to his or her home screen. Compare the two screenshots below. The first is without these optimizations; the second is with them.


Two views of the finished app.

You can also view the completed app online by going to the Supplementary Material section and clicking the last WatzThis link.

Let's go to Chapter 5 and wrap up this lesson.

Summary

Congratulations! You did quite a lot in this lesson.

You started out by learning about the importance of a good development environment. Next, you installed Chrome and took it for a test drive. Then you installed Komodo Edit and configured some settings to help you create mobile apps.

You also created a project, which you built up through a series of steps (which programmers call iterations) into an interesting app that's almost useful.

Did you have trouble with any of the steps in this lesson? Feel free to post a message in the Discussion Area. I want to help you all I can!

In Lesson 3, we'll start learning about the language that gives structure to webpages and makes mobile Web apps possible—HTML5.

Until then, don't forget to take your quiz, check out the FAQs, and complete your assignment! I'll see you soon.

Supplementary Material

HTML5test - How well does your browser support HTML5

Top 48 Integrated Developer Environments (IDEs) & Code Editors ProfitBricks Blog

CSS Color Names

Lesson 2 FAQs

Q: Is your story about the fictitious company based in truth? I mean, is that how software startup companies really operate?

A: It's not a true story. But it is based on actual scenarios I've been involved in—always on the side of the developer, of course!

Q: All the code in this lesson looked like gibberish to me. Is that okay?

A: Yes. We're going to spend the next few lessons learning how to read and write this gibberish. The point of this chapter was to take the mystery out of building mobile Web apps and to give you a little starter app that we can learn about and build on in coming lessons.

Q: I'd like to post my apps to the Internet so I can test them on a mobile device. How can I do that?

A: IMany companies provide Web hosting for free or at very low cost, and almost any of them will do. Just make sure that the one you choose gives you the ability to transfer files to it using FTP (File Transfer Protocol). One free hosting company is x10hosting.com Free hosting works well for personal sites and testing, but if you want to create a site designed for other people to see, you'll want to use a paid Web hosting service. One very good, low-cost Web host is Dreamhost. The FTP client that I recommend is Filezilla, which you can download for free here: filezilla-project.org To learn how to create a free Web hosting account and upload files to it using Filezilla, check out Create a Free Hosting Account and Upload Your Website with FTP video on YouTube.

Q: In Chapter 4, you mentioned modifying the app to change the speed of the automatic flipping. How do you do that, anyway?

A: I'm assuming that you have a basic knowledge of how the Internet works and that you've used mobile apps on a smartphone or tablet computer. I'm also assuming that you know at least some HTML or have worked with it in the past. That's all you need!

Lesson 2 Assignment

One of the best things about mobile Web apps is that you can make a change in a matter of seconds. Go ahead—play around with the WatzThis Flashlight app and see what sort of custom modifications you can make to it.

Here are some things you might want to try:

Change the text.
Choose different colors. (I've linked to a list of CSS color names in the Supplementary Material section.)
Alter the speed of the auto-flipping.
Add buttons.

Don't worry about whether you understand everything that's going on in the WatzThis app, and don't fret about breaking anything. I'm going to explain the code—and how to fix it when you mess it up—in later lessons. For now, just have fun with it.