Lesson 7: Accessing Device Features and Storage

Lesson 7: Accessing Device Features and Storage

Introduction

At WatzThis, management decided it would be a good idea to give a few select people (only about, oh, 10,000) access to the app so that we can get some user feedback. Real people have been pressing WatzThis's buttons, dancing to the auto mode, and finding their way around dark places for several days now. As they are apt to do, the users have a lot of ideas and suggestions for making it a better app.

Two ideas, in particular, catch your eye:

  1. Some users have complained that Internet access is spotty in their favorite nightclub, and they can't access the app at all on airplanes. They want to be able to access the app even when they're offline.
  1. Other users have suggested a feature that tells them their current location. This would give some context to the flashlight app. For example, if I step on something while walking in the dark in Miami, it might not be the same thing I'd step on in Minneapolis. The "Where Am I?" feature may also come in handy after a long night of dancing.

Both of these requests depend on using capabilities of smartphones. Prior to HTML5, the only way to use these capabilities was to write a native app. Today, however, the capabilities of smartphones are increasingly available to Web apps.

In this lesson, we'll look at how to use offline storage and geolocation in mobile Web apps. We'll also discuss a few other device features that you can access from mobile browsers. Let's get going in Chapter 2!

Introducing Devices and Device APIs

Your average smartphone contains more sensors and gizmos than a high school science lab. The devices in that little wonder of engineering might include:

  • Microphone
  • Speaker
  • Camera
  • Accelerometer
  • Light sensor
  • Temperature sensor
  • Barometer
  • Altimeter
  • Compass
  • Gyroscope
  • GPS receiver
  • Anything else that smartphone engineers can think of

With all these great capabilities literally at your fingertips, it would be a shame if you, as a mobile app developer, couldn't use them just because you decided you want to develop with HTML5.

Enabling all these features for HTML5 Web apps is more complicated than enabling them for native apps, however. The problem is each phone operating system accesses native device features differently.

In order for Web apps to use these features, there needs to be a standard way for HTML to tell the browser what to do. Then the browser needs to tell the operating system what to do, and then the operating system needs to tell the device what to do.

If the interaction between a Web app and a native device camera were a dialogue, it would look something like this:

The User: I want to take a picture. I wonder what this button labeled "Take a Picture" does. (The user touches a link labeled "Take a picture.")

HTML5 App (to the User): You got it, hon.

HTML5 App (to the Browser): I say, good sir, please start up the camera, for our user would like to take a picture.

The Browser (to the HTML5 App): It's a lovely day for taking a picture. Simply lovely.

The Browser (to the Operating System): Hey, Operating System dude! We wanna take a picture here. Would ya open the camera?

The Operating System (to the Browser): Oh yeah, you wanna take a picture? No prob, dude!

The Operating System (to the Camera): Camera, would ye wake up, lass?

The Camera (to the Operating System): Top of the mornin' to ye!

And so the conversation goes. Each player speaks a slightly different language, but if each one knows how to interpret what the last player said and put it into the language of the next player, everything works.

HTML5 is so new that the language for communications about accessing native devices isn't finished yet. For this reason, the language for browsers to talk to operating systems about native device features isn't finished either. But both are making solid progress and getting better all the time.

Who creates the languages for HTML5 to request access to native device features? That job belongs to the HTML5 Device Access Working Group. The group defines these languages in terms of APIs (which are application programming interfaces, as you may recall from Lesson 6). Each API lists things that the software can do and tells how to make it do them.

The device access APIs come in two types: data and sensors.

Examples of APIs that are concerned with data include:

  • Contacts API: specifies how a Web app should read information from the device's contacts database
  • Calendar API: specifies how a Web app should access the device's calendar data
  • Messaging API: gives Web apps access to the text messaging capabilities of the device

Examples of APIs that are concerned with sensors include:

  • getUserMedia: specifies how a Web app can take pictures or record video and audio
  • Battery API: gives Web apps access to the status of the device's battery
  • Vibration API: specifies how Web apps should be able to control the vibration, or tactile feedback, capabilities of a device
  • Geolocation API: gives Web apps access to information about where on Earth you are

Offline Storage

Closely related to the device access APIs are the HTML5 storage APIs. The storage APIs give Web apps access to the data storage capabilities of devices. The result is that mobile Web apps can function without an Internet connection­—the same way that native apps do.

Today, offline storage and geolocation are two of the most standardized and widely supported HTML5 APIs. They also happen to be the two you need to learn about to build the latest features of WatzThis. So continue on to Chapter 3, and let's find out where you're at . . . using geolocation!

Getting to Know Geolocation

The geolocation API lets your browser share your current location with websites that you trust. Here's how it works:

  1. You (the Web developer) write a bit of JavaScript that calls the getCurrentPosition method of navigator.geolocation. As you learned in Lesson 5, method means how an object behaves. The basic code might look like this:

    navigator.geolocation.getCurrentPosition();
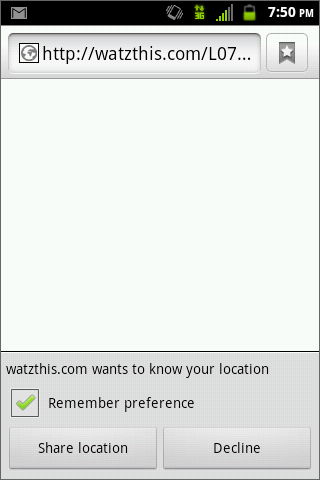
  2. The first thing the browser will do when it encounters a request for getCurrentPosition is to check that it's okay to be giving out your location. If you've previously given permission for this particular app to get your location, the browser will proceed. If you haven't, the browser will ask you for permission. This is the polite, and safe, thing to do.

    On Android, for example, the request looks like this:

    Geolocation request on Android

  3. If the browser gets permission to share your current location, it'll try different ways to get your latitude, your longitude, and several other properties of your location (such as altitude) that it may be able to find out from your device.

    If the app is running on a smartphone with geolocation capabilities, the browser will query GPS. If GPS isn't available, the browser may use your wireless access point's location, the location of the cellphone tower you're connected to, or your computer's address on the Internet (called an IP address).

The following table shows each of these ways of obtaining a user's location, in their usual order of accuracy:

Method

Benefits

Drawbacks

GPS

  • Highly accurate
  • Can detect movement and altitude in addition to location
  • Not available on all devices
  • Only works outdoors
  • Slow
  • Requires a lot of battery power

Wi-Fi

  • Accurate
  • Uses less power than GPS
  • Can't detect movement
  • User must be near Wi-Fi hotspots and have Wi-Fi enabled

Cellphone tower

Usually more available than Wi-Fi or GPS

Not very accurate

IP address

Always available as a fallback if nothing else works

Usually just locates your Internet Service Provider (ISP)

To get a taste of how geolocation works and to see it in action on your smartphone or desktop computer, copy and paste the following code into an HTML5 template in Komodo Edit.

  1. In Komodo Edit, click File > New > File from Template > HTML5 to create a blank template.
  2. Copy the following code, and then paste it into the head of your new template, right after the title.
<script>
var gps = navigator.geolocation.getCurrentPosition(
    
function (position) {  
    for (key in position.coords) {
        document.write(key+': '+ position.coords[key]);
        document.write ('<br>');
        }
    }
                                                   
                                                   );
</script>

By default, Chrome doesn't allow geolocation requests when you preview a file from your computer's hard drive (rather than uploading the file to a Web server). If you don't have a Web hosting account, you can preview the above script in the Safari or Firefox browser, or you can go to the geolocation test link in the Supplementary Material.

If you preview the resulting document in a browser that supports the geolocation API, you should see a list of all the available properties and their current values. Here are some sample results from running this script:

speed: null

accuracy: 100

altitudeAccuracy: null

altitude: null

longitude: -103.353539

heading: null

latitude: 43.960079

Notice that some of the properties are null. This is because I tested on a device without GPS support. If your browser is unable to find out altitude, speed, and heading information, the value for these properties will display as "null" or as some other value indicating that the information isn't available, such as 0 or NaN.

Now that you know a little bit about how to determine the user's current location, let's add a "Find Me" button to the WatzThis app. Here's the current app:

<!DOCTYPE html>  <html>  <head>    <meta charset="utf-8"> <meta name="HandheldFriendly" content="True">    <meta name="MobileOptimized" content="320"/>    <meta name="viewport" content="width=device-width, initial-scale=1.0">         <title>WatzThis?</title>   <script>  var light = new Array();  var t;  var color=0;  var flipping=0;  var speed;   light[0] = 'black';  light[1] = 'white';  light[2] = "red";  light[3] = "blue";  light[4] = "green";  light[5] = "orange";   function flip(whichway){       document.body.style.backgroundColor = light[whichway];       stopFlip();  }       function autoFlip() {     document.body.style.backgroundColor = light[color];    if (color < light.length-1) {               color++;         } else {               color=0;         }      t = setTimeout("autoFlip()",speed);  }  function doAutoFlip(changespeed){       if (!flipping){             flipping=1;      speed=changespeed;          autoFlip();       }     }  function stopFlip() {       clearTimeout(t);       flipping=0;  }  </script>     </head>   <body>      <div id="container">   <div id="flashlight"> <input type="button" id="OFF" class="bigButton" value="OFF" onclick="flip(0);">  <input type="button" id="ON" class="bigButton" value="ON" onclick="flip(1);">  <input type="button" id="RED" class="bigButton" value="RED" onclick="flip(2);">      </div>  <div id="danceparty">  <input type="button" id="AUTO" class="bigButton" value="AUTO" onclick="doAutoFlip(500);">  <input type="button" id="STOP" class="bigButton" value="STOP" onclick="stopFlip();">  </div>    </div> </body>  </html>

A good location for the "Find Me" button might be as part of a new third row of buttons, underneath Auto and Stop. Let's add the button first; then we'll worry about making it do something.

Find the closing tag of the danceparty buttons div element. I've highlighted it here:

<div id="danceparty"> 
<input type="button" id="AUTO" class="bigButton" value="AUTO" onclick="doAutoFlip(500);"> 
<input type="button" id="STOP" class="bigButton" value="STOP" onclick="stopFlip();"> 
</div>     
</div>
</body> 
</html>

Insert a new line after this closing tag, and type or paste the following:

<div id="geolocation"> 
<input type="button" id="latlong" class="bigButton" value="GET LOC" onclick="getLoc();"> 
</div>

If you save and preview your document, you'll see that we now have a new button. But if you click the button, it won't do anything. Let's change that.

Go up near the top of the code, and find the end of the <script> element. We'll put our new function just inside of the closing script tag (</script>). Insert a new line, and paste or type in the following:

function getLoc(){

var gps = navigator.geolocation.getCurrentPosition(
function(position){
  var latitude = position.coords.latitude;
  var longitude = position.coords.longitude;
  alert("Your Latitude is: " + latitude + " and your longitude is: " + longitude + "! Have fun!");
}
);
}

Save the file, and then preview it in your Web browser by clicking on the Preview in Browser button in Komodo Edit. (Remember that you must preview this file from a Web server or use Safari or Firefox to preview it from your hard drive.) When you press the GET LOC button, the browser should ask you for permission to get your current location. If you agree, you should then see a popup with your current latitude and longitude!

Unless you happen to be a navigational wizard or a sailor, this information is unlikely to do you much good. But when you combine it with other sources of data (such as a map, for example), your current latitude and longitude becomes extremely useful. We'll look at how to use this data in the next lesson.

For now, congratulations! We've written an app that takes a step outside of the Web browser and into a realm that once was only for native apps and expensive GPS devices.

In the next chapter, you'll take another step outside of what browsers have traditionally been able to do. You'll learn to store data that the browser can access offline, and you'll even find out how to build a Web app that doesn't require an Internet connection.

Using the Application Cache

HTML5 has several options for storing data on devices. First among these—and perhaps the most important for our purposes—is the application cache, or AppCache.

You probably already know that a cache (pronounced cash) is a place to store or hide things. The AppCache provides a way for Web browsers to store files on a device and use the stored versions. Otherwise, the device would have to retrieve new files from the Web server each time you access a Web app.

By caching files locally, the AppCache dramatically improves the performance of Web apps. It also has the potential to make Web apps usable without an Internet connection.

To use the AppCache, you need to create a cache manifest. That's the file that tells the browser what files it should store on the device. It takes the form of a simple text file that's linked from every HTML page in your app.

Here's a sample cache manifest file:

CACHE MANIFEST

# version 1

CACHE:

index.html

docs.html

watzthis.css

buttons.png

http://code.jquery.com/mobile/1.0/jquery.mobile-1.0.min.css

http://code.jquery.com/jquery-1.6.4.min.js

http://code.jquery.com/mobile/1.0/jquery.mobile-1.0.min.js

NETWORK:

/register.html

FALLBACK:

*.html /offline.html

The manifest has three parts: the explicit section, the online whitelist section, and the fallback section.

The explicit section begins after the word CACHE:. It lists the network path or URL to each file that you want the browser to cache. This might include HTML files, CSS files, JavaScript files, images, audio files, video, and so forth.

When the browser first opens the cache manifest file, it will download all the files in the explicit section. If you list every file that your app needs in order to run in this section, you can turn off your device's Internet connection, and the app will continue to function normally once the files have downloaded.

As long as the cache manifest file isn't modified, the browser will continue to use the version of the files that it has cached every time it loads this site going forward. Sometimes, however, you may want the cached files to update to the latest versions. This is where the line of text above the list of files comes in:

# version 1

The #, or hash symbol, indicates that what follows is a comment for humans to read rather than for the browser. Because it only takes a change of one character in the cache manifest file to force the browser to reload all the files, this particular comment often appears in the cache manifest file to allow developers to control when end users will see the latest versions of files. For example, you might modify a bunch of files in your app and then deploy them to your server. After everything's in place, you could update the version comment to:

# version 2

Users would then begin to see the new files the next time they access the app while connected to the Internet. In effect, this is a way to install updates to mobile Web apps.

The part of the cache manifest beginning with the word NETWORK is the online whitelist. This is where you list resources that you don't want cached. For example, if you have a directory of images that you've specified should be cached in the Explicit section, but you want one of those images to never be cached, you'd list that image here.

Why would you want certain files to stay uncached? Well, a common use for the online whitelist section is to list resources, such as APIs, that need an Internet connection to function.

The fallback section is where you list files that the browser should display if a requested file is inaccessible.

Each line of the fallback section contains a file (or a pattern) followed by a space (or a tab) and then the file that should replace it.

*.html /offline.html

In my example above, the asterisk (*) tells the browser to replace any missing HTML file with a file called offline.html. This file would presumably contain a message to the effect of "You must be online in order to view this content."

Configuring Your Server for Cache Manifests

To use the AppCache, your Web server has to deliver the cache manifest file to your browser in the right format. This is a new technology, so Web servers generally don't have built-in support for cache manifests. Fortunately, it's easy to remedy this in most cases.

If you're using an Apache Web server (which is most likely the case if you host your app on the Linux operating system), you'll need to find or create the file called .htaccess in the root of your Web directory. Then add the following command inside that file:

Addtype text/cache-manifest .appcache

After you add this, Web browsers that support AppCache will understand that any file with the .appcache extension is a cache manifest.

It's easy to link to a cache manifest from within an HTML5 document. Simply add the manifest attribute to the <html> element on every HTML page of the site, like this:

<html manifest="http://www.watzthis.com/watzthis.appcache">

If your manifest contains a large number of files, or large files, the first load of a page that links to the manifest will be slower than normal. After that initial load, however, the app will be much faster. Why? Its resources are coming directly from device storage rather than being downloaded from the Internet.

We're coming to the end of another lesson! Please go to Chapter 5 for a quick recap.

Summary

In this lesson you saw some advanced techniques for making HTML5 mobile apps much more powerful by taking advantage of the built-in capabilities of smartphones and mobile devices.

You got an overview of the work and goals of the HTML5 Device Access Working Group. That organization is planning to enable HTML5 to have just as much freedom to access devices as native apps currently have.

Also, you learned about the geolocation API, which most major Web browsers now support. Many mobile Web apps use this API to find out a user's location.

And now you know about the application cache, which speeds up mobile Web apps and makes them available for offline use.

What's next in Lesson 8? You'll put together several of the techniques and languages that you've learned—specifically geolocation and JavaScript—to use freely available data and functionality on the Web. I'll see you then.

In the meantime, don't forget about the Supplementary Material, FAQs, quiz, and Discussion Area!

Supplementary Material

Geolocation API Specification 2nd Edition

Share your location - Google Chrome

Geocaching

WatzThis? - The Best in Web Development Training

Lesson 7 FAQs

Q: Device Access seems dangerous to me. What's to stop any website I visit from finding out my location or snooping into my address book?

A: Privacy and security are two of the most important priorities for the Device Working Group. In general, each Web app needs to specifically request access to any device data or sensors that it wants to access. That means the user controls what to share. Only grant this access to sites you trust.

Q: Device APIs sound great, but when are they going to be usable on smartphones?

A: Some Device APIs are available on some smartphones and tablets now. For example, the latest versions of iOS, Android, and Blackberry browsers support the File API, which lets the browser access the device storage directly. Most browsers now support geolocation. It may be a while until some of the other APIs have enough browser support to justify using them in Web apps. However, "bridging" technologies exist that will let you use device APIs right now, as you'll see in Lesson 12.

Lesson 7 Assignment

One fun thing you can do with geographic coordinates is go on treasure hunts. Geocaching is a popular real-world treasure hunt game in which you use a GPS-enabled device to try to locate treasures, known as "caches," that other players have left behind.

In this assignment, you'll use a simple HTML5 app to create a link to geocaching.com that will tell you where there are hidden treasures near you. Whether you want to go and look for them is up to you! Just follow these steps, and you'll be on your way to a new super-geeky hobby:

Create a new file in Komodo Edit by clicking File > New > New File. Paste the following code into the blank document:

<!DOCTYPE html>
<html>
<head>
<title>
Find Caches Near Me!
</title>
<script>
navigator.geolocation.getCurrentPosition(makeLink, noLink);
 
function makeLink(position)
{
  var lat = position.coords.latitude;
  var long = position.coords.longitude;
  document.location.href="http://www.geocaching.com/seek/nearest.aspx?origin_lat="+lat+"&origin_long="+long+"&dist=100&submit3=Search";
 
}
function noLink()
{
  alert('Location not found!');
}
 
</script>
 
</head>
 
<body>
<h1>Geocaches</h1>
<p>If your browser asks to use your current location, click Yes. You will then be redirected to geocaching.com</p>
</body>
</html>

Save the file as geocaching.html, and then preview it in your browser. (As I mentioned in the lesson, you'll have to use Safari or Firefox.) You should see a question about whether the browser can use your current location. Here's what that question looks like on my Android phone.

Getting the location for geocaching If you agree to allow access to your location, you'll automatically go to geocaching.com, where you'll see a list of the closest caches to you.

A list of geocaches near me If the script doesn't work for you, try accessing it at the following URL: https://www.watzthis.com/L07/geo.html

If you want to go out and try to find some of these caches, read the rules of Geocaching at Geocaching 101 and have fun!