Preferences dialog box
Intermediate Dreamweaver CS3: Lesson 01
Chapter 1:
Introduction
Hello and welcome to Intermediate Dreamweaver CS3. If you've come to this class after taking my other course, Introduction to Dreamweaver, welcome back! If this is our first class together, let me introduce myself and tell you a little about who I am. Then, we'll talk about what we're going to be doing over the next six weeks.
My name is Robert Fuller, and I began my Web development career more than a decade ago. My first decent paying job was as an entry-level design assistant. Day after day, my manager and I would churn out Web pages. The two of us were responsible for a site that spanned over 10,000 individual pages.
Most of our daily updates consisted of more content than some sites have overall. It wasn't always fun, it wasn't particularly cutting edge, but it taught me a thing or two about graphics design and getting things done under a deadline. I eventually moved on and worked in different shops. By the time stepping out on my own seemed the best path to take, I was a senior Web developer for an Internet start-up in New York's Silicon Alley, just north of Wall Street.
These days, I teach classes (both face-to-face and online), write books (The HTML Virtual Classroom and the Photoshop CS3 Bible are the two I'm most proud of), and help a select group of public interests that I personally believe in advance their goals on the Web. By select group of public interests, I mean you.
What I enjoy most is talking with students. It's a real privilege to help people, and it's my goal to help you succeed in your Web-developing projects. I will do well in some places and fail in others. Where I: succeed, I don't expect praise. You paid for this class and deserve my best efforts. When I fail, let me know so that I can improve my efforts. In this way, we can learn from each other.
Since my first decent paying Web job, Dreamweaver's been a constant item in my tool kit. I may step away from it from time to time and use different editors should the job require it, but it's still my go-to program most days. Over the years, I've seen this tool change—sometimes for the better and sometimes for the worse. This is the nature of software updates. But there's no other tool like it on the market.
Needless to say, I enjoy teaching the subject, and many of my students from my introductory Dreamweaver course asked about a follow-up. Well, this is it. I did my best to combine what students said they wanted to learn next with topics I feel are important for you to know. I'm hoping I've created an environment in which the novice Dreamweaver user can move to the next level.
This class doesn't require a lot. You just need a basic understanding of how Dreamweaver works and a desire to learn more. Although I recommend that you learn HTML and CSS if you don't already know them, you don't need HTML and CSS knowledge to learn something in this class. At the same time, if you know this stuff already, you aren't going to get bored.
In today's lesson, we'll start with an examination of four languages Dreamweaver helps you use as building blocks for your Web pages: HTML, XHTML, CSS, and JavaScript. As the course continues, we're going to look at multimedia content, the basics of Web forms, and touch a little on XML. We'll wrap up with a discussion of design principles to help you better apply all the tech-heavy stuff we'll deal with throughout the course.
Over the course of our lessons and assignments, we'll build a site together. I'll post content in the Assignments section (such as images and text) wrapped in zipped archive files. With each subsequent lesson, we'll incorporate what we've learned into the site. When all is said and done, you'll have a solid, in-depth understanding of traditional layout and how that translates to the Web. Plus, your sites will be clearer, cleaner, and more accessible to your audience than ever before.
With our introductions out of the way and our goals set before us, let's move on to Chapter 2 and begin discussing the two markup languages Dreamweaver assists you with.
Chapter 2:
Code! You're Kidding, Right?
Hypertext Markup Language (HTML) is the language of the Web. Without it, there is no Web. This may seem like a basic point to make in an intermediate course, but even at this level of Web design, I realize you may not know HTML. That's okay. It was possible to get through my last class without it, and you can get through this one without knowing it too. But, if you want a career in Web design, you're going to have to knuckle down and learn it.
But don't panic. HTML is fairly simple, and you can pick up the basics quickly. If you need to, practice your HTML coding an hour a day, and you'll be a veritable wizard in a month. Trust me. Check out the Supplementary Material section for this lesson.
And if you're a graphics designer who is kicking your feet and hollering, "I'm a visual person! I don't do code," allow me to allay your fears. Like you, I'm not a computer science major. And I, too, am a visual person.
I was a film and video major in college and just happened to get into computers because it was made very clear to me that computers were the way of the future in my field. I picked up HTML by tinkering—a method I heartily recommend—because tools like Dreamweaver didn't exist at the time.
The point I'm making is this: If I can do it, you can too.
Now, HTML has gone through many updates, which have both added tags to the language and improved how these tags behave. It all began with HTML. Then, there was HTML 2.0, HTML 3.0, HTML 3.2, HTML 4.0, and HTML 4.01.
In the past, browsers like Netscape and Internet Explorer deviated from the standards set down by the World Wide Web Consortium (W3C). In case you're not familiar with them, the W3C sets international standards for the Web. In a nutshell, Netscape and Internet Explorer kept adding elements to the language that only their browsers could support (this era is often referred to as the browser wars). In this way, they turned HTML into a kind of digital pig Latin.
To this day, you often have to write two lines of code that do essentially the same thing to satisfy the quirks in different browsers. In fact, it's such an accepted practice that Dreamweaver does it automatically. And this is what brings us to XHTML.
XHTML is simply the latest version of HTML. The X in XHTML stands for extensible. The W3C rewrote HTML using another language it created, called Extensible Markup Language (XML).
XML is not a language in its own right. Rather, XML is a meta language, or a set of rules for creating languages. It's the extensible part that's important to focus on. Basically, the W3C rewrote HTML using XML. Thus, XHTML was born.
The new extensibility now available in XHTML means that anyone can add tags to the language and any browser can use those tags. No more multiple lines of code to satisfy different browsers. Interestingly, no one has really bothered to add new tags, outside of the W3C, since XHTML was created.
But despite all the hullabaloo, for the most part, any browser will render any HTML you throw at it, regardless of what version of the language your code conforms to. For example, the <center> tag, which stopped being part of the HTML specification some time ago, still works just dandy in any browser you can name. But mixing and matching different versions of HTML and XHTML into a single document isn't a good idea. You should decide on a version, stick with it, and let the browser know which version it is.
You do this by placing a DOCTYPE declaration at the beginning of your Web pages. "What's a DOCTYPE declaration?" Glad you asked. A DOCTYPE declaration is nothing more than a line of code at the beginning of your files that tells the browser these two things:
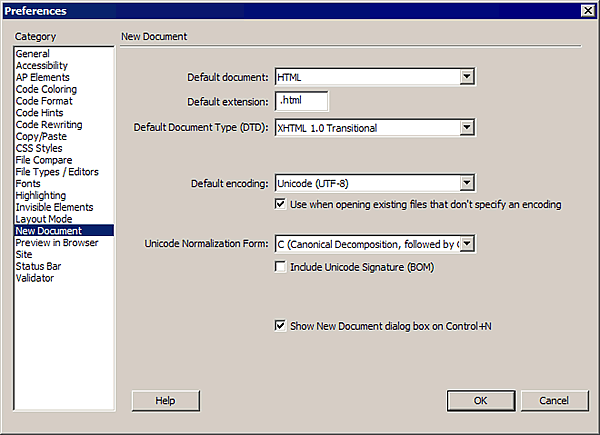
You may be wondering how you're supposed to do all of this and make sure all the other code you're using is correct when you hardly know HTML. The answer is Dreamweaver handles it all for you. Open Dreamweaver right now and follow along as I walk you through setting Dreamweaver's DOCTYPE preferences:

Preferences dialog box
But, which one do you choose? Right now, we're in a transitional period between HTML and XHTML. Fortunately for us, the W3C understands and has written a DTD just for this purpose—XHTML 1.0 Transitional. Choose this DTD and click OK.
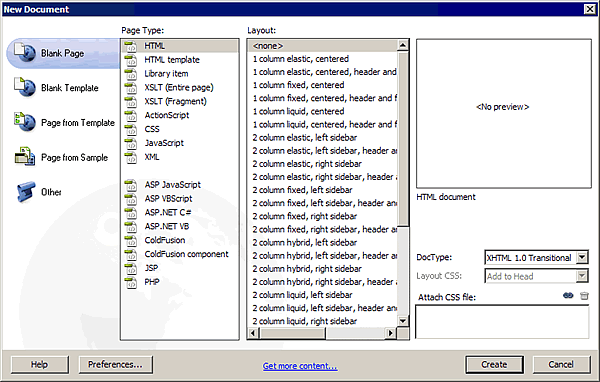
So, what does this do to our future documents? Let's take a look:
New Document dialog box
 Note Note Notice the DocType drop-down menu in the lower-right corner of the New Document dialog box. It was prefilled with the same selection we made in the Preferences dialog box. Dreamweaver gives you access to this in the New Document dialog box in case you ever need to create a lone file with a different DOCTYPE. |
Now it's time to look at the code. Click your Code View button on the Document window's toolbar, shown here:

Code View button
Your Document window should look like this:
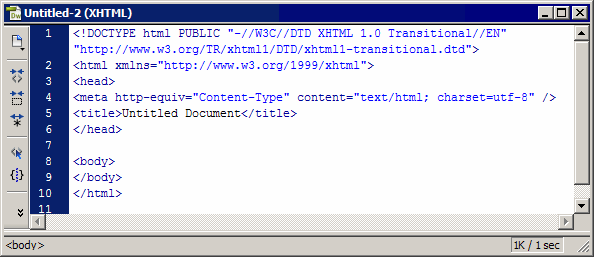
Document window displaying code
That first line of code is the DOCTYPE declaration. Like I said a moment ago, this line is doing two things:
If you go to that URL, shown below in Internet Explorer, you'll see a listing of all the accepted tag and attribute entities for this version of the language and their rendering specifications.
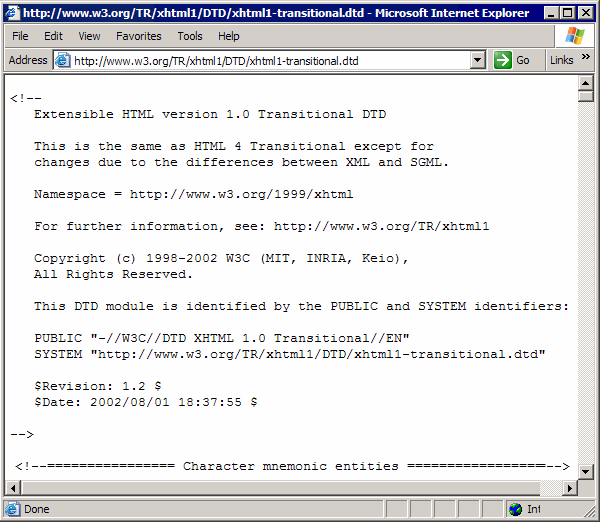
xhtml1-transitional.dtd
What Happens if You don't Use a DTD?
Without a DTD, a browser (especially Internet Explorer) will go into something developers call quirks mode, and it will render the code the way it sees fit. Insert a DTD, and browsers, for the most part, start rendering your documents the way the W3C standards say the code should be rendered. Thus, you start controlling how your Web pages appear across different browsers (more or less).
Will there still be differences in how your pages look in two different browsers or on two different platforms? Yes. Will those differences be as mind-boggling as when browsers like Internet Explorer are left to quirks mode? Not as much.
The biggest improvement you'll find when using DTDs is in the rendering of CSS. And CSS is what we'll talk about next.
Chapter 3:
What is CSS?
CSS stands for cascading style sheets. In it's simplest terms, CSS is a presentation language. It simply specifies how Web page content should look. It defines the appearance of text, images, and just about any other type of Web page content you'll create. So, HTML and XHTML structure the page's content, including headings, paragraphs, and images. CSS spells out how these elements appear on a Web page.
To hear some people talk, CSS just showed up yesterday. It's the next big thing. Not true. Since 1996, it has been a well-established Web standard. The only problem has been that commercial Web browsers haven't supported it very well. The number one offender has been Internet Explorer.
So, why has CSS gotten so much press in the last few years? Google. Google gives higher rankings to pages with less HTML and more readable text in them. CSS allows you to move all formatting to a separate document, streamlining your HTML files. Ergo, sites that conform to the HTML and CSS standards receive a boost in their Google rankings.
For me, the coolest thing about CSS is how it streamlines my work. For example, say I have 200 paragraphs in a Web site. In old-school HTML, if I wanted to change the font, size, and color of these paragraphs, I'd have to make up to 200 individual edits to my code. In Dreamweaver, that would mean 200 trips to the Property Inspector, shown below, to change font, size, and color values.

Property Inspector
With CSS, I can create a style using the following CSS Rule dialog box and specify in a single document that all paragraphs should look a specific way. If I ever need to change that look, I simply go back to the CSS Rule dialog box and make one round of edits to that lone CSS document. The changes will cascade across every HTML file that references that document. No muss, no fuss.
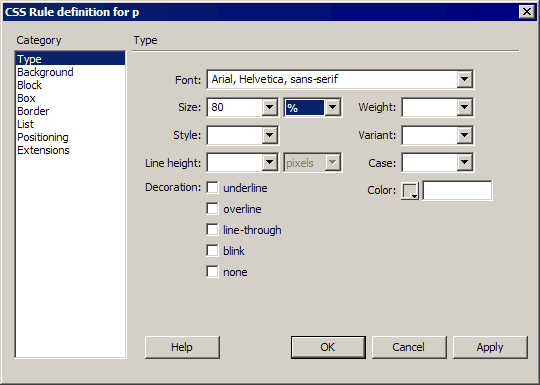
CSS Rule dialog box
Of course, CSS does more than simply format things like text. CSS has evolved into a complete layout methodology. You can specify where and how specific sections of the HTML document should be displayed in the browser window. No more funky table-based layouts.
So, Learn CSS Too
That's right. Not only should you learn HTML code, but you should learn CSS code as well. Again, don't panic. After you pick up HTML, CSS becomes very easy to learn—so easy, in fact, you can pick up the basics in less than half the time it takes to learn HTML.
As with HTML, you can get through this class without knowing how to hand-code CSS. In fact, I've written this course with the assumption that you don't know how to code in either language. Yet, nearly 50% of this course focuses on CSS. That may seem to beg the question, "Then, why do I need to learn this stuff at all? Dreamweaver's going to do it all for me!"
Well, it is and isn't. If you took the intro class, you'll recall all those Discussion Area questions that I answered with, "Can you open your document, switch to Code View, and then copy and paste all the code into a reply to this message?"
You'll only get so far in Web design (and, by extension, Dreamweaver) if you try to stay codeless. Sometimes the only way to do something is to do it in the code itself. Because the makers of Dreamweaver know this, they've built a lot of code-friendly features into the interface to make it easier. Like I said at the end of the intro course, "You now know enough to be dangerous." Time to move to the next level. Learning HTML and CSS will make that happen.
This leaves us with one last topic to discuss, JavaScript. And before you give into the urge to scream, let me say that you don't need to know JavaScript the same way you need to know HTML and CSS.
Let's move on to Chapter 4 and find out why.
Chapter 4:
What is JavaScript?
Originally, JavaScript was designed to allow Web designers to control Java applets. You could imbed these little Java programs into Web pages. But because Java applets had so many problems associated with them (a poorly written applet can crash a user's machine, and a maliciously written one can destroy it), this never materialized. Instead, JavaScript went on to do what it does best: manipulate HTML.
As of this writing, though I use the term JavaScript, there are really three versions of this language out there: the original JavaScript, Microsoft's JScript version, and a standards-compliant flavor of the language called ECMAScript. However, JavaScript is still the predominant term used to describe them all.
Like everything else mentioned here today, some browsers support some things, and other browsers support other things. Most JavaScript code is a mangled-together mélange similar to HTML, where we mix different statements together to make each browser happy. In the intro class, we used JavaScript to create image rollovers and navigation bars. At one point, I even had students use JavaScript to drag images around the screen—mostly to show what a bad idea it was.
Interestingly, if you go digging around the Dreamweaver interface, you won't see the word JavaScript anywhere. Instead, Dreamweaver calls its 20 some-odd JavaScript-based effects behaviors. JavaScript is one instance in which Dreamweaver can do almost all the coding for you. This has more to do with the nature of JavaScript than the power of Dreamweaver.
With JavaScript, you create little programs simply called scripts. Once you've made one, you can use it again and again. So, all Dreamweaver has done is collect a big tool kit of scripts and created a kind of plug-and-play interface for them, called the Behaviors panel.
Once you've learned what the behaviors are and how to navigate the various dialog boxes, you're pretty much good to go. And, there are forums at the Adobe Web site (shown below) where you can pick up other behaviors from folks who actually know how to write JavaScript. So, in theory, you can become an HTML and CSS whiz and leave all your JavaScripting to Dreamweaver.
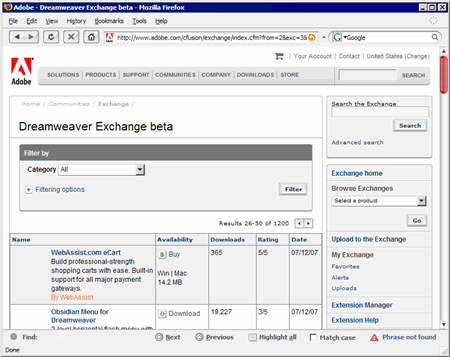
Adobe's Dreamweaver Exchange
Of course, like anything else, there will be times when you'll see something done on another Web site that you just have to implement on your own. And, you know what? You'll probably find Dreamweaver doesn't have a behavior that does it. That's probably when you'll get the itch to learn JavaScript yourself—which isn't a bad idea.
Our discussion of JavaScript brings up two other topics: DHTML and AJAX. DHTML stands for Dynamic HTML, and it's really a misnomer. There's nothing dynamic about HTML. It's just marketing hype to describe combining HTML, CSS, and JavaScript to create special effects.
Ever see a funky fly-out menu on a Web site? Chances are there's a combination of CSS and JavaScript (the HTML goes without saying) that makes it happen.
AJAX is basically just DHTML all grown up. AJAX stands for Asynchronous JavaScript and XML. Updates to the core JavaScript language, the inclusion of XML, and a few loopholes in how Web browsers handle frames have allowed developers to take what used to be called DHTML to the next level. That is, using JavaScript to build some pretty sophisticated Web applications, where in the past, JavaScript was really only good for the typical image rollover.
So, why is AJAX such a hot buzzword these days? Google again! Google has developed some very cool applications—namely Google Maps and Google Earth—using AJAX programming. I've supplied links to them in the Supplementary Material section so you can look for yourself.
Do you need to be concerned about DHTML and AJAX? Where DHTML is concerned, not at all—and with AJAX, not yet. I just want you to know what the terms mean and understand where they came from. We'll be doing plenty of DHTML-ish stuff in class and calling it behaviors, and AJAX is a subject for another day.
Okay. Enough of the technical code talk!
There's one chapter left, so let's wrap everything up.
Chapter 5:
Summary
Congratulations! You made it through Lesson 1. In this lesson, we mainly discussed the primary technologies Dreamweaver assists you with. I probably came across a little tech-heavy.
Although I recommend you learn HTML and CSS, you don't have to learn it all today. Again, you don't need HTML and CSS knowledge to learn something in this class. But, I think doing so will enhance your Dreamweaver skills and help you design better Web sites.
So, let's count off what we covered today. You learned a little about HTML and XHTML. You also dabbled in Dreamweaver and set up the DOCTYPE Declaration so that browsers will know which version of HTML we'll be using.
We then took a look at CSS and found out that it's no Johnny-come-lately, but instead, is almost as old as HTML itself. You also found out that the majority of the press it's getting these days has as much to do with better Google rankings as it does with the very real advances it provides us.
Last, you looked at JavaScript and were surprised to see that the instructor was not telling you that you must learn it. You also found out that Dreamweaver refers to its JavaScript-based effects as behaviors and that you can expand Dreamweaver's list of behaviors with a visit to the Adobe Web site.
Coming up in Lesson 2, we'll take our first steps into pure CSS-based layout. We'll examine how CSS functions, just what is meant by the word cascading, and how to construct simple, two-column layouts.
Don't forget to post any questions you might have in the Discussion Area. In fact, I'd love it if you took the time to say hello and introduce yourself. My hope is that you'll use the Discussion Area often and that we'll learn a lot together. To get to the Discussion Area, click the discussion link.
See you in the next lesson!
After every lesson in this course, you can test your knowledge by taking a short, multiple-choice quiz. To access your first quiz, click the word Quizzes at the top or bottom of any page in this classroom. When the quiz form comes up, select Lesson 1 Quiz. Once you've taken the quiz, apply what you've learned by doing this lesson's assignment. While the assignments that accompany every lesson in this course are optional, they will reinforce and expand your learning. To access your first assignment, click Assignments at the top or bottom of any page in the classroom. Then, scroll down to the section for Lesson 1.
Also, since learning something new usually raises questions, every lesson in this course comes with an FAQ section. You'll find the link that goes to this lesson's Frequently Asked Questions by clicking the Resources link at the top or bottom of any page in this classroom. Within the Resources link, you'll also find the course index, which many students like to print and use as a detailed table of contents. Also, you'll find book recommendations and recommended resources that I've found very helpful and would like to pass along to you. These aren't required, but they're excellent sources for further learning. | ||
Supplementary Material
|
The World Wide Web Consortium's HTML/XHTML Home Page http://www.w3.org/MarkUp/ |
| This page within the W3C's Web site keeps you abreast of everything happening in the HTML Working Group's never-ending quest to promote, improve, and expand HTML and XHTML. |
|
The World Wide Web Consortium's CSS Home Page http://www.w3.org/Style/CSS/ |
| This page within the W3C's Web site keeps you abreast of everything happening in the CSS Working Group's never-ending quest to promote, improve, and expand CSS. |
|
Web Standards Guide to CSS http://www.westciv.com/style_master/academy/css_tutorial/introduction/css_intro.html |
| This site offers a fast, fun, and free CSS tutorial. |
|
Google Maps http://maps.google.com/maps?hl=en&tab=wl |
| Here's that taste of Ajax programming I mentioned in Chapter 4. Enjoy! |
|
Google Earth http://earth.google.com |
| Here's another example of Ajax. |
FAQs
Q: How much previous HTML and CSS knowledge do I need for this class?
A: As with anything Web design related, the more code you know, the better off you are. However, I structured this class with the assumption that you have little or no coding experience, and I attempt to walk you through the code as needed. If you've come to this class with no coding experience at all, I would recommend taking an introductory CSS and XHTML course after completing this class. In Lesson 12, I'll have recommendations of other courses that might help you build on what you learn in this course.
Assignment
In our fist assignment, I want you to set up your local root folder for the site we're going to build in this course.
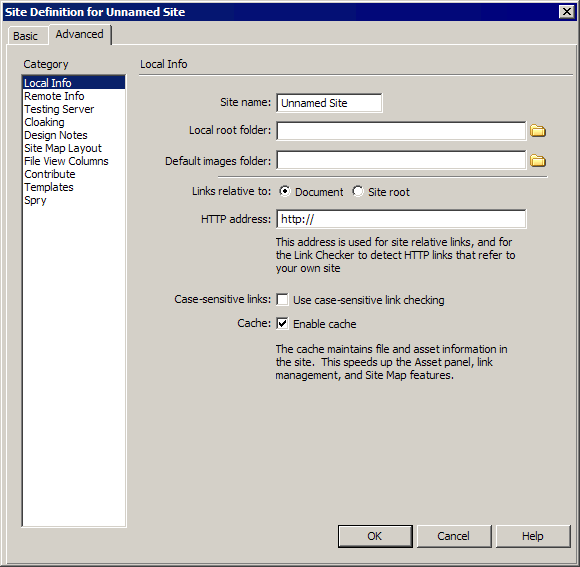
Site Definition dialog box
The
Site Definition dialog box closes, and the Files panel now displays
your new local site. If you do not see the Files panel, choose Window Files from the menu.
I don't want you to add any files just yet, but I do want you to add some folders:
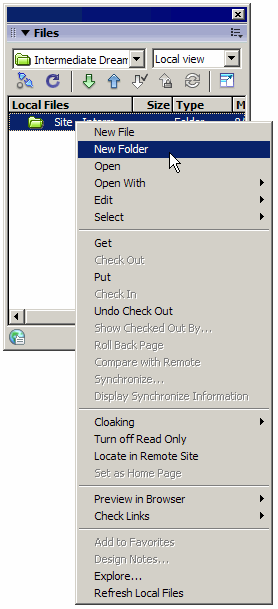
Files panel context menu
Okay. That's it for now. If you have any trouble, just holler in the Discussion Area.