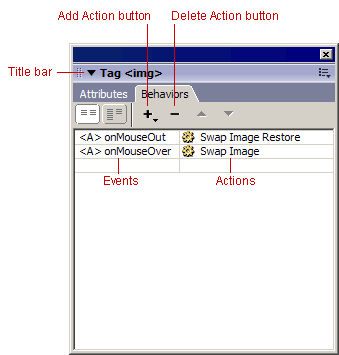
Behaviors panel
Intermediate Dreamweaver CS3: Lesson 09
Chapter 1:
Introduction
If you've ever used Dreamweaver to create an image rollover or image-based navigation bar, you've been using JavaScript. In Dreamweaver, any predefined JavaScript-based effect is called a behavior. These Dreamweaver behaviors allow you to swap images, generate pop-up windows, as well as over 20 other possible effects.
In this lesson, we'll examine the interface for working with behaviors and discover how to implement some of the more useful ones.
So, follow me to Chapter 2 and let's get started!
Chapter 2:
Working With Behaviors
In Dreamweaver's lexicon, behaviors proceed from a very simple equation: An event + an action = a behavior. Let's look at a simple example we're all familiar with—the basic image rollover. The mouse moving over the initial image is the event. The swapping of the first image for the second is the action. Together, the event and the action comprise Dreamweaver's Swap Image behavior.
The event part of the equation comes directly from the JavaScript language itself. JavaScript is called an event-driven language, and it possesses syntactic elements called event handlers. For example, in JavaScript, the event handler used to create an image rollover is named onMouseOver. To return the image in a rollover to the original state requires the onMouseOut event handler.
As you'd guess, event handlers related to mouse movement and clicks are used quite frequently, simply because most of the things you do in graphical user interfaces (GUIs), like the Windows and Mac operating systems, involve the mouse. Of course, the list of available event handlers is vast because different page elements respond to different events.
The Behaviors Panel
As with just about everything in Dreamweaver, there's an interface for working with behaviors. In this case, it's called the Behaviors panel, shown below. It's conveniently divided into two columns, with event handler names on the left and the Dreamweaver action names on the right. To launch the panel, choose Windows > Behaviors from the menu bar.

Behaviors panel
Behaviors need to be attached to elements that can trigger them. Most commonly, these are items that natively interact with the mouse, like links. Of course, there are plenty of exceptions, and like so many topics we've hit on in this class, an entire course could be devoted to JavaScript alone (and is, if you're curious).
But, sticking with a simple example, if we want a link to trigger a behavior, the first thing we need to do is select the link. Or, more accurately, the tag that makes the link possible—the <a> tag. We learned how to isolate tags using the Document window's Tag Selector back in our discussions of CSS.
When you select a page element, its corresponding HTML tag is displayed in the Behaviors panel title bar. When you click the Add Action button (the + sign), a menu of actions is displayed (shown below), which highlights those actions available for the element you've selected.
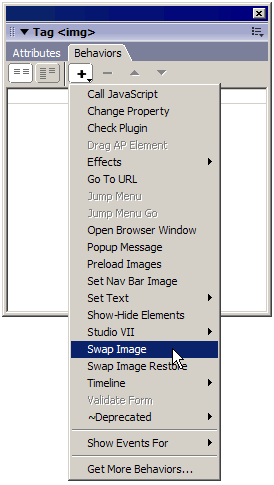
Add Action menu
If you look back at the first picture above, I have an image selected (the <img> tag), and I've attached two behaviors to it. The Swap Image action coupled with an onMouseOver event swaps one image for another when the mouse moves over the image. And the Swap Image Restore action and OnMouseOut event swaps the original image back again when the mouse is removed from the image. You may combine these two behaviors to create a number of image rollover effects.
You use the Delete Action button (the - sign), obviously enough, to delete an action (and, therefore, the behavior) you've applied to a selected page element. To the right side of the Add and Delete Action buttons are two arrow buttons (up and down). You use them to change the order of multiple actions assigned to a single event handler.
When you select an event handler in the Behaviors panel, an arrow button appears beside it. Clicking this arrow button displays a list of the possible event handlers for the attached action, as shown below.
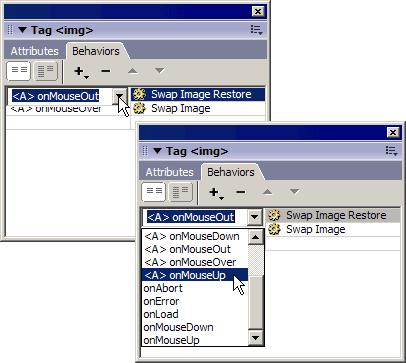
Event drop-down menu
Dreamweaver will default to the most commonly used event handler for a given action. But if you want to change that event handler, you simply click it and make a selection from the drop-down menu. The list of possible events is derived from the Show Events For submenu. This is located at the bottom of the Add Action drop-down menu, shown here:
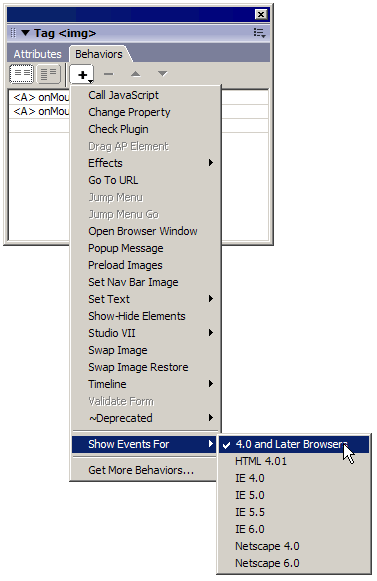
Show Events For submenu
This submenu is where you choose the browsers you want your behaviors to be compatible with. Here are your choices:
Stick With the Default
The existence of these various options begs the question, "Why so many options?" The answer is that there's yet to be a universally agreed upon JavaScript standard. Netscape created JavaScript, Microsoft came out with their own version, and concerned programmers (including the W3C) have yet a third version called ECMA Script (to which Netscape, Mozilla, and Firefox now adhere).
Just remember the golden rule of Web design: Make your pages friendly to as many browsers as humanly possible. This submenu defaults to the first (more inclusive) option, and I would argue you should never change that.
For my money, the best way to learn how to do something is to do it, so let's hop over to Chapter 3 and actually start attaching some behaviors.
Chapter 3:
Attaching Behaviors
to Page Elements
In the last chapter, I discussed the basic mechanics of attaching a behavior. This time around, we're actually going to do it.
One useful behavior Dreamweaver offers you is the ability to create pop-up windows. I know what you're thinking: "Pop-up windows? Those are evil! Browsers block them! Bad! Bad! Bad!"
Well, there are pop-up windows, and then, there are pop-up windows. Pop-up blocker software is designed to prevent the launching of any browser window not triggered by a human action (like a mouse click). If a verifiably human action didn't initiate it, the blocker software will stop it. What differentiates a good pop-up from a bad pop-up then is the event handler:
Mouse-driven events (onClick, onMouseOver, and so on) = GoodBrowser-initiated events (like onLoad, onUnLoad) = Bad
Allow me to give you an example of a benign pop-up. Have you ever been to a site where you're presented with a series of thumbnail images, and clicking those thumbnails opens a larger version of the image in a modified browser window? Perhaps it's a browser window that has only a title bar (no buttons or status bar, and it can't be resized). Well, that's a user-initiated pop-up.
A pop-up window is simply a browser window generated by a JavaScript function, giving you the ability to control the window's exact dimensions and other properties. Let's make one. We'll use Dreamweaver's Open Browser Window behavior to create a pop-up window example, and we'll set this behavior up so it's triggered by clicking a link.
But, it will be a special type of link. The link itself will point nowhere. Instead, clicking the link will trigger the JavaScript that builds the window and displays the page.
In this example, we'll use a small image as a link to open a pop-up containing a larger version of the same image. While this is a common usage for pop-up windows, it isn't the only one. Anything you can place in a traditional HTML document can be placed inside a pop-up window.
After all, a pop-up is just another browser window—one that you have total control over. Let's get started.
Downloading Our Images
Download the sample images below. Just right-click, CONTROL-click, or COMMAND-click the following images (depending on your OS and the browser you're using). Then, choose the appropriate command from your browser's Context menu to save these two images into the images folder that's inside the misc folder within your local site.
The thumbnail

The full-sized image
Creating Our Files
We're going to need two HTML files for this example: one to contain the link that triggers the pop-up and another to open inside the pop-up itself. So, go to your Files panel, and then create these two files in your misc folder. Name the first one trigger.html and the second one pop-up.html.
First, let's set up the pop-up.html file:
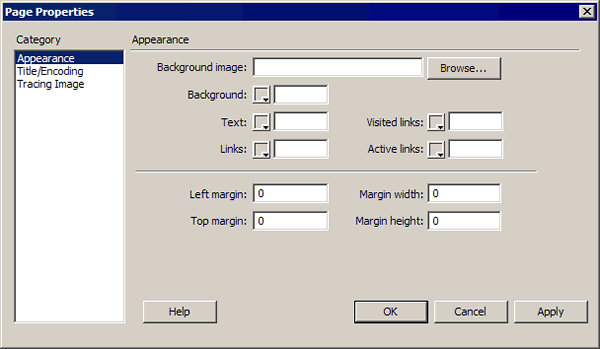
Page properties
 Note Note We set the margin to zero in this file because when the document is opened, we want only the image to be visible. So, we kill off any margins, and then later, when we define the properties of the pop-up window, we'll set its dimension to those of the image file, and the window will fit it perfectly. Why not just open the full-sized image directly in the pop-up window? Try opening a GIF, JPEG, or PNG file in a browser some time. You'll notice there is always a margin around it, and the background is always white. The only way to have total control over the margins, background colors, and other properties is to place the image in an HTML file and then format the HTML file as you see fit. |
Creating the Trigger
Now let's create the link that will trigger the pop-up.
Next, let's assign the Open Browser Window behavior to the null link. Look down at the Tag Selector. You should see something like this: <body><a><img>. The <a> tag is the link affecting the image (the <img> tag).
 Caution Caution Some
pop-up blocker software allows the user to terminate any window
generated via JavaScript's window.open method. Consequently, no pop-up
you create in Dreamweaver would function. |
That wasn't too hard, was it? Another little goody to add to your bag of tricks.
Let's take a look at another useful behavior: the disjointed rollover.
Follow me to Chapter 4, and I'll explain what I mean by disjointed.
Chapter 4:
The Disjointed Rollover
In the traditional rollover image, a user mouses over an image, and that image is swapped for another one. A disjointed rollover does essentially the same thing, using the same JavaScript code, with a slightly different twist. Instead of swapping out the image the user mouses over, it swaps out another image in a different location.
As I always say, nothing beats an example. So let's build a disjointed rollover together.
Download the sample images below. Use right-click, CONTROL-click, or COMMAND-click, depending on your OS and the browser you're using. Then, choose the appropriate command from your browser's Context menu to save them in the images folder that's inside the misc folder within your local site.
These small images will be the ones we rollover:

Red thumbnail

Green thumbnail

Blue thumbnail
These are the full-sized images that will be swapped out:

Full-sized red image

Full-sized green image

Full-sized blue image
Now we need to use the spacer GIF. You may already be familiar with it. Spacer GIFs are 1 x 1 pixel transparent GIF images most commonly used in old table-based layouts to wedge open table cells. So why are we using one here?
Well, we're going to create a series of image swaps. Rollover a thumbnail, and a full-sized version of the image appears in a different location. In this example, the page will load with only the thumbnails visible, so we'll need an invisible placeholder image to act as the image that'll be swapped. If this still seems a little confusing, don't worry. It'll make more sense as we build it.

spacer.gif
Next, it's time to create our files. We'll only need one HTML file for this example. So, go to your Files panel, and create a new file in your misc folder. Name the file disjointed.html. Then open it in a Document window. Let's begin.
The first thing we'll need to do is create a structure to hold our images. To keep this simple, let's just use a table. Place your cursor in the open Document window, and then insert a table with the following attributes:
Rows: 2
Columns: 3
Width: 600 pixels
Border thickness: 0
Cell padding: 10
Cell spacing: 0
Header: None
With the table in place, let's insert the thumbnail images. Place the thumbnails in the bottom row: red, then green, then blue:
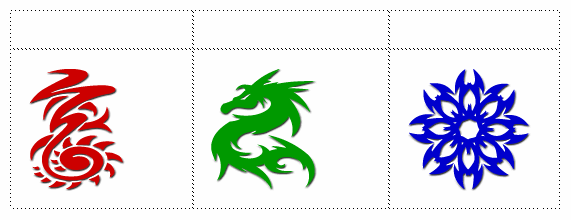
First, the thumbnails . . .
Next, let's merge the cells of the upper row. Select the cells (I just click in the left-most cell and drag across to the far right one), and then click the Merge Cells button in the Property Inspector, as shown below:
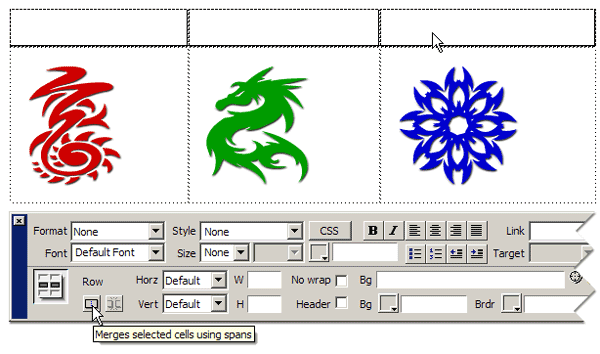
Merge cells
Time to shrink-wrap and align the table. In other words, I want to remove any width values from the table so that the only thing providing dimension for it is the content in its cells and the cell padding. Select the table, and click the Clear Column Widths button, as shown here:
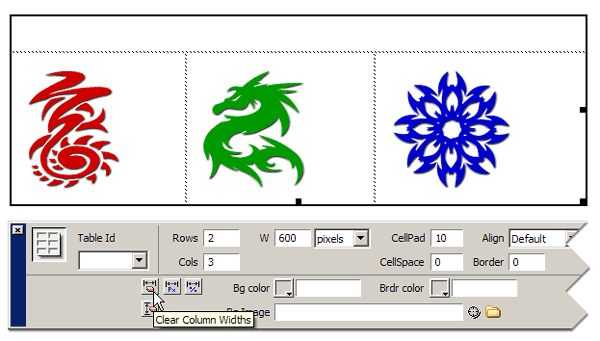
Clear column widths
Then move over to the Align drop-down menu (it's just to the right of the CellPad field), and then, set the table's alignment to Center.
I also want the images that get swapped in and out to be center-aligned in the top row. So, click in the top cell to place the cursor, and use the Horizontal Alignment drop-down menu on the Property Inspector to set the alignment to Center, as shown here:
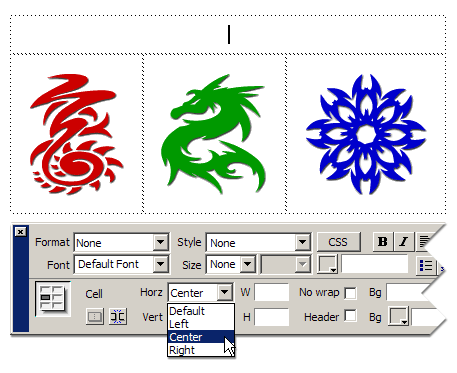
Center the cell content
Now we can insert the spacer GIF in the top cell. The spacer GIF itself is only 1 x 1 pixel square, and like all image rollover effects, the images being swapped in and out must all be inserted with the same dimension values. This means we need to know what the width and height of the three full-sized images are.
In theory, you would have made these images yourself, and the numbers would be fixed in your mind. Since I made them (and they're supposedly fixed in mine), I'll just tell you what the dimension values are: 266 x 260.
So let's insert the spacer GIF and reset its dimensions to 266 x 260, as shown here:
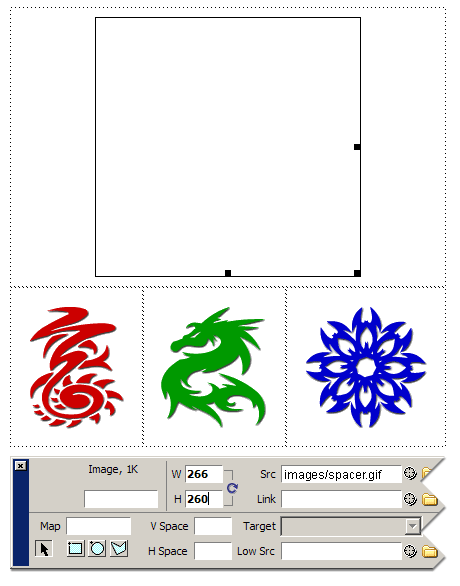
Set the image dimensions
Labeling the Images
In order for the JavaScript functions we're about to attach to identify one image file from the next, the images must be labeled. In JavaScript, these images are considered unique objects, but they don't truly exist unless they have unique names. The filename of the image doesn't count—that's just a property.
Think of it like this: Your hair color is simply one of your many characteristics. But hollering across a room, "Hey! Brown-haired person!" is a little rude. "Hey! Robert!", while possibly rude in some situations, is a much better way of getting my attention.
Select each image in the current document, and enter the following names I've chosen for them (somewhat arbitrarily) in the Name field of the Property Inspector (which, for some reason, has never been properly labeled itself in any version of Dreamweaver), as shown in the next image:
spacer.gif: swapped
red-tn.gif: redThumb
green-tn.gif: greenThumb
blue-tn.gif: blueThumb
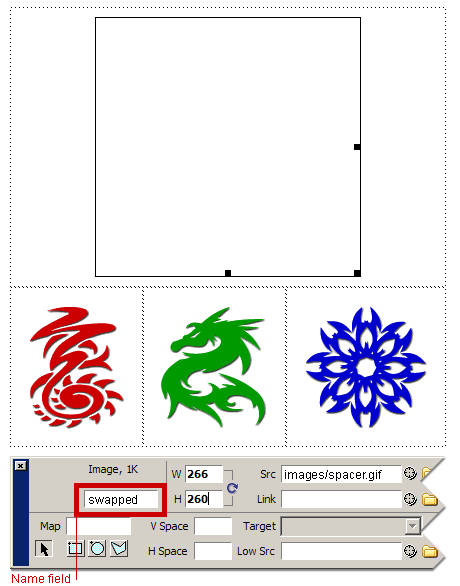
Name field
Attaching the Swap Image Behaviors
Now let's attach the Swap Image and Swap Image Restore behaviors to each of the three thumbnail images. When each thumbnail is moused over, the larger version of the image will replace the spacer GIF, and the spacer GIF will return to the screen when the mouse moves off the thumbnails. So, without further ado, here are your next steps:
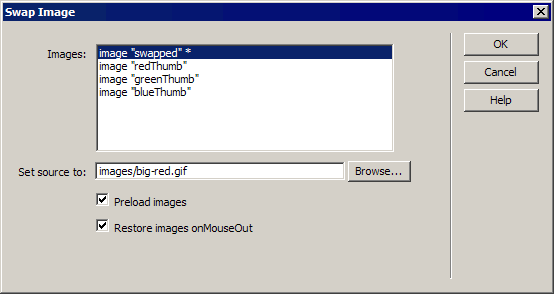
Swap Image dialog box
Notice that this dialog box has two check boxes: one for preloading images and another for restoring images onMouseOut. They're selected by default and guarantee that A) the image objects are already in the browser's memory buffer once the page has loaded, and B) that the Swap image Restore behavior is attached automatically, so we don't have to go do it ourselves.
If the images aren't all in memory when the page loads, when the mouseover occurs, the browser will start to download the image (instead of having already done it beforehand). And that can cause a visual glitch while the user waits for the image. Let's finish attaching our behaviors:
That's enough of behaviors for the moment.
We'll play around with these some more in the lesson assignment. Let's hop over to Chapter 5 and wrap up.
Chapter 5:
Summary
Today's lesson was all about Dreamweaver's predefined JavaScript features, called behaviors. First, we learned how the Behaviors panel functions. Then, we experimented with attaching behaviors to page elements, building two behaviors in the process: the Open Browser Window and Swap Image (Swap Image Restore) behaviors.
Coming
up in Lesson 10, we'll examine user forms. We'll learn about their
component parts, what makes a form tick, and how best to lay them out.
See you there!
Supplementary Material
|
Using a Behavior in Dreamweaver to Launch a New Browser Window in a Specified Size http://www.digitalfamily.com/dreamweaver/advanced-tutorials/behaviors-new-browser.html |
| Learn how to use behaviors in Dreamweaver to create many interactive features, like opening a small browser window when someone clicks an image. This is a great way to make supplemental information available without closing the page a visitor is already viewing. |
|
Spry Collapsing Panel http://www.layersmagazine.com/dreamweaver-spry-collapsing-panel.html |
| Dreamweaver's Spry Framework presents another type of JavaScript interaction. Here's a little taste. |
|
Enhancing Dreamweaver With New Extensions http://www.layersmagazine.com/enhancing-dreamweaver-with-new-extensions.html |
| You can find extensions that do everything from add Flash buttons to fly-out menus to full-featured shopping cart systems. As you consider the many extensions available, remember many of them are great, but they don't all enjoy the same quality control as Dreamweaver. When you visit the Dreamweaver Exchange site, you'll find reviews and rankings to help you sort through the best options. Do keep in mind that not all of the extensions out there are well supported. They're not all free either. |
FAQs
Q:
When we create things like navigation bars and jump menus that have
JavaScript in them using Dreamweaver's Insert bar, are behaviors
involved?
A: Yes. Any predefined JavaScript-based effect uses Dreamweaver behaviors.
Assignment
Time to put some of these behaviors to work in our site.
We're going to use the Side Bar area of the layout, but I think I've changed
my mind about a thing or two. At the moment, we have an editable region
in the sidebar area, which means any content we placed there in one
file would need to be duplicated manually from page to page. In other
words, if we place a bunch of subnavigation in there (which is exactly
what I propose we do), then we will have to enter that subnavigation
ourselves in every page.
Personally, I don't feel like doing
that. Do you? After all, our main navigation is part of the template.
Shouldn't our subnavigation be too? I think so.
So, go to the Assets panel and navigate to the templates section. Then, double-click the base template file there to open it in the Document window.
Next, look at that Side Bar editable region. Just click on its labeled tab to
select it, and then, press your DELETE key to remove it from the
template.
Now, let's put our first link in that spot. Place your cursor there, and type the words Our Instructor.
Then, select those words, go down to the Property Inspector, format the terms as a paragraph, and then, type a pound sign (#) into the Link: field to create a null link.
Now, taking the new skills you've learned, I want you to create a pop-up
window for the instructor.html file we created in the last lesson. If
you need to, don't hesitate to review the lesson materials before you
start.
Select the anchor tag (<a>) for the link using the Tag Selector, and attach the Open Browser Window behavior to the link, setting the window dimensions to 400 x 300 pixels.
If you run into any unexpected trouble, hop over to the Discussion Area, and let me know.