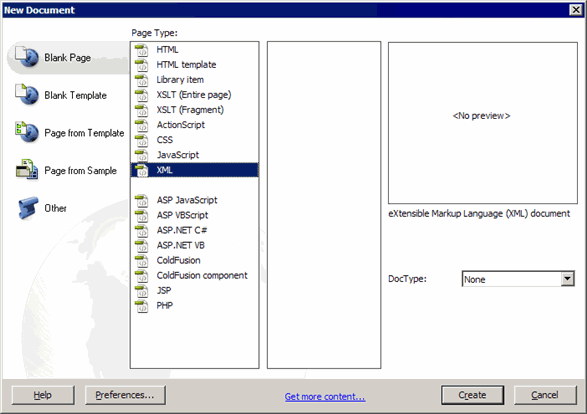
The New Document dialog box
Intermediate Dreamweaver CS3: Lesson 11
Chapter 1: Introduction
In this lesson, we'll delve into the brave new world of XML! Okay, XML isn't all that brave or all that new, but I'll wager that XML is new to you. The first question we must answer is this: What is XML?
That one isn't too hard. XML stands for Extensible Markup Language. As you can see, the XML acronym shares two letters with HTML—the markup language part. But, this can be a little misleading. If I were new to XML, heard it was a markup language, and understood the basics of HTML already, I'd simply assume this XML was another flavor of markup language that may have some things in common with HTML. Well, I'd only be about half right.
As we've discussed previously, HTML is made up of a series of predefined tags. These tags are written in plain text and consist of letters and abbreviations grouped between greater-than and less-than brackets. For example, the HTML tag used to mark up the beginning of a paragraph is written <p>. To signify where a paragraph ends, we use the same tag, but we include a forward slash, like so: </p>.
Well, XML is quite similar. Just like HTML, XML is tag-based and written in plain text. But, there's a hitch. There are no predefined tags in XML. You make them up as you go!
Okay, maybe that's a bit cavalier. Much thought and effort is put into creating XML tags, but the fact remains: The author creates the tags and their usage. So, to be technically succinct, XML is not a language per se. It is a metalanguage. In other words, it is a specification (or set of rules) for defining new and unique tag-based languages.
Instead of thinking of XML as a language, think of it like this: You have a bunch of information (data), that exists in text form (words and numbers), and you need a way to organize it logically for later use in a computer environment. You could easily use a spreadsheet program, like Excel. Or, maybe a database program, like Access. But those are both proprietary programs that require everybody who needs to work with the data to have that software on hand.
XML is simply a method that lets you organize your data in text form, without proprietary software, into a tag-based medium. We simply need to come up with a logical tag scheme and wrap our information in those tags. Now, don't get me wrong. Creating a new tag-based language (using the rules of XML) is no simple feat. XML is potentially very complex and has a whole slew of features.
In fact, an entire course just like this one could be written about XML and just barely scratch the surface. I just want to open your eyes to XML and show you a few of the features Dreamweaver has for working with it. In this way, I hope to whet your appetite for more, spur your curiosity, and perhaps get you to do a little further study on your own.
With that said, let's get started in Chapter 2!
Chapter 2:
Writing XML
If you know HTML, then picking up the syntax of XML isn't too difficult. Of course, maybe you haven't tinkered with HTML beyond what we've discussed in class. That's okay. The little we've done in class is more than sufficient to get you started.
Remember our discussions of HTML lists when we were building our navigation bar? The tag structure for an unordered HTML list is virtually identical to the way we'd structure tags for an XML document.
As you'll recall, a simple unordered list would look something like this:
<ul>
  <li>Apples</li>
  <li>Oranges</li>
  <li>Bananas</li>
</ul>
In HTML, a list is called an element. So the unordered list element begins with the <ul> tag and ends with the </ul> tag. In between, we have <li> and </li> tags to mark up the individual list items.
The relationship between the <ul> and <li> tags is called a parent/child relationship. The parent element is the unordered list. The list items are its children. In XML, things are pretty much the same. We create parent elements that must have opening and closing tags, and they in turn may contain their own child elements.
So how do we go about creating our own XML tags? We'll need an example. I always think of personal address books, simply because I happen to keep one, and it fits the bill I described earlier—it's loaded with information (data) that exists in text form (words and numbers), and it's organized logically. Granted, mine is basically scribbled on the pages of a pocket-sized book that's sitting at the bottom of my book bag, buried under a bunch of stuff. So, let's imagine I need a way to organize it logically for later use in a computer environment, shall we?
Go ahead and open Dreamweaver. Then choose File > New from the menu. This will open the New Document dialog box, as shown here:

The New Document dialog box
Make sure the Blank Page option is selected on the far left, and then choose XML from the Page Type list. Now, all you have to do is click OK. A new, empty XML document opens in your Document window, as shown here:
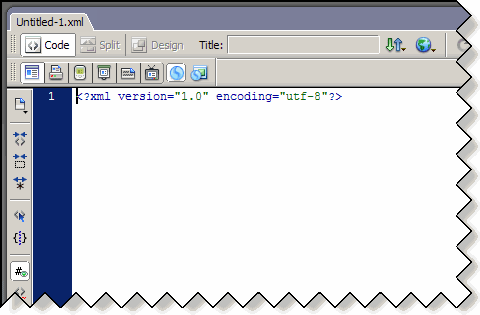
New XML document
Dreamweaver enters the first line of XML for you. This tag specifies the version of the XML language the document conforms to (in this case, version 1.0) and the type of character encoding. Computers don't, for lack of a better term, speak using words. They store text characters digitally.
The encoding takes numbers and maps them to the specific characters. In my example, the encoding is utf-8, or 8-bit Unicode, which is capable of encoding virtually every character used by humans in all their various writing systems.
 Tip: Tip: That
short description of character encoding barely scratches the surface of
the subject. If you want to learn more about character encoding, go to
Google and search for character encoding. You'll be surfing for hours! |
Back to the Address Book.
If we're going to create an XML document that corresponds to my address book, the first set of tags we need will have to describe what the document contains. And the tag name we come up with needs to be human-readable. In short, anyone should be able to open the file and easily figure out what the data signifies. So, let's continue creating our electronic address book with these steps:
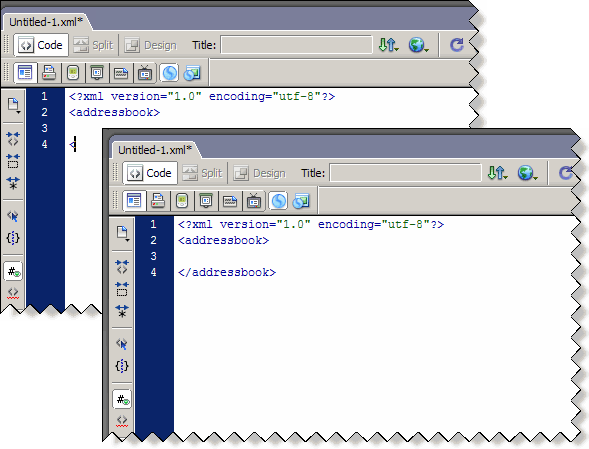
Enter the tag
Sometimes, I find that Dreamweaver flakes a little and doesn't finish my tags for me, even though that is the default behavior. I typically just have to minimize the window and then bring it back to wake Dreamweaver up. If you run into this and my solution doesn't work, don't panic. Just type the tag, and then check your Preferences (Edit > Preferences or Dreamweaver > Preferences ) and look under Code Hints when you get a spare moment.
Okay, you now have the parent tags in place. The rest of our child tags (the individual entries) will fall between them. Now we should save our file:
The next step in our example is to populate our address book XML file with entries:
My address book is pretty simple. I have a place for the person's name, street address, city, state, and ZIP code, and a place for a phone number. So we'll simply create tags for each of these elements, as follows:
<last_name>
<first_name>
<street>
<city>
<state>
<zip>
<phone>
To keep this example short and sweet, we'll only create two entries—one for you and one for me.
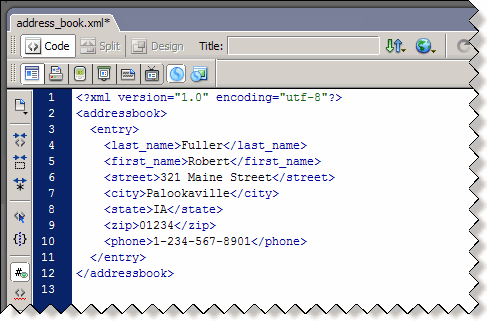
Code sample
Notice that my code is neat and indented. Is yours? If it isn't, there's a really simple way to clean it up. First, make sure your Coding toolbar is active. Choose View > Toolbars > Coding if it isn't. Then, simply select all your code, click the Format Source Code button at the very bottom, and choose Apply Source Formatting from the menu that appears, as shown here:
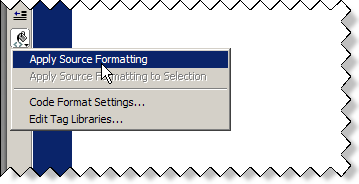
Apply Source Formatting
Now it's time to insert an entry for yourself. All you need to do is select your code from the opening <entry> tag to the closing </entry> tag, then copy and paste it below your first entry. Then you can go back and update the values with your own information, as shown here:
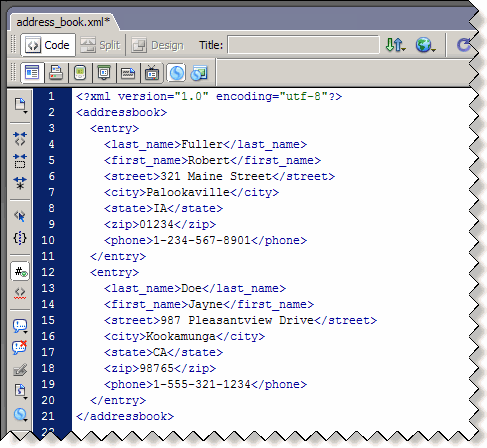
Your second entry
Granted, this example is very short-n-sweet. But do you realize what you have? You have the beginnings of a database! It isn't terribly complex, and it isn't interactive, but it is a database. It may not look like much, even if it had 100 entries in it, but the fact that it's written in XML means we can do a lot with it.
For example, we can use a style sheet language specifically designed for working with XML (called XSL, the Extensible Style Sheet Language) and build a Web page out of our XML address book.
And that is exactly what we're going to do in the next chapter, so let's go!
Chapter 3:
Introduction to
XSL and XSLT
XML documents contain only the tags you come up with to structure your data. That's XML's purpose—to structure data. What you do with that data after you've organized it is up to you. You can write a program to read and manipulate the data or write more data to the file. Nowhere in the XML specification is there even a hint of how the data is meant to be used or viewed.
Consequently, XML has no mechanism for display and formatting. That's actually the beauty of XML. It's a free, open, highly supported format that anyone can use to do just about anything. No big investment in proprietary systems involved.
Now, the creators of XML weren't entirely unconscious of how limiting not having a potential display and formatting solution could be. So, they also created a style sheet language for formatting XML called Extensible Stylesheet Language (XSL). Of course, you might assume that if there's a style sheet language involved, then the display mechanism must be a Web browser. Not necessarily.
XSL is not Web-specific. For example, you could use XSL in a program that spits out XML data to a printer or some other output device. But, this being a Dreamweaver class, we're interested in some kind of Web-related application for the data we've just been playing with.
Enter Extensible Stylesheet Language Transformations (XSLT). XSLT is a subset of XSL, specifically for outputting XML documents to a Web page. It's really quite cool, if you'll pardon my geekiness.
Without a lick of programming, and without even breaking a sweat, we're going to create an XSL document that pulls repeating data out of our XML file, formats it for us, and writes it into a Web page on the fly. Pretty nifty, if you ask me. Let's get started.
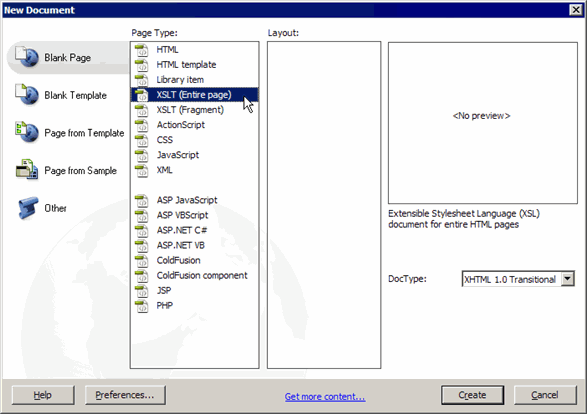
XSLT (Entire Page)
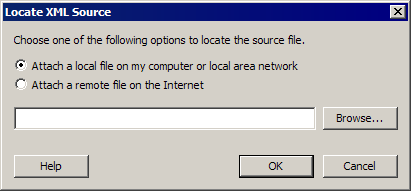
Locate XML Source dialog box
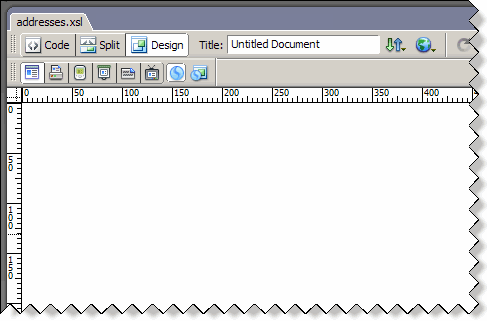
addresses.xsl
What you should notice is that this looks a lot like a regular HTML file, and in some ways, it is. There's both XSL and HTML code in there. If you hop over to Code view, you'll find a section of code down near the bottom that reads like this:
<xsl:template match="/">
<html xmlns="http://www.w3.org/1999/xhtml">
  <head>
  <meta http-equiv="Content-Type" content="text/html; charset=utf-8"/>
  <title>Untitled Document</title>
  </head>
  <body>
  </body>
  </html>
</xsl:template>
This section is the template the Web page will be based on. Don't confuse this with Dreamweaver's .dwt templates we've talked about. That's an entirely separate animal that just happens to use the same word.
At the moment, it's basically an empty Web page, and that's what we see in the Document window's Design view. What we insert there will be written into this template section as a combination of HTML and XML code (XSL code is, itself, written in XML).
Let's think about what we want this page to look like when we're done. I'm thinking each entry should look something like this:
Last name, First name
Street address
City, State, and ZIP code
Phone number
Next, we have to get our XML elements into this XSL file in just that order, with a few little flourishes here and there. Most of what we're going to do is drag-n-drop work. And, we'll include a wee bit of static text for presentation purposes.
Take a look at your Panel Groups. You may have noticed that when you have the .xsl file active in the Document window, the Bindings panel becomes active too, shown next. If it isn't, just choose Window > Bindings from the menu.
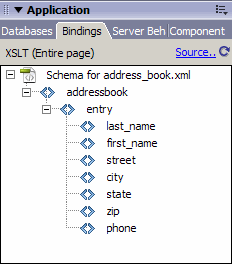
Bindings panel
This panel shows us the various elements in our XML file that we can now create XSL formatting for. We're going to enter some HTML content into our XSL file, and then we'll drag these elements into the document. When displayed, the XSL file will know to look to the XML file, pull in the data we've requested, and then format it as we've specified. So, let's pick up where we left off:
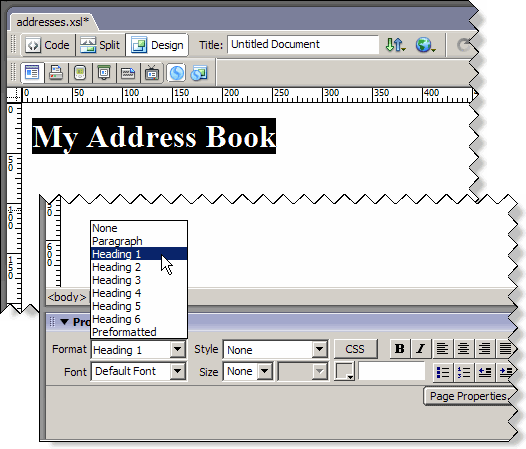
My Address Book
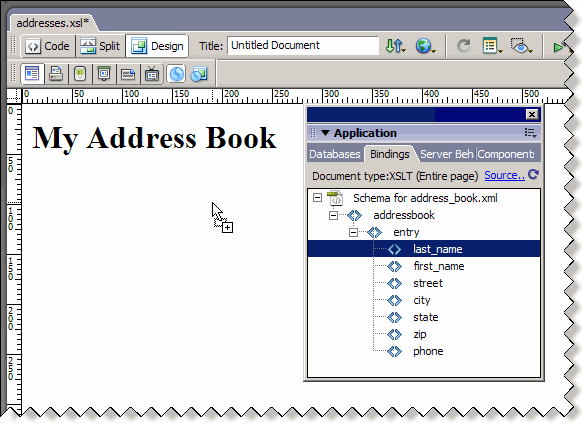
Drag the element
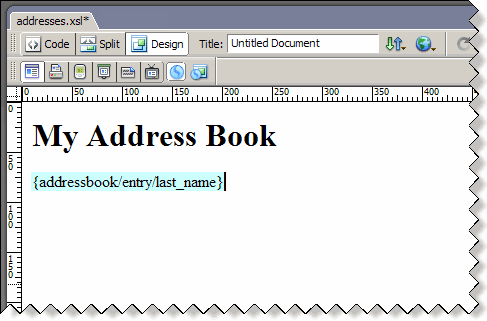
Element in position
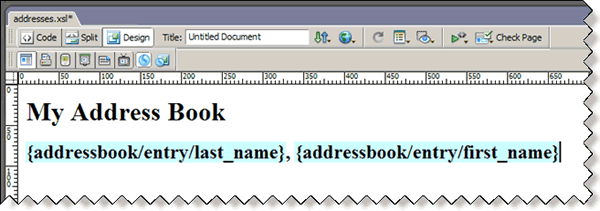
Completed Heading 2
When you're done, your page should look like this:
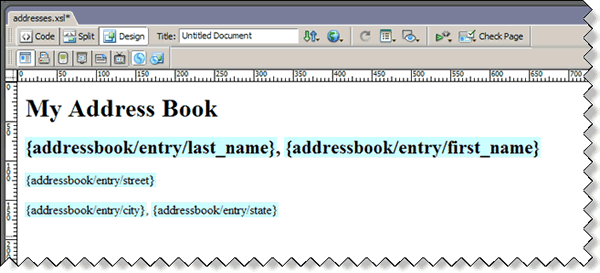
Page so far
The next bit requires a little trickery. You'd think you could just tap your SPACEBAR and then drag the <zip> element onto the page, but that wouldn't quite do it. That space would be ignored, and the ZIP code would run into the state abbreviation, and we don't want that. So, we have to insert a non-breaking space character to force the two bindings apart:
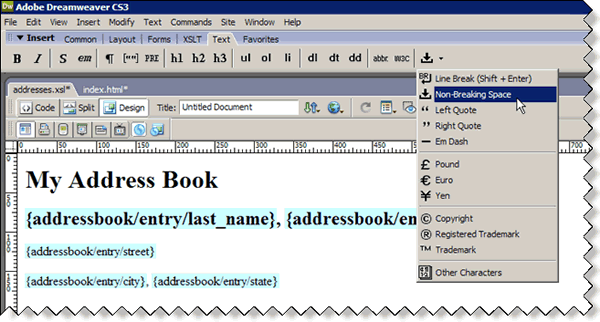
Non-breaking space
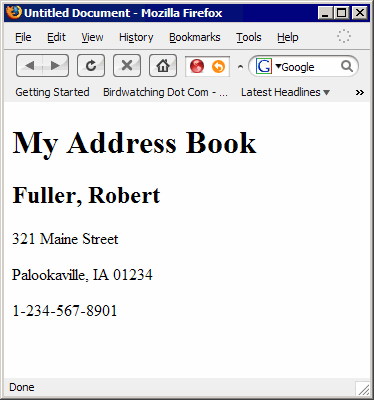
Page so far
Well, this is all well and good. But it's got a number of shortcomings. For example, we're only seeing one of our entries. That's no good. We want all of our entries displayed. And, we don't want to have to repeat this whole process for every potential entry in our address book.
No problem. Enter the repeating region.
Let's hop over to Chapter 4 and find out more about it.
Chapter 4:
What's a Repeating Region?
A repeating region object allows us to display all the repeating elements that exist in our XML file. For example, we potentially have an unlimited number of <entry> elements in our XML file (our little example only has two, but you get the idea). We want to select the bindings that correspond to repeated elements and convert them into a repeating region.
Dreamweaver will wrap them in a gray outline with a tab on it, identifying the content inside the outline as belonging to a repeated region. When we preview the page, the browser will display all the repeating elements in our XML file using the formatting we've already specified.
Let's get to it:
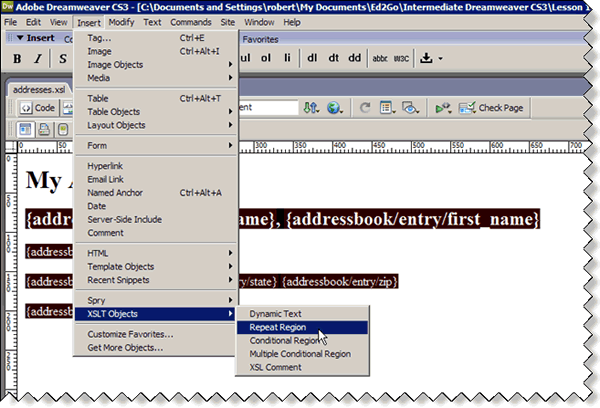
Insert repeating region
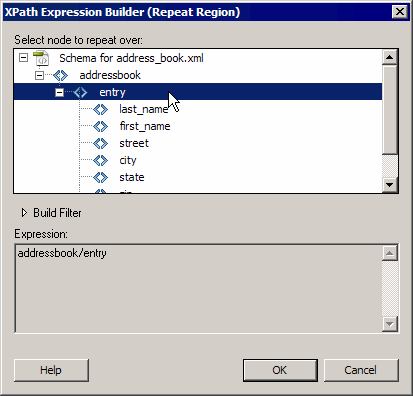
XPath Expression Builder dialog box
In the XSL code, this creates something called an XPath expression that essentially says, "For each of these elements you find in the XML file, please format as outlined here." As previously mentioned, the tabbed outline now surrounds our repeating region, with the xsl:for-each statement in place.
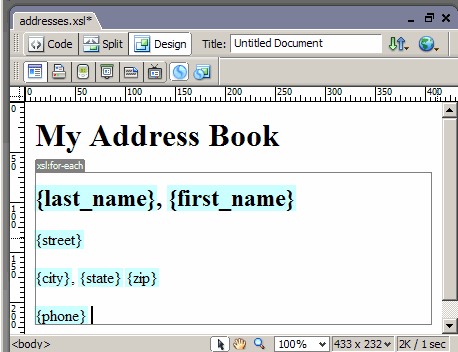
Our repeating region
If you preview the document now, all your entries will be displayed, as shown here:
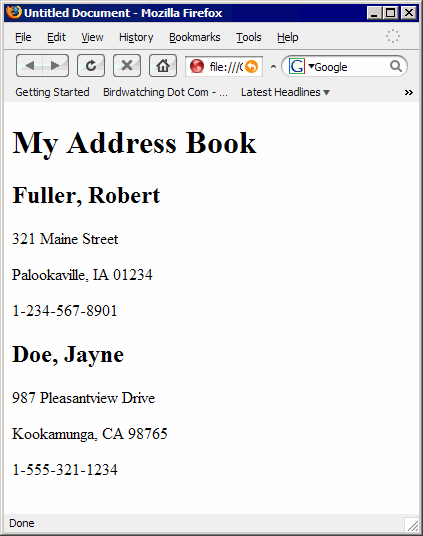
All entries in place
I don't know about you, but I think we could take this at least one step further. I think the spacing is kinda off, and I'm not too hip on the default Times New Roman font. Time for a little CSS.
Combining CSS and XSL
You'll recall that, a moment ago, I said that this XSL document has a little template region that tells the browser what HTML to use to format the XML elements. Well, we can use any and every feature of HTML, CSS, and others (in short, anything Dreamweaver can do for us) in this document. So, why not gussy this page up a little more with some CSS?
We've got a Heading 1, some Headings 2's, and a bunch of paragraphs in there we can assign a CSS style sheet to, so that's exactly what I propose we do. Now, I'm not going to tell you how to lay it all out. I'll only give you one suggestion. The rest is up to you. We could create an entire external style sheet for this file, but since it's so small, let's stick with an embedded style sheet for convenience's sake.
So, go over to your CSS Styles panel (Window > CSS Styles, if it isn't already visible). Click the New CSS Rule button, as shown below, and then in the resulting dialog box, create a style for your <h1> tag, and define it in this document:
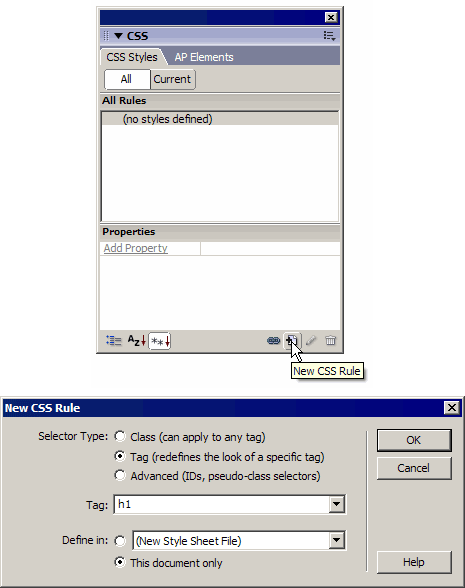
Creating a new style
Now you have the ball rolling. Feel free to experiment. Once you're done there, create a style for the <h2> tag. Then finish up with a style for the <p> tag. Here's the style sheet I came up with:
h1 {
font-family: Tahoma, Arial, sans-serif;
font-size: 100%;
font-weight: bold;
}
h2 {
font-family: Tahoma, Arial, sans-serif;
font-size: 75%;
font-weight: bold;
margin: 0px;
}
p {
font-family: Tahoma, Arial, sans-serif;
font-size: 75%;
margin-top: 0px;
margin-right: 0px;
margin-bottom: 0px;
margin-left: 25px;
}
My finished page looks like this:
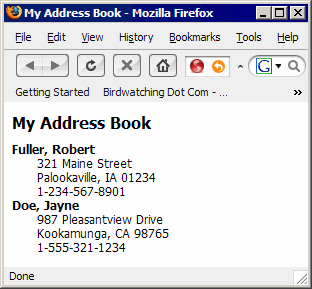
My finished page
Well, that's it for our introduction to XML.
Let's move on to Chapter 5 and wrap up.
Chapter 5:
Summary
Today, we got our feet wet with XML. We learned that the XML is a metalanguage—a specification for creating tag-based languages. We then took a common, everyday item like an address book and saw how to convert it into an XML file. We discovered that XML has no specific mechanism for display and formatting, which redirected our focus to something that does—XSL. We saw how to create an XSL file, bind our XML data to it, and format that data for delivery by a Web browser.
Well,
there's one final lesson left. In Lesson 12, we're going to talk about
design theory so that you can take all your newfound Dreamweaver skills
and logically apply them to everyday design problems.
Supplementary Material
|
The XML Home Page http://www.w3.org/XML/ |
| Extensible Markup Language (XML) is a simple, very flexible text format derived from SGML (ISO 8879). Originally designed to meet the challenges of large-scale electronic publishing, XML is also playing an increasingly important role in the exchange of a wide variety of data on the Web and elsewhere. Here, you'll find everything you need to know about XML. |
|
XML at Wikipedia http://en.wikipedia.org/wiki/XML |
| Learn about the history of XML and what it does. |
|
The XML FAQ http://xml.silmaril.ie/ |
| This is a list of frequently asked questions about the Extensible Markup Language (XML). |
FAQs
Q: Aren't XML and HTML basically the same thing?
A: Nope. XML is a metalanguage, which means it isn't a language in its own right. Instead, it's a specification for how to create markup languages. When you create a new, unique markup language using the XML specification, it's called creating an XML application. In fact, the newest version of HTML—XHTML, or the Extensible Hypertext Markup Language—was written in XML. Thus, it is an XML application.
Assignment
In this assignment, I want you to create your own little flat file database and do just what we did in the lesson—create an XML file and then output it to a browser with an XSLT document, including CSS styling.
What to use for a database, though? We're all individuals with our own sense of style, wit, and wisdom. So, do this:
So,
there you have it: 10 songs, who recorded them, and what years they
came out. Now, create an XML file to organize this data. Then, using
the techniques we learned in class, set up the XSLT document and style
the elements with CSS.
As always, review the lesson material carefully before you begin. If you run into any trouble, visit me in the Discussion Area. Good luck!