| Click Here and take a look at the Recipe Center Web site that we're going to build! |
Lesson 01 - What Is PHP?
Chapter 1:
Introduction
Hello, and welcome to Introduction to PHP and MySQL! My name is Rich Blum, and I'll be your instructor for this course. Before I talk about all the exciting stuff we'll be doing, let me tell you a little about myself.
Since 1988, I've been a network and server-support person at a large (3,500+ user) organization. For almost two decades, I've worked with Windows- and Linux-based network servers and desktop computers. To help manage the chaos, I created my own network-monitoring applications, using Java and the MySQL database on a Linux server. To make it easy to extract real-time data from the database, I created a Web-based, interactive reporting system. And to give the system fancy Web interfaces, I used PHP.
I chose PHP because it provides an easy way to create Web pages that can change based on changing data that's stored in a database. PHP is easy to incorporate in standard Web pages, and it's relatively easy to set up a Web server that supports PHP.
Course Overview
Now let's talk about this course. The purpose of this course is to help you get comfortable using the PHP programming language in your Web environment. Hopefully, you already know HTML and have been using it to create Web pages. Over the next six weeks, you're going to build upon your HTML skills and add another powerful tool to your Web programming toolbox. Together, we'll develop a fully functioning Web application using PHP. We'll create PHP programs that can interactively query a database to add dynamic data to your Web page.
What we'll build is a Recipe Center Web site—a dynamic site where visitors can view and search for recipes. Registered users will even be able to log in and add favorite recipes of their own. All submitted recipes and e-mail addresses will be collected in a database and, once you approve them, get displayed live on the site.
Click Here and take a look at the Recipe Center Web site that we're going to build!
Now, here's the important part: By the end of the course, through creating the Recipe Center, you'll have produced an entire interactive content management system that you can modify and use for your own applications! So, even if your idea of a great recipe is a map to the nearest drive-through, by building this application, you'll give yourself a huge gift.
Of course, before we can dig into PHP programming, you need to know what PHP is all about. So that's where we'll start today. This will get us ready to begin designing the previously mentioned content management system, which we'll start working on in the next lesson.
During our time together, we'll walk through all the steps necessary to incorporate PHP code into regular HTML. Naturally, we'll delve into how you code PHP to access data stored in a database. We'll use the popular Open Source MySQL database to store dynamic Web content for the PHP application to access. We'll cover exactly how to design a database environment for the Web application and how to create the necessary database elements to implement it.
We'll go through each individual step in detail, ensuring that you don't miss any steps along the way. In every lesson, you'll see all the PHP code you need for inserting new data, retrieving data, and displaying data for each element of the application we create.
At the end of this course, we'll discuss some of the basic administrative functions required to keep your Web application running smoothly. After all, there's more to Web application administration than just putting code online and waiting for customers! So, we'll talk about creating reports from stored data to make sure your database and Web servers are running well, and you'll find out how to monitor for suspicious activity on your server.
Back to Today
Let's get back to today's lesson. In this first lesson, we'll focus on why you'd want to use PHP and how you can use it to dynamically change content on a Web page. Then we'll set up a Web server on your computer. And finally, we'll start exploring the Recipe Center Web application project that we'll work on throughout this course.
All right, let's move on to Chapter 2 and explore why PHP has become so popular and how it can help you.
Chapter 2:
Why Do We Need PHP?
With literally millions of Web sites on the Internet and more springing up every day, it's getting harder and harder to attract and impress online visitors. Having outdated information on your Web page will not only frustrate them, it might even damage your company or organization. To avoid this, your Web presence must be dynamic; that is, it must constantly change.
This is where PHP can help. Understanding the purpose of PHP requires an understanding of the two different types of Web pages you can create: static and dynamic. Let's take a look at the differences between the two.
Static Web Pages
Static Web pages contain information that doesn't change until the Web designer or programmer manually changes it. In the early days of the Internet (the '90s), simply jumping on the Internet bandwagon was important for corporations. It wasn't so important what you posted on the Web as long as you had an Internet presence where customers could get basic information about your company and products. Static Web pages, consisting solely of HTML (Hypertext Markup Language), easily accomplished this function.
But one of their big limitations is how much effort it takes to update them. Changing a single element in a static Web page requires rebuilding and reloading the entire page (or sometimes even a group of Web pages). This is way too cumbersome a process for an organization that frequently needs to post real-time information, such as events, awards, or closings. Also, during this process, a developer can accidentally change other items on the page, seriously affecting the validity of all the data.
And so we enter the world of . . .
Dynamic Web Pages
Dynamic Web pages allow you to easily change your content in real time without even touching the coding of the page. That's right: Without manually making any changes to the page itself, the information on the page can change. This means you can keep the content on the page fresh so that what a visitor sees there now may be updated or replaced in a day, an hour, or a minute. The core layout of the Web page can remain the same (such as where the logo, links, and so forth display), but the data presented constantly changes. Pretty exciting, isn't it?
To successfully create a dynamic Web page, you have to know a method for automatically inserting real-time data into the HTML code that gets sent to the client browser. And that's why we're here! The key to all this is . . .
Web Scripting Languages
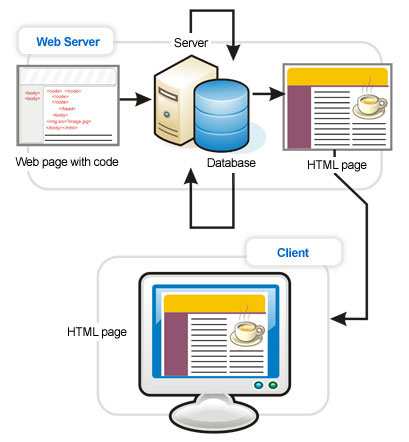
Remember that the client browser only displays what the Web server sends it. And for a dynamic Web page to change what it sends to visitors in real time, the HTML coding must be able to automatically change. To accomplish this, developers embed programming code using a scripting language within the HTML code. As the embedded program runs, it automatically changes the content (or layout) of the Web page without any intervention from the Web designer. The image below demonstrates this process.
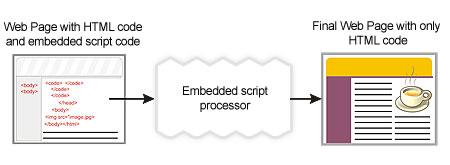
Programming code embedded in a Web page
The embedded program code generates standard HTML code that the client browser interprets. Now, since there is programming code embedded in the dynamic Web page, something somewhere must run the code to produce the HTML for the new content. In fact, there are two places where the embedded programming code can run:
The most popular client-side scripting language is JavaScript. JavaScript is code that's embedded in an HTML Web page and runs within the client browser. It can utilize features of the browser—or even the PC itself—that are not normally accessible from standard HTML code. A common use for JavaScript code is to produce pop-up messages and dialog boxes that interact with the viewer. These are elements that HTML code can't generate. The next image demonstrates how a Web page embeds JavaScript and sends it to the client.
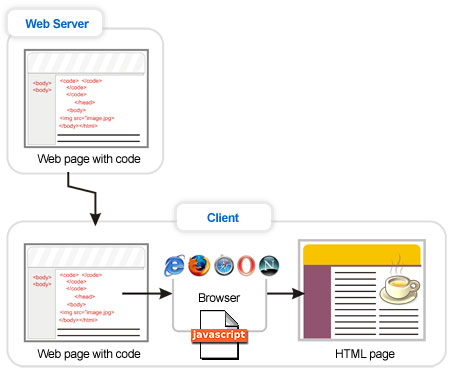
Running client-side programs
The downside of client-side scripting languages is that you're at the mercy of the implementation of the client's Web browser. While the HTML language is standard, Web scripting languages aren't. So it's not uncommon to run across a Web page that works just fine for one type of browser, but not at all in another type.
Server-side scripting languages solve this problem. In server-side scripting, the Web server interprets the embedded programming code before sending the Web page to the client's browser. The server then takes the HTML that the programming code generates and inserts it directly into the Web page being sent. The server does all of the work running the scripting code, so you are guaranteed that every Web page will run properly. Here's an illustration of this process.
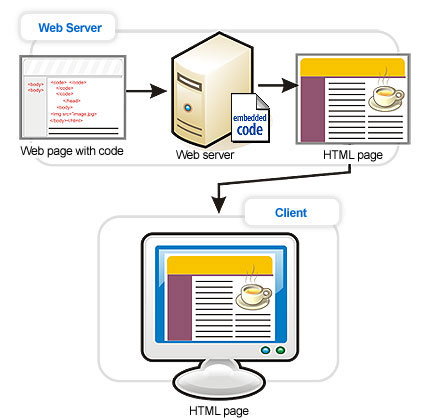
Running server-side programs
There are lots of server-side scripting languages available. The Microsoft server platform offers the proprietary ASP and ASP.NET languages. Unix and Linux platforms have competing scripting languages, such as Perl, Python, and, of course, PHP. You can use any of these to incorporate dynamic content on a Web page. But we're going to focus on PHP.
PHP provides a platform for writing a wide range of scripts, from simple single-line scripts to entire object-oriented programs. You can start out writing simple PHP scripts and, as time goes on, easily expand them into complete object-oriented applications.
PHP also has the benefit of being Open Source software. The Open Source project (in case you're unfamiliar with it) was started by a group of college student programmers who just wanted to share their work with others. Over the years, programmers from around the world have collaborated via the Internet to create numerous excellent Open Source software applications.
Open Source software is freely available for you to download, install, and even modify for your own use (as long as you share your modifications with the rest of the Open Source community). It's taken the Unix and Linux worlds by storm, and it's now starting to make rapid headway in the Windows world, too.
Next, we'll take a look at what you'll need to use PHP in your Web applications.
Chapter 3:
Hosting PHP Web Pages
>You may be familiar with the process of finding a host for a Web site. Much like hosting a normal HTML Web site, there are two methods you can use for hosting a site that uses PHP. You can find a commercial Internet Service Provider that supports PHP Web pages, or you can set up your own Web server.
When you look for a host for a site that uses PHP, you have to find one that provides these three elements:
But for this course, rather than trying to find a provider to be your host, you're going to set up a Web server locally, on your own computer. But don't rush out and buy anything. Thanks to the increasing popularity of PHP, there are a few choices for hosting your own PHP Web server at no cost.
The Open Source movement has embraced the PHP programming language for Web page development, and it has created an environment specifically suited for hosting PHP Web pages—AMP.
AMP is an acronym that stands for the elements used to create the server:
The Apache Web server is the most popular Web server platform in use on the Internet. It provides plug-in modules to support lots of features, including PHP embedded scripting. It can run on virtually any operating system platform, including Microsoft Windows workstations and servers.
The MySQL database server is an extremely popular database platform. While it lacks some of the more advanced features of commercial database products, it makes up for it in ease of use and quickness. Many commercial Internet sites use MySQL as the back-end database to support functions such as online shopping and content management.
In the early days of PHP, you had to install and configure each of these elements yourself. But you can now find AMP packages for many different operating systems. For the Microsoft Windows environment, the complete package is called WAMP (yes, the W stands for Windows). If you prefer to use the Open Source Linux operating system, the package is called LAMP (you guessed it, L for Linux).
For this course, I recommend using the prepackaged WAMP server called WAMP64. The WAMP64 server provides the full Apache and MySQL servers in a single Windows installation package, along with all of the libraries to fully support using the PHP programming language in your Web pages.
Since the WAMP64 package is Open Source software, you can freely download and install it. It is preconfigured to provide an easy way to get up and running in a WAMP environment. The WAMP64 installation even allows remote devices to connect to your Web server, providing a complete Web page hosting environment.
Installing WAMP64
Installing the WAMP64 package is a fairly easy process. Here are the steps you'll need to take to get your WAMP64 server up and running:
From the main Web page, click the Downloads link on the left of the page. The Downloads page contains information about the latest version of WAMP64, as well as a link to download the installation file.
The WAMP64 Download Web page
The WAMP64 installation file comes as a self-extracting EXE file. The file is a little over 15 MB, so if you have a dial-up Internet connection, it could take a while to download it.
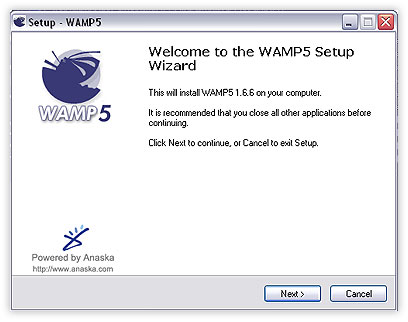
The WAMP64 Setup Wizard
For simplicity, WAMP64 places all of the server software (Apache, MySQL, and PHP libraries) in a common directory. You can specify where to place the Apache server document root (the location where your PHP and HTML Web page files reside). This is the location the server makes available to remote Web clients. If you don't have any experience running a Web server, don't worry; WAMP64 kindly selects default values for everything for you. For this course, the defaults will work just fine.
If you prefer to only run the servers when you want, don't select the autostart feature. WAMP64 provides an easy startup icon in the normal Programs menu to make manually starting the servers a snap.
Unblocking the Apache Web Server TCP Port in Your Firewall
When you select for the WAMP64 servers to start, you may get a message from your Windows Firewall, as shown.
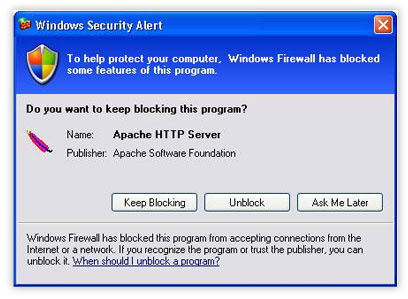
Windows Firewall query
By default, the Windows Firewall blocks all access to all network ports on your system. To be able to connect to the Apache Web server, you'll need to unblock the application. Click the Unblock button in the message box to permanently allow connections to your Apache Web server. If you're running a third-party firewall software package, such as Symantec Firewall, you'll need to unblock the Apache application port (TCP port 80) manually. Various firewall applications work differently, so please consult your firewall documentation to unblock the Apache Web server port.
This server control provides a single location to control the WAMP64 servers. It allows you to stop and restart the Apache and MySQL database servers, as well as easily access configuration files and administration Web pages.
The server control also gives you a quick graphical indication of the WAMP64 server status. When both the Apache and MySQL servers are running, the control meter is white. When only one of these servers is running, the control meter is yellow. When neither server is running, the control meter is red.
Running your own Web server system has never been easier. You now have everything you need to start creating a Web application.
So let's move on to Chapter 4, where we'll explore the project we're going to be working on together.
Chapter 4:
Why Build a Content
Management System?
Back in the old days (a few years ago), organizations didn't really pay much attention to their old Web pages. As designers created new pages, the old ones were just deleted. As a result, it was often difficult to track what content had been on a Web site a year ago, last month, or sometimes even last week.
When Web developers changed the content of a Web page, the old information was often lost. And so trying to present an organized image on the Internet was challenging. Some organizations tried using standard file archiving systems to maintain older versions of Web pages, but that often became complicated and confusing.
This is where management comes in. Content management focuses on how information presented on a Web site is controlled and managed. Because the information offered on Web pages is getting ever more complicated, content management systems are becoming increasingly popular. And this is why we'll spend this course learning how to implement all the elements required for a Web page content management system.
The most important component in a content management system is a back-end database. The Web server needs data to produce dynamic Web pages (or at least the Web page content). The easiest place to store this data is in a database that's accessible to the Web server. The PHP code in a dynamic Web page extracts the content directly from the database to send to clients. As the Web page designers place new content in the database to display on the Web page, the old content remains, it's just not shown on the main page.
Storing Web page content in a back-end database
To understand how this works, think of a news Web site. Reporters write news articles and place them in a database as the news happens. Web designers create dynamic Web pages to display the latest news articles and rotate off older articles (but keep them in the database). Users looking for stories on a particular topic can search not only the articles currently displayed on the Web site but the entire database of articles.
Notice that there is an advantage to this system. After Web designers create the content management system, they don't have to be involved in the day-to-day updating of content. The designers can grant reporters access to the database to insert new articles.
The dynamic Web pages extract the new articles and display them on the Web page without the designers having to do any additional work. This allows the Web designers to spend their time working on the next new overhaul of the main Web page instead of worrying about day-to-day content posting.
The project we're going to work on in this course functions exactly the same way. So let's look at it now.
The Recipe Center Project
As you saw in Chapter 1, the project we'll be working on is a recipe center. It's an interactive content management system that allows registered users to post their favorite recipes on a dynamic Web site. The Web pages it contains will use plain PHP and HTML code, so you can create the application using an ordinary text editor (such as Notepad).
Let's run through the various elements of this project now.
The Recipe Center main Web page
The main Web page consists of several different sections, which are often called divisions. The top division shows a simple header that is common to all the Web pages in the application. You'll learn how to create headers and footers you can easily incorporate in all your Web pages.

Simple header
 The
left side of the main Web page contains a basic navigation area that
allows visitors to easily navigate between the different parts of the
application. With dynamic Web pages, it's often easy to get lost in a
myriad of Web pages. So having a consistent navigation area is a must.
The
left side of the main Web page contains a basic navigation area that
allows visitors to easily navigate between the different parts of the
application. With dynamic Web pages, it's often easy to get lost in a
myriad of Web pages. So having a consistent navigation area is a must.
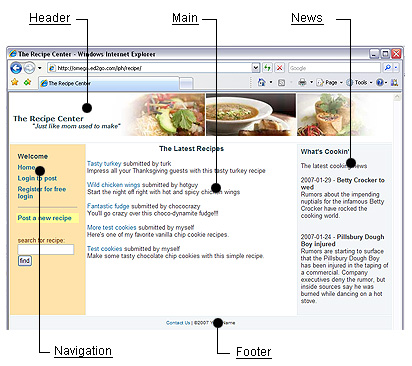
 The
right side of the main Web page posts current news items important for
visitors, such as expected system maintenance downtimes or industry
news items. The administrator (you) can add news items that are
automatically displayed or can delegate that function to others.
The
right side of the main Web page posts current news items important for
visitors, such as expected system maintenance downtimes or industry
news items. The administrator (you) can add news items that are
automatically displayed or can delegate that function to others.
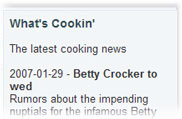
Center area
The center area of the main Web page is dynamic and displays links to the latest recipes posted by registered users. It only displays the last 10 posted recipes. The application maintains older recipes in the database but doesn't display them. Visitors can use the Search feature in the navigation area to search the database for any recipe that users post. When a visitor requests a search, the server returns a Search Results page, as shown below.

The Recipe Search
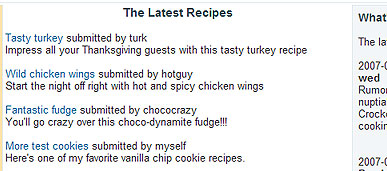
Many interactive Web sites let customers leave comments that the server then displays on the site. The Recipe Center includes this feature. When registered users view a recipe, they can post comments about the recipe. The server then displays the comments along with the recipe.
Displaying a recipe and its comments
The beauty of the Recipe Center is that you can control how users register. The application uses a simple registration page to gather information from the visitor.
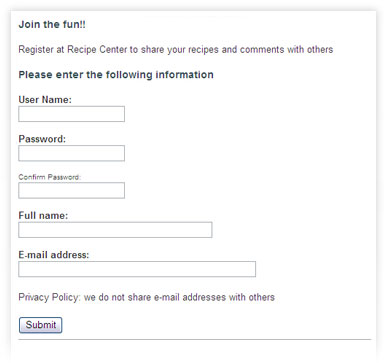
The user registration
You can either allow anyone to fill out a registration form and be accepted, or you can institute a control policy where the administrator must approve a user registration before it's accepted. The application uses a login page to allow registered users to identify themselves. Once a user logs in, the application remembers that user account throughout the session. A registered user can post a new recipe by using the form shown below.
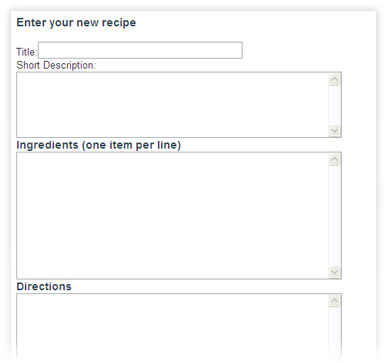
The recipe posting form
This Recipe Center Web application, which we'll build together, includes all the basic features of a dynamic content management system, powered by PHP.
By the end of this course, you'll be able to take what you've learned on this project and go out and create your own Web page masterpieces—impressing your customers, coworkers, and friends.
Chapter 5:
Summary
We covered a lot of ground today. I hope you now feel clear about what PHP is and what it can do for your Web site.
We discussed the differences between static and dynamic Web pages and how using static Web pages can be a problem when dealing with real-time data. Dynamic Web pages help solve this problem by using a scripting language embedded within the HTML code. The scripting language produces code that can change with each visit to the Web page.
We also covered the two types of Web page scripting languages. Client-side languages, like JavaScript, run on the client. The client Web browser downloads the program code along with the HTML code and then runs the program code.
Server-side languages, such as PHP, run on the server. The server interprets the embedded program code and then creates dynamic HTML code before sending the Web page to the client. Server-side scripting languages have the advantage of running on the server, which can maintain a consistent programming environment.
We also explored the elements required to host a PHP Web site. The Open Source AMP project provides an excellent environment for hosting PHP Web pages. You can use either a Windows environment (WAMP), or a Linux environment (LAMP). In this course, I'm going to give instructions assuming you're working in a Windows environment using the WAMP64 Windows package.
And finally, we talked about the course project. Content management systems are all the rage now, and knowing how to create one is a crucial skill for any Web designer. By working on the Recipe Center Web application, you'll learn PHP programming skills while interacting with a MySQL back-end database.
So are you ready to roll up your sleeves and start playing with code? I hope so, because in our next lesson, we'll delve into the basics of embedding PHP code in HTML.
In the meantime, I look forward to meeting you and answering your questions in this lesson's Discussion Area. Don't forget that you still have a few more things to do for this lesson.
| After
every lesson in this course, you can test your knowledge by taking a
short, multiple-choice quiz. To access your first quiz, click the word quizzes at the top or bottom of any page in this classroom. When the quiz form comes up, select Quiz 01, and then click the Submit button. Once you've taken the quiz, apply what you've learned by doing this lesson's assignment. While the assignments that accompany every lesson in this course are optional, they will reinforce and expand your learning. To access your first assignment, click assignments at the top or bottom of any page in the classroom. Then, scroll down to the section for Lesson 1.
Also, since learning something new usually raises questions, every lesson in this course comes with an FAQ section. You'll find the link that goes to this lesson's Frequently Asked Questions by clicking the resources link at the top or bottom of any page in this classroom. Within the resources link, you'll also find the course index, which many students prefer to print and use as a detailed table of contents. Also, you'll find book recommendations that I've found very helpful and would like to pass along to you. These aren't required, but they're excellent sources for further learning. | ||
Supplementary Material
|
The Apache Software Foundation http://www.apache.org |
| Learn more about the most popular Web hosting software on the Internet. |
|
MySQL AB::The world's most popular open source database http://www.mysql.com |
| The MySQL Web site provides a wealth of detailed information on how to configure, run, and fine-tune your back-end database server. |
|
PHP: Hypertext Preprocessor http://www.php.net |
| The PHP project Web site provides basic information on how to use PHP. |
|
Install PHP5 Apache MySQL on Windows: WAMP64 http://www.wampserver.com/en/ |
| The home Web page for WAMP64, this site provides advanced information if you want to customize your WAMP64 server environment beyond using the default values. |
FAQs
Q: Can I continue to use Microsoft FrontPage or Adobe Dreamweaver to develop my Web pages?
A: Yes. Both FrontPage and Dreamweaver allow you to embed scripting language code within your Web pages. We'll discuss how you embed PHP into HTML later in the course.
Q: Can I use my ISP to host my course project?
A: If your ISP supports PHP and MySQL, then yes, you can. Many ISPs support the LAMP environment for an extra fee. However, be careful that you don't mix your course project work with any live Web pages you are hosting.
Q: If I already have a Windows server with the IIS Web server running, can I still use WAMP64?
A: Yes, you have two choices available to you. One option is to configure the Apache server in WAMP64 to use a different TCP port than your IIS server (which should be running on TCP port 80). This will allow both servers to run at the same time. The other option is to manually download and install PHP and MySQL to run on your IIS server. This procedure is beyond the scope of this course, but there are tutorials available on the Internet describing how to do it.
Assignment
Today's
assignment is to drop by the Lesson 1 Discussion Area and introduce
yourself. Let us know a bit about your experiences with designing and
building Web sites, and tell us what you're hoping to do with PHP.
Also, if you haven't already set up a PHP hosting server on your local computer (as described in the lesson), please do so.