Storing data records within a table
Lesson 03 - Creating a MySQL Database
Chapter 1: Introduction
So far, we've covered why you should use PHP and MySQL for dynamic Web pages and the basics of how to program using PHP. I hope you were able to get your Lesson 2 assignment program functioning and are ready to start working with real data. In today's lesson, we'll discuss how to use MySQL to hold the data for the Recipe Center application.
First, we'll take a look at how MySQL organizes data and what we'll need to do to keep all the data in the Recipe Center organized. Then we'll build the actual MySQL database objects required to support the Recipe Center application.
We use the phpMyAdmin Web-based MySQL administration tool to create a new database, add tables, place data into the tables, and create a user account for the application to use.
Chapter 2:
Using a Database
Computers are all about storing information. However, unlike that junk drawer in your kitchen, you want to store your information in an orderly fashion. After all, you wouldn't want to mix up postings to your Recipe Center application with postings to your Fabio fan club application, would you?
The MySQL database server provides a user-friendly platform for you to organize your data, making it simple to identify which data belongs to which application and easy for the application to access the data (because, really, what good is data if the application can't get to it?).
MySQL provides three levels of data organization:
A database is the grouping of related data into a single container. The database is the largest level of grouping of data on the database server. The MySQL database server allows you to create multiple databases, all accessible from the same MySQL server service running on the computer.
To help keep things organized, it's a good idea to create a separate database for each application you're hosting on your Web server. This helps to separate data elements, and it eliminates accidents caused by accessing the wrong data from the wrong application.
Each database you create must have a unique name on the server. To help with the organization process, it's usually a good idea to somehow relate the database name to the name of the application. The MySQL server allows you to use up to 64 characters for a database name, so naming your databases shouldn't be too hard.
You can also use many special characters within a database name. The exceptions are forward and backward slashes, exclamation points, and asterisks. You may include spaces within a database name, but doing so can sometimes complicate things, so I wouldn't recommend it. You can start a database name with any allowable character, except a space.
The table is a subset of data within the database, which contains a grouping of similar data items. For example, say your company wants to track data on employees, customers, and products. In this case, instead of having just one group of mixed-up data elements, you would want to create three separate tables to hold the data:
Grouping similar data into its own table gives you more control over it. For example, if you need information about a specific customer, you know to go to the Customers table.
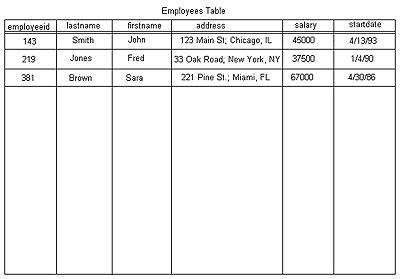
Finally, you use data fields to hold individual data elements within a table. For example, the Employees table might contain data fields for an employee's ID number, first name, last name, home address, salary, and employment start date. The data fields are the core of the application because they are where the application actually stores data.
The table groups data fields into records. Each record is a single occurrence of values for each of the data fields. Here's a diagram to help you understand this concept. In it, each employee is one record.
Storing data records within a table
The diagram shows the data fields as the table headings. Each record appears as a single line of data in the table (in this case, the information for a single employee). This representation pretty well summarizes how MySQL handles your data. MySQL stores each line of data (record) as a single entity within the table structure. Later on, you'll learn how to query the individual tables to extract the stored data elements.
In a MySQL database, you must define the individual data fields so that MySQL knows how to handle the data you'll be placing in them. Each data field has a name and a defined data type. A data type describes the type of data the data field will contain. MySQL has different methods for storing different types of data, such as numbers, dates, and names. This table describes some of the basic data types available in MySQL.
| MySQL Data Types | |
Data Type | Description |
| int | A whole number between -2147483648 and +2147483647 |
| float | A floating point number between -3.40283466E+38 and +3.40283466E+38 |
| bool | A Boolean true or false value |
| date | A day value displayed in YYYY-MM-DD format. |
| datetime | A day and time value displayed in YYYY-MM-DD HH:MM:SS format. |
| char(x) | A character string of x number of characters. |
| varchar(x) | A variable length string of x or less characters |
| text | A character string of up to 16,535 characters |
Data Field Characteristics
Besides the data field name and the actual data, a data field can be marked with special restrictions. MySQL uses these restrictions to control how you place data into a data field. The most popular restriction is a primary key.
A primary key defines the table data fields that uniquely identify each individual data record. To understand, imagine that you're retrieving data from the Employees table and you have two employees named John Smith. You'll run into a problem trying to get the correct data for the correct employee. So you need to add another data field to tell you which John Smith each record refers to.
To do this, you must create an employee ID data field and assign a unique ID number to each employee. Since the new employee ID data field uniquely identifies each employee record, you can specify it as the primary key for the Employees table. MySQL creates a separate hidden table relating the primary key values to record numbers, and then it uses that as an index to quickly retrieve query data based on the primary key value.
Another popular restriction you'll run across in MySQL is the Not Null restriction. If you set a data field with the Not Null restriction, MySQL prevents you from entering a record without a value in that data field. The MySQL server uses this restriction automatically for data fields that are specified as a primary key (you can't have an empty primary key data field). It is also handy for forcing an application user to enter a data value for a particular data field (such as forcing a home phone number in the Employees table).
The Recipe Center Database
Now let's look at the Recipe Center database. The Recipe Center application tracks four types of data:
Each of these different types of data will be stored in separate tables. Some content management system designers prefer to use a single table for all data elements, but that can get confusing. For this application, we'll keep things simple by keeping our data separate.
We'll create a recipes table to hold data related to the recipes customers post. Each recipe record will need to contain a unique recipe ID, the name of the recipe poster, a title for the recipe, a short description to display on the main page, a list of ingredients, and the directions on how to make the recipe.
The comments table will hold data related to the comments customers post about recipes. Each comment record will contain a unique comment ID, the name of the poster, the recipe ID the comment pertains to, and, of course, the comment text.
The news table will hold data related to the news articles posted in the news section of the Web page. These are items of interest that you can post, informing your customers of current events in the cooking world or even just notifying them of planned system downtime. Each news record will contain the date you post the item, a short title, and a brief text description of the news article.
Finally, the Recipe Center will track registered users within its own users table. Each user record will contain the unique text user ID (no two users can have the same ID), a password for the user account, the full name of the user, and an e-mail address where you can contact the user.
That sums up the data requirements for the Recipe Center database. Now it's time to start building our database!
Chapter 3:
Creating the Application Database
The WAMP64 server provides two methods for you to access the MySQL database server. You can start both methods from the WAMP64 menu by left-clicking the WAMP64 server control icon in the system tray. If you don't see the WAMP64 server control icon, then the services aren't running. Click Start > Programs > WampServer > start Wampserver to start the services.
The first method for accessing MySQL is the MySQL Console. This provides a simple command line interface to the MySQL server. You can enter SQL commands to create, modify, and delete database items, as well as query existing databases. Access this tool by left-clicking the WAMP64 system tray icon and selecting MySQL and then MySQL Console.
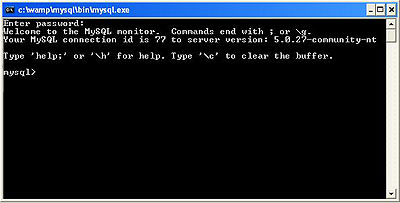
The MySQL Console window
The MySQL Console automatically logs in to the database server using the user account root, which has full privileges on the system. It will ask you for the password, but by default there is no password. So just hit the ENTER key to continue.
The other method for accessing MySQL is to use the phpMyAdmin Web page. This tool provides a great graphical interface for just about any database administration task you'll need to do. We'll use the phpMyAdmin Web page to create the Recipe Center database and also to enter some test data.
Start the phpMyAdmin Web page by left-clicking the WAMP64 system tray icon, then selecting phpMyAdmin from the menu.

The phpMyAdmin Web page
Once you get the phpMyAdmin Web page going, you're ready to start building a database.
Creating the Recipe Center Database
Creating a database in phpMyAdmin is a simple process. Just follow these steps:
The collation type defines how text data is handled within the database. If you ask the server to sort data, it must know what rules to follow to perform the sort. The collation type is what defines these rules.
If you click the drop-down arrow next to the Collation drop-down list, you'll see a long list of available collation options. You can select collations for specific languages (such as German, Spanish, or Swedish), or you can select collations that use generic text encoding schemes, such as ASCII or UTF8.
The ASCII text encoding scheme is used by English speaking countries to represent the 26 letters of the English alphabet in both uppercase and lowercase, along with the digits 0 through 9 and a set of special characters. The UTF8 text encoding scheme is a newer encoding scheme that also incorporates special characters found in various foreign languages.
For the Recipe Center database, select the UTF8_unicode_ci collation option. This allows us to use any character set, with case-insensitive sorting (thus the ci at the end). After selecting the collation type, click the Create button. You'll see the database creation page, showing that the server created the database and asking if you want to create a new table within the database.

New recipe database with no tables
Now it's time to start building some tables.
Creating a New Table
Now you have a new database, but you don't have any tables yet to hold data. If you just added the new recipe database, you should see the recipe database window providing a place to add a new table. If you've exited phpMyAdmin since creating the new recipe database, you must select the recipe database name from the drop-down database list on the left of the window. After selecting the recipe database, you'll see the entry textbox to create a new table.
In the Create new table textbox:
A new table template window appears.

The Create New table template
There are six rows of text boxes, one row to define the attributes of each data field in the table. Each text box in the row defines a different attribute for the data field (such as data field name, the data type, and the collation method to use for the data field). There are also several radio buttons that allow you to set special properties for the data field, such as whether it's a primary key, needs a separate index, or needs its values to be unique (without being a primary key). Here's how you should set up the data fields for the recipe table.
| The recipes table data fields | ||||||||
Field | Type | Length | Collation | Attributes | Null | Default | Extra | Actions |
recipeid | int | empty | UTF8_unicode_ci | unsigned | not null | empty | auto_increment | primary key |
title | varchar | 50 | UTF8_unicode_ci | empty | not null | empty | empty | none |
poster | char | 8 | UTF8_unicode_ci | empty | not null | empty | empty | none |
shortdesc | varchar | 100 | UTF8_unicode_ci | empty | not null | empty | empty | none |
ingredients | text | empty | UTF8_unicode_ci | empty | not null | empty | empty | none |
directions | text | empty | UTF8_unicode_ci | empty | not null | empty | empty | none |
For the fields that show empty, just leave that field blank. No value is required.
The action for the recipeid data field is set so that it is the primary key for the recipe table. It's also set with the auto_increment attribute. This feature allows the MySQL server to automatically assign a new recipeid value for each record added to the database. That way we don't need to worry about keeping track of assigned recipeid numbers, because MySQL will do it for us!
The shortdesc data field uses the MySQL variable character data type (varchar). We'll create the ingredients and directions data fields using the text MySQL data type. This data type allows the database to handle larger text values (up to 65,535 characters) than the varchar data type. That should be plenty of ingredients and directions!
After entering the data fields, there are three text boxes related to how MySQL will handle the table. You can place a comment in the Table Comments area if you wish, but it's not necessary. By default, phpMyAdmin selects the InnoDB storage engine. This is the high-performance MySQL storage engine, and it's just fine for our application. Select the same table collation method as for the data fields (UTF8_unicode_ci).
Click the Save button to save the new table. The table display window appears, showing all the details for the new table.

The recipes table display window
Inserting Test Data
Now that you created a table, you'll want to have some data in it for testing. The phpMyAdmin tool provides an easy graphical interface for you to insert new data records into tables.
The database view shows a list of the tables contained in a database and a set of icons for performing actions on the tables. To see the database view, select the recipe database from the drop-down list on the left side of the window (actually, you'll see it listed as recipe(1), showing that it contains one table). You'll see the database view for the recipe database.

The database view for the recipe database
For now, all you should have is the new recipes table. The database view shows a few details about the tables, such as the number of records and the current size of the table.
There are also six icons in the Actions area for you to work with the individual tables:
| Table actions | |
Action | Description |
| Browse | for viewing data in the table, if any is present. |
| Structure | for viewing and modifying the data fields defined in a table |
| Search | for searching for data within the table |
| Insert | for inserting new data into the table |
| Empty | for removing all data from the table, but keeping the structure |
| Drop | for removing the table from the database |
Let's insert a new data record in the recipes table:
The new data record should be added. You can now click the Browse Action button to see if your data is there.
Meet me in Chapter 4, where we'll take another important step in creating the Recipe Center.
Chapter 4:
Creating the
Application User Account
Things are moving along pretty fast now. You've got a new database, a new table in the database to hold recipes, and a new data record to see that everything's working. There's one more step we need to take.
All of the work you've been doing in the phpMyAdmin tool was done using a special user account for MySQL. MySQL maintains its own user account database. It doesn't use the user accounts that exist on the host system.
By default, MySQL only contains a single user account. The MySQL root user account has privileges to view, modify, and change all items within the database. The purpose of the root account is for the administrator to work on the system. But you shouldn't use the root user account for normal database activity, such as querying the database or adding data records.
Allowing applications to log in using the root user account is a very dangerous practice. If an unscrupulous person hacks into the application, he or she will have full access to your database server. So it's best to create a normal user account that only has access to the application data. Taking this precaution is the best way to ensure that bad things don't happen to your database.
You can create new user accounts with the phpMyAdmin tool. Let's do that now.
From the main home page in the phpMyAdmin tool, click the Privileges link near the bottom of the page. The User Overview page appears.

The phpMyAdmin User Overview page
The User Overview page provides a single place to modify (or delete) existing user accounts and to add new ones. Notice that currently there's only one user account shown in the user list—the root user.
|
Click the Add a New User link at the bottom of the user list. This produces the Add a new User Web page.

The phpMyAdmin Add a new User Web page
There are three sections to the Add a new User Web page.
The Login information section defines information used to assign the privileges. MySQL has a somewhat odd way of handling user account privileges. You can define generic privileges for users based on a user account name and also on the location from which the user logs in. This feature will come in handy for us, as we want to restrict our application to logging in only from the same host as the PHP Web server (which is called the localhost).
The Database for user section provides an easy way to create a default database for the user to play with. We won't use this feature in our situation, as we've already built our recipe database.
The Global privileges section allows us to assign privileges to the user account that apply to all databases on the server. Since the whole purpose for this account is to restrict it to a specific database, we won't be entering anything in this section either.
So, to create our new account, follow these steps:
That's all there is to it. Go back to the Privileges Web page, and you'll see the new test user account in the user list. Now we need to assign it some privileges.
Assigning Privileges
The new test account needs to be able to work with the tables in the recipe database. The root user account must assign specific privileges to the test account so that it can insert, delete, modify, and query tables in the recipe database. We'll do that from the Edit Privileges Web page for the user account. Here's how to get there:
The Edit Privileges Web page allows you to change various properties for the user account. You can:
As you might have guessed, we'll be editing the privileges for a specific database. Click the drop-down box, and select the recipe database entry.
Automatically (without even clicking the Go button), you are brought to another Web page, as shown.

Editing database privileges for a user account
This Web page provides three specific categories of privileges:
Give the test user account privileges to SELECT, INSERT, UPDATE, and DELETE data from the database. You don't need to give it any structure or administration privileges, as you'll be doing all of that work from the phpMyAdmin tool as root. This also helps prevent problems if someone manages to steal the user account and password from your Web site.
After selecting all of the data privileges, click the Go button at the bottom of the page to process the request.
Now the test user account has access to the data contained within the recipe database, but not to anything outside of there.
Chapter 5:
Summary
Today, we walked through the MySQL setup required to host the Recipe Center application. MySQL provides three levels of data storage. A database contains all of the data objects for handling data. You should create a separate database for each application within MySQL. Inside the database, MySQL uses tables to group similar data elements together. Individual data elements are stored as data fields within the tables. You must configure the individual data fields for the correct data type and properties required for the data they contain.
The phpMyAdmin tool provides a simple graphical environment for working with MySQL. You can create, modify, and delete databases, tables, data fields, and database user accounts all from the phpMyAdmin Web page. The phpMyAdmin tool also provides Web pages so you can add, modify, and delete data within the tables.
We also went through the steps for creating a new database for the Recipe Center application and for creating a table and data fields. After that, we added a new user account that gives us access to the Recipe Center application. Remember, for PHP applications, it's always best to use a separate user account that has restricted privileges.
In our next lesson, we'll start building Web pages for the Recipe Center application. We'll also begin creating the templates that control how visitors view and post information in the database.
Until then, remember that, as always, today's lesson includes a quiz and an assignment.
|
|
Supplementary Material
|
The phpMyAdmin Project http://www.phpmyadmin.net |
| Read the phpMyAdmin manual, and work through advanced tutorials on the official phpMyAdmin Web page. |
FAQs
Q: When I start phpMyAdmin, the home Web page displays a warning message about the root user account. Do I need to do anything?
A: By default, the WAMP64 installation of MySQL doesn't have a root user password. This is a huge security problem if your server is on a network and it's set to Online mode (by default, it is in Offline mode). Offline mode prevents external users from connecting to the Web server, so that's not a problem. If you use your WAMP64 server in Online mode though, you should use phpMyAdmin to change the password for the root user. After that, you'll need to change the c:\wamp\phpmyadmin\config.inc.php configuration file.
Look for an entry marked password, and enter your new root password there.
Q: What do I do if I set a password for the MySQL root user, but then I forget it?
A: You can recover from this dilemma without having to reinstall the entire WAMP64 server. Create a text file named init.txt with the single text line:
SET PASSWORD for 'root'@'localhost' =PASSWORD('newpassword');
where newpassword is your new root password. Next, use the WAMP64 control icon to stop all of the services. Then, from a command line prompt, type:
c:\wamp\mysql\bin\mysqld-nt.exe --default-file="c:\wamp\mysql\my.ini" --init-file="c:\init.txt"
This starts the MySQL service and resets the root password. You can now reboot your system, start the WAMP64 services as normal, and (hopefully) log into MySQL using your new root password.
Assignment
If you followed along in the lesson, you should have created the recipes table in the database. There are three more tables that need to be created for the application. Now is a good time to get comfortable with the phpMyAdmin tool and add these three tables.
Using the same technique that we used to create the recipes table, create the comments, news, and users tables.
The comments table should have the following data fields:
| The comments table data fields | ||||||||
Field | Type | Length | Collation | Attributes | Null | Default | Extra | Actions |
commentid | int | empty
| UTF8_unicode_ci
| unsigned |
not null | empty | auto_increment | primary key |
date | date | empty
| UTF8_unicode_ci | empty | not null | empty
| empty | none |
poster | char
| 8 | UTF8_unicode_ci | empty |
not null | empty | empty | none |
recipeid
| int | empty | UTF8_unicode_ci | empty | not null | empty
| empty | none |
comment | text | empty | UTF8_unicode_ci | empty | not null | empty | empty | none |
The news table should have these data fields
| The news table data fields | ||||||||
Field | Type | Length | Collation | Attributes | Null | Default | Extra | Actions |
date | date | empty | UTF8_unicode_ci | empty | not null | empty | empty | none |
title | varchar | 30 | UTF8_unicode_ci | empty | not null | empty | empty | none |
article | text | empty | UTF8_unicode_ci | empty | not null | empty | empty | none |
Finally, the users table should have these data fields:
| The users table data fields | ||||||||
Field | Type | Length | Collation | Attributes | Null | Default | Extra | Actions |
userid | char | 8 | UTF8_unicode_ci | empty | not null | empty | empty | primary key |
password | char | 41 | UTF8_unicode_ci | empty | not null | empty | empty | none |
fullname | varchar | 50 | UTF8_unicode_ci | empty | not null | empty | empty | none |
email | varchar | 50 | UTF8_unicode_ci | empty | not null | empty | empty | none |
That’s all the information you should need to create your new tables. Make sure you type the data field names correctly, or you’ll have problems later on when we start writing the PHP programs that access the data. If you have any problems creating your tables, drop by the Discussion Area and post what’s happening.
After you’ve created your tables, add a few test records to the recipes and news tables. That will help you when we start working on our Web pages. Don’t worry about the comments and users tables for now—we’ll put data into those tables later on.
 Important:
In this lesson's assignment, you'll build three more tables that are
integral to the Recipe Center application. Therefore, it's crucial
that you do the Lesson 3 assignment.
Important:
In this lesson's assignment, you'll build three more tables that are
integral to the Recipe Center application. Therefore, it's crucial
that you do the Lesson 3 assignment.