Creating a table in HTML.
Lesson 04 - Creating a Dynamic Home Page
Chapter 1:
Introduction
You've made it to Lesson 4! I hope you were able to successfully build all of your MySQL database tables in the Lesson 3 assignment. They're all crucial to the application, so if you had any problems, please post a message in the Discussion Area.
Today, we're going to start designing the Recipe Center application. To do that, we'll talk about a couple of HTML features that we'll use to create the application's home page. First, we'll discuss how to create separate areas on our home page using HTML tables. Each table cell will contain a different section of the Web page. We'll use PHP include files (I'm sure you remember those from Lesson 2) inside each table cell to fill in the content.
After that, we'll pretty up the Web page using Cascading Style Sheets. This is another HTML feature that allows us to set background colors, fonts, and font styles that apply to all the pages of the application.
Let's get started building our home page.
Chapter 2:
Laying Out the Web Page With Tables
This might be review for you, but let's start with a brief look at how HTML tables work. Tables have many uses in HTML. You often see them used to present data in an organized manner within a standard Web page, much like a spreadsheet uses cells to place values in rows and columns for calculations.
HTML tables also create individual cells that are the intersection of rows and columns. However, in HTML you can place all sorts of different data within each cell, not just text or numbers.
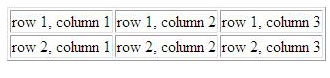
HTML uses the <table> tag to define a table. A table has a predefined number of rows (each row is identified with a <tr>/</tr> tag combination) and a predefined number of data elements, or columns (identified with a <td>/</td> tag combination). Here's a simple example of creating a table with two rows and three columns:
<html>
<body>
  <table border="1">
  <tr>
    <td>row 1, column 1</td>
    <td>row 1, column 2</td>
    <td>row 1, column 3</td>
  </tr>
  <tr>
    <td>row 2, column 1</td>
    <td>row 2, column 2</td>
    <td>row 2, column 3</td>
  </tr>
  </table>
</body>
</html>
The border attribute is a numerical value that sets the size of the border line used between cells. The resulting table looks like this:
Creating a table in HTML.
We'll use a table similar to that one to create the layout for the Recipe Center. The content on the application's pages will be segmented into different sections. Each section will be an individual cell within the table.
You may be wondering how we can use such a small table to control the layout of our Web pages. Fortunately, the <table> tag provides some attributes that we can set to control the size and layout of our table.
Before we build our table, let's map out how we want the Recipe Center application's home page to look. Here's a screen shot of how we'll lay it out.
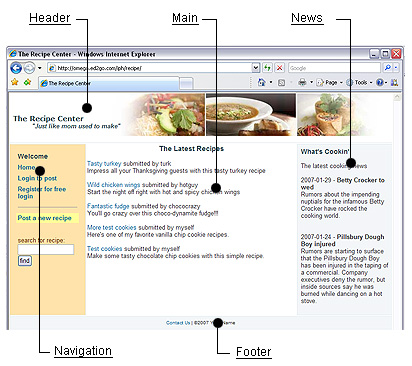
The Recipe Center Web page layout
The application uses a table format, but there are a few differences from the simple table example we looked at above:
So, taking all of these things into consideration, here's the basic template we'll be using for the Recipe Center's home page:
<!DOCTYPE html PUBLIC "-//W3C//DTD XHTML 1.0 Transitional//EN" "http://www.w3.org/TR/xhtml1/DTD/xhtml1-transitional.dtd">
<html xmlns="http://www.w3.org/1999/xhtml">
<title>The Recipe Center</title>
<body>


<table width="100%" border="0">
  <tr>
    <td id="header" height="90" colspan="3">
        <?php include("header.inc.php"); ?></td>
  </tr>
  <tr>
    <td id="nav" width="15%" valign="top">
        <?php include("nav.inc.php"); ?></td>
    <td id="main" width="55%" valign="top">
        <?php
            if (!isset($_REQUEST['content']))
                include("main.inc.php");
           else
           {
                $content = $_REQUEST['content'];
                $nextpage = $content . ".inc.php";
                include($nextpage);
            } ?></td>
    <td id="news" width="30%" valign="top">
         <?php include("news.inc.php"); ?></td>
  </tr  >

  <tr>
    <td id="footer" colspan="3">
    <div align="center">
        <?php include("footer.inc.php"); ?>
    </div></td>
  </tr>
</table>


</body>
</html>
Let's walk through this code. The first two lines use standard HTML code to define the document type and HTML type for client Web browsers. Following that is a <title> tag to give the Web page a title that will display on the client browser's title bar. Next, we use the standard <body> tag to indicate the start of the body of the Web page.
After that, we define the actual table. The width table attribute is used to indicate that the table will use 100% of the Web page's width. The percent symbol is important. If you leave it off, the attribute will use the value in pixels.
The border attribute is used and set to zero to make the border lines between cells invisible (we don't want to see border lines separating our cell sections).
Following the table tag, you should be able to pick out the three table row (tr) tag combinations, defining the three rows of cells in the table. Within each row definition are the table data (td) definitions defining each of the table cells. The first and last table rows contain only a single table data definition. The colspan attribute is used to span the cell across all three columns (since the middle cell uses three columns).
Notice that within each of the table data tags is a PHP code tag. The main cell uses a more complicated PHP program, which we'll walk through in the next chapter. The other cells define the PHP include files used to include the content in those cells.
These data elements will remain constant on every Web page in the application. The header table data tag also includes a height attribute to define how tall the row should be (in pixels) to lock in the size of the header.
To help keep things simple, we'll use a standard naming convention to name the PHP include files used in the application. The .inc.php filename extension indicates that the file is used as an include file and contains PHP code. Thus, in a little while, we'll create the header include file as header.inc.php and the footer include file as footer.inc.php.
The middle table row is where most of the action is. There are three table data definitions within the table row. Again, we use the width attribute to define how much space each cell should take (as a percentage of the total table width). The nav and news cells are relatively small, so they're given a smaller percentage of the total width. The main cell is where we'll be presenting most of the data, so it has a larger area to work with.
Since we want the content from the PHP include files to appear at the top of the cell areas, we use the valign table attribute set to top to ensure things are vertically aligned at the top of the cell. The footer cell uses the align attribute to align the footer text in the center of the cell.
Creating the Main Web Page
Okay, that was a lot of stuff to cover, but that pretty much sums up the layout for our home page. Let's go ahead and put all of this together to create our home page's template:
That completes the main Web page template. Now we can start filling in our template with actual PHP code.
Chapter 3:
Displaying Content
The main cell area will contain the application's main content. This means that each time the application needs to display a different Web page (such as a list of recipes or a registration form), you'll need to include a different PHP include file in the main cell area.
Instead of creating separate Web pages to statically produce the different Web page content, we'll let PHP do all of the hard work for us. Since PHP allows us to dynamically assign values to variables within the PHP code, we can easily pass along a PHP include filename to the same index.php file for each application function. The index.php file must then incorporate PHP code to take the include filename passed to it to be used for the main cell.
This is the reason for the PHP code in the main cell area. Every Web page in the application will pass the name of the next PHP include file to display to the index.php page. It's the job of the index.php Web page to determine what the next PHP include file used in the main cell should be, based on the information passed by the previous Web page. This may sound confusing, but once we start using it, you'll see how simple it really is.
Passing Data in HTML
The core of this technique is getting information to pass between HTML Web pages. There are three methods you can use to do this:
In each of these methods, you must define a variable in the HTML code and then assign it a value. The difference between these methods is how you pass that variable between the Web pages.
The GET method passes one or more HTML variables within the session URL. An HTML variable is a variable that an HTML Web page assigns a value to. This is most commonly found when creating forms. Each field in the form is assigned an HTML variable name. When a visitor enters values into the form, the Web page uses the GET method to pass the variables and their values to another Web page.
Following the Web page address, you add a question mark to the URL, then the variable name, followed by an equal sign, followed by the value you assigned to the variable. If the Web page passes two or more variables, it must use an ampersand sign to separate the variable and value pairs.
This looks something like this:
http://localhost/recipe/index.php?content=showrecipe&recipeid=4
The variable content is used to hold the text name of the PHP include file used in the main cell, called showrecipe. The variable recipeid is used to hold the numerical value 4. In other words, this would display the recipe that's been assigned the id of four.
The GET method is used to pass simple HTML variable values between Web pages. We'll be using the GET method to pass include file names along with variable values (such as the recipeid example shown). For more complex data passing, we'll use the POST method.
The POST method passes HTML variables within the HTTP session as session parameters. While users can see the GET variables as the Web page passes them in the URL name, they won't have a clue that the Web page is passing anything in the HTTP session data. That all happens under the hood in the HTTP protocol.
This helps prevent users from seeing the variable values. It also has the added benefit of providing a larger area for data, as the GET method limits variable values to 100 characters (there's no limit using a POST).
Since there's no limit to the amount of data you can pass using the POST method, we'll be using this method when a visitor posts a new recipe or comments on a recipe. This allows us to pass large text areas from the Web page form the visitor fills out to the PHP Web page that will insert the data into the database.
The last method, Session cookies, requires that you set a cookie on the client Web browser to pass the data. The variable name and value is set within the cookie stored on the client's PC. This is not a good technique to use for consistently passing data variables, as it requires interaction with the client browser for each variable passed, and it assumes that the client browser is accepting cookies.
We'll use session cookies to track whether visitors log in to the application. Only logged in visitors will be allowed to post new recipes and post comments about existing ones. PHP allows us to send a session cookie to track logged in visitors within the PHP program.
Reading Passed HTML Variables
Now that we know how to pass HTML variables between Web pages, we'll need to make the index.php page read the passed variable. The PHP language provides four special arrays just for this purpose:
| Retrieving an HTML Variable using PHP | |
| Array | Description |
| $_GET ['var'] | retrieve the value assigned to the variable var using the GET method |
| $_POST ['var'] | retrieve the value assigned to the variable var using the POST method |
| $_COOKIE ['var'] | retrieve the value assigned to the variable var using session cookies |
| $_REQUEST ['var'] | retrieve the value assigned to variable var using whichever method is required to access that variable. |
The $_REQUEST [] array provides the most robust method for retrieving a variable. Since we'll be using both the GET and POST methods in our application, we use the $_REQUEST [] array in our index.php file.
Once PHP retrieves the HTML variable, it can assign it to a PHP variable for use within the PHP program. We use that technique to obtain the value of the content variable from each Web page:
 <?php
  if (!isset($_REQUEST['content']))
    include("main.inc.php");
      else
  {
  $content = $_REQUEST['content'];
  $nextpage = $content . ".inc.php";
    include($nextpage);
  } ?>
This code first checks whether the content variable has been set using any HTML method. If not, it includes the main.inc.php file, which will display our current list of recipes for the client.
If the content variable has been set, that means the index.php file has been called from another Web page in the application, requesting a different content include file in the main cell section. The content variable is retrieved and assigned to the PHP variable $content.
Next, the full PHP include filename extension is added to the content value using the PHP dot operator. This operator just appends the second text object to the first text object. Finally, we use the PHP include() function to include the next PHP include file.
If you're still a little confused on this topic, don't worry too much. Hopefully, discussing how the navigation bar works will help clear this up.
The Navigation Bar
One drawback to dynamic Web pages is that, well, they're dynamic. They're always changing content. Because of this, visitors may never see the same Web page twice. While overall this is good, it does present a small problem. With each Web page being different, you need to create a standard way for visitors to find their way around. Enter the navigation bar.
The navigation bar provides a unified location on all Web pages where the visitor can jump to any major Web page in the application. If the visitor is in the middle of viewing a recipe and decides to post a new recipe, you've got to provide a way for him or her to get there with a simple click.
In the table layout, we've allocated an entire table cell for the navigation bar. Since visitors will use the navigation bar to quickly jump to important areas within the application, we'll need to include links to each of those Web pages:
All but the last of these items will be a simple HTML link in the navigation bar. Later on, we'll work on making the search text box, but we'll put that piece aside for now.
The navigation include file is called nav.inc.php. To help keep things consistent, we'll create a table to hold each of the link elements. In the nav.inc.php file, enter the following HTML code:
<table width="100%" cellpadding="3">
  <tr>
    <td><h3>Welcome</h3></td>
  </tr>
  <tr>
    <td><a href="index.php"><strong>Home</strong></a></td>
  </tr>
  <tr>
    <td><a href="index.php?content=login"><strong>Login to post</strong></a></td>
  </tr>
  <tr>
    <td><a href="index.php?content=register"><strong>Register for free login</strong></a></td>
  </tr>
  <tr>
    <td><hr size="1" noshade="noshade" /></td>
  </tr>
  <tr>
    <td bgcolor="#FFFF99"><a href="index.php?content=newrecipe"><strong>Post a new recipe</strong></a></td>
  </tr>
  <tr>
    <td> </td>
  </tr>
  <tr>
    <td>
<form action="index.php" method="get">
    <label><font color="#663300" size="-1">search for recipe:</font> </label>
      <input name="searchFor" type="text" size="14" />
      <input name="goButton" type="submit" value="find" />
      <input name="content" type="hidden" value="search" />
  </form>  </td>
  </tr>
</table>
You should recognize most of this code (remember, we'll save the more complicated search text box section for later). The table tag uses the cellpadding table attribute to help center the text within the navigation bar for a more professional look.
Each row contains a single column. The first row is simply our Welcome message. Each of the other rows provides a simple HTML link to another Web page in the application we'll need to build later on. Notice that each link uses the GET method to pass along the content variable value for the next Web page to display.
For example, the link index.php?content=register passes the value register to the index.php Web page. The browser will ask for the index.php Web page, then the main cell section will retrieve the content value, add the .inc.php extension to it, then use the include() function to produce the register.inc.php content in the Web page.
That's the whole concept used throughout the application to display the various Web pages.
Once you get this idea down, you're all set for the rest of the application.
Chapter 4:
Creating the Supporting Web Pages
Now that you've created the main home page and the navigation include file, it's time to move on to some of the other supporting components.
The header and footer include files are pretty simple. For the header, we'll want to produce a snazzy banner that will appear on all of our Web pages. The header.inc.php file should contain the following code:
<h1><br>

The Recipe Center</h1>

<h4>
         <em> "Just
like mom used to make"</em></h4>
Nothing too exciting here, just a title and a catchy phrase. Notice that in the include files, you don't have to worry about using the <html> and <body> tags, as they're already in the index.php file. The include files are just added within that file.
Similarly, create the footer.inc.php include file with the following code:
<a
href="mailto:me@myhost.com"><font size="1">Contact
Us</font></a><font size="1"> | ©2007 Your Name
</font>
The footer include file just has a link for a contact e-mail address and a standard copyright notice (you'll probably want to change these values for your information).
Testing It Out
Okay, we're starting to make some headway here. You should now have the index.php, header.inc.php, footer.inc.php, and nav.inc.php files complete. You can check your progress by using a browser to view your work (remember to start the WAMP64 server first). Using the URL, http://localhost/recipe/, you should see the following:
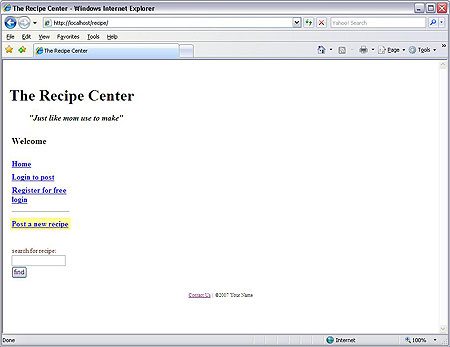
The application home Web page
You may notice something's still different here from the example of the Recipe Center that we saw earlier (beside the fact that there's no data yet). The example we looked at had some fancy background colors and an image in the header. So far, we just have the plain HTML coded version. We need to add the colors and image. Let's work on that next.
Using Cascading Style Sheets
Using basic HTML tags, we created a fine layout. But it's just black and white, and that won't cut it these days. To attract new customers, you've got to add color to your site. And to do that, we're going to use one of the most exciting things that have hit HTML in recent years: Cascading Style Sheets (CSS). Just in case you haven't done much with CSS, let's take a quick look at how it works.
CSS allows you to create a color pattern for your entire Web site in a single file. Each individual Web page you create references the CSS file to blend in the color components. If you want to change the color layout of your application, all you need to do is change the values in a single file, not all of your individual Web pages. That's a huge time-saver!
Each HTML element tag uses attributes to control the size, color, and font of the element. For example, the <h1>, <h2>, and <h3> tags can each be assigned a different font, font size, and color from the standard ones produced by the client's browser. If you have to add these attributes every time you use one of these tags in all of your Web pages, that's a lot of items to change if you decide to change your layout design.
To help keep your sanity, you can define element attributes in a common location (called a style sheet), then incorporate those attributes in every occurrence of that element. The cascading part of CSS means that each individual HTML element can receive attributes from multiple places—each one cascading (or overriding) previously assigned ones.
Here's the order in which HTML elements receive style attributes. Each attribute style in the list overrides the previous ones.
Thus, any attributes specifically set in an element tag override any attributes set in an internal style sheet, which override any attributes set in an external style sheet, which in turn override any attributes the client browser uses by default. This allows you to set an overall style for your Web pages using an external style sheet and then override those settings for individual situations, using the standard element tags.
Creating the Style Sheet
The style sheet is a text file that contains style settings for all the different element tags you use in your Web pages. You define the attributes for each element using the following format:
element {attribute:value; attribute:value…}You can set as many attributes for the HTML element as necessary within the brackets. You separate the individual attributes using a semicolon, and you can place them on separate lines in the text file to make the file easier for human eyes to understand.
Besides the standard HTML elements, you can also set attributes for defined sections on the Web page. You may have noticed that in the table attributes within the index.php file, individual table data cells are tagged with an id attribute (such as header, footer, nav, and news). Our style sheet will also define attributes for each of these sections. A section is defined starting with a pound sign.
Let's create the style sheet to use for the Recipe Center application. Follow these steps:
body{
  font-family: Arial,sans-serif;
  font-size: 80%;
  color: #333333;
  line-height: 1.166;
  margin: 0px;
  padding: 0px;
}
a{
  color: #006699;
  text-decoration: none;
}
a:link{
  color: #006699;
  text-decoration: none;
}
a:visited{
  color: #006699;
  text-decoration: none;
}
a:hover{
  color: #006699;
  text-decoration: underline;
}
h1{
  font-family: Verdana,Arial,sans-serif;
  font-size: 120%;
  color: #334d55;
  margin: 0px;
  padding: 0px;
}
h2{
  font-family: Arial,sans-serif;
  font-size: 120%;
  color: #334d55;
  margin: 0px;
  padding: 0px;
}
h3{
  font-family: Arial,sans-serif;
  font-size: 110%;
  color: #334d55;
  margin: 0px;
  padding: 0px;
}
h4{
  font-family: Arial,sans-serif;
  font-size: 100%;
  color: #334d55;
  margin: 0px;
  padding: 0px;
}
#header{
  padding: 7px;
  border-bottom: 1px solid #E2EAEF;
  height: 90px;
  width: 100%;
  background-image: url(images/banner.jpg);
  background-repeat: no-repeat;
  background-position: top right;
}
#nav {
  padding: 12px;
  border-bottom: 1px solid #E2EAEF;
  border-top: 1px solid #E2EAEF;
  border-right: 1px solid #E2EAEF;
  background-color: #FFE3AA;
  width: 20%;
}
#news {
  padding: 7px;
  border-bottom: 1px solid #E2EAEF;
  border-top: 1px solid #E2EAEF;
  border-left: 1px solid #E2EAEF;
  background-color: #f3f6f8;
  width: 35%;
}
#footer {
  padding: 7px;
  border-bottom: 1px solid #E2EAEF;
  border-top: 1px solid #E2EAEF;
  background-color: #f3f6f8;
  width: 100%;
}
The style sheet defines attributes for all the major HTML elements we'll use on our application Web page. The various sections define different background colors, easily identifying the different sections to visitors.
Notice that the header section style also incorporates an image stored in the images folder. This folder must be created under the recipe folder and the appropriate image file stored there. This is a handy way to incorporate standard images in your Web pages using CSS. If you need to change an image, just change your style sheet definition!
Using Styles
Now all we need to do is incorporate the CSS style sheet in our Web page. Fortunately, since all of our Web pages are included from the index.php file, that's the only file we need to mess with.
To incorporate an external style sheet, you'll need to use the <head> tag to define a head area, and use a <link> tag to define the location of the style sheet.
To do that, modify the start of the index.php file to look like this:
<!DOCTYPE html PUBLIC "-//W3C//DTD XHTML 1.0 Transitional//EN"   "http://www.w3.org/TR/xhtml1/DTD/xhtml1-transitional.dtd">
<html xmlns="http://www.w3.org/1999/xhtml">
<head>
<link rel="stylesheet" type="text/css" href="mystyle.css" />
<title>The Recipe Center</title>
</head>
<body>
The href attribute references the mystyle.css file we saved in the recipe folder. Now when you look at your application from the browser, it should look like this:
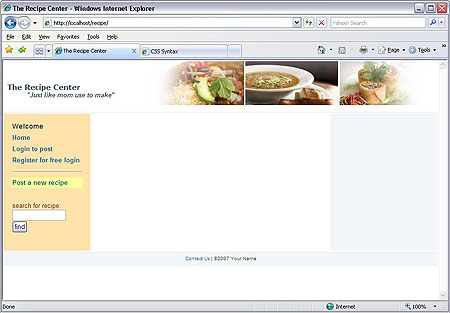
The application home page using the style sheet
That looks much better! Now we're ready to start plugging in some content data. But I think we've done plenty for today.
So, take a moment to catch your breath, and then meet me in Chapter 5 where we'll wrap things up.
Chapter 5:
Summary
Today, we walked through the HTML and PHP code required to present the application home page. The Recipe Center application uses an HTML table to break the home page into different sections. Each section is defined as a PHP include file. This allows us to create separate files for each section of the Web page.
The application uses an HTML variable to pass the name of the next Web page to the main Web page. This variable is retrieved using the PHP $_REQUEST [] function, and used in an include() function to display the Web page content.
Finally, we discussed how to use Cascading Style Sheets to simplify the color and layout of the Web page.
In the next lesson, we'll start putting content into our application. We'll see how to query the MySQL database for data and then display that data on the Web page using PHP.
Supplementary Material
|
Cascading Style Sheets http://www.w3.org/Style/CSS/ |
| This is the official Cascading Style Sheet Web page. Here you can learn about the different options available in style sheets, and walk through simple tutorials on how to incorporate style sheets in your Web pages. |
FAQs
Q: Can I mess with the table and style sheet settings in the course application?
A: Sure, feel free to play around with the various style settings used throughout the course. It's best to make a second copy of the files (such as recipe2) and store them in a separate folder in your www folder. That way you can always keep the original versions around in case you completely mess anything up.
Q: I noticed that if I accidentally forgot to create one of the PHP include files, I got a PHP error message on my Web page, but the rest of the include files were present. Can I do something to make everything stop when an error occurs?
A: Yes. Remember from Lesson 2 that PHP continues processing if an include() function fails, but it stops if a require() function fails. So, just replace the include() functions with require() functions in the index.php file.
Assignment
For today's assignment, you just need to make sure you've created all the application files we discussed in the lesson and given each one the code it's supposed to contain. The files are:
Each one should be located in the recipe folder under the WAMP64 www folder. If you have any problems, be sure to come to this lesson's Discussion Area and let me know.