Welcome to
Lesson 5. So far, you have a basic layout for your application Web
pages and a database full of data you want to display. What's next? The
answer, of course, is to use your PHP programming skills to extract the
data and display it dynamically in your Web pages.
Today,
we'll look at how to use the SQL query language and PHP together to
query the MySQL database for specific data elements. Then we'll use PHP
to display those data elements in your Web page so your visitors can
view them. If you're new to SQL, don't worry—we'll start by going over
the basics of how to create a standard SQL statement to retrieve data.
Once we have our SQL queries prepared, we'll learn how to send them off
to the MySQL server using PHP embedded within the Web pages.
After
sending the SQL statements, we'll find out how to retrieve the results
using PHP, and then use PHP to format the returned data and display it
in the Web pages. By the end of this lesson, you'll have a significant
portion of your content management system working!
Now let's move on to Chapter 2 and start writing some SQL statements.
The Structured Query Language
(SQL) is a language for interacting with relational database systems
that's been around since the early 1970s. Over the years, other
database vendors have attempted to mimic or replace SQL with their own
query languages. But despite their attempts, SQL still provides the
easiest interface for both users and administrators to interact with
any type of database system.
In
1986, the American National Standards Institute (ANSI) created the
first SQL standards. The United States government adopted them as a
federal standard and named it ANSI SQL89. Most commercial database
vendors now use this SQL standard to interface with their products.
As
you can probably guess, additional updates have been made to the ANSI
SQL standard over the years, resulting in SQL92 (also called SQL2) and
SQL99 (also called SQL3) versions. The latest approved version of SQL
is ANSI SQL 2006 (which doesn't have a nickname yet), which, of course,
MySQL fully supports.
The SQL language provides a standard way of sending commands to a database. SQL commands consist of three elements:
- a keyword
- an identifier
- optionally one or more literals
SQL keywords
define the action the database server takes based on the SQL statement.
The SQL language provides many keywords for performing lots of actions.
We'll only be using a few keywords in the SQL statements within our
application, so don't worry about having to know and understand the
entire SQL library. The table below shows the four most common SQL
keywords and what they do.
| Basic SQL Keywords |
| Keyword | Description |
| SELECT | Retrieve data records from a table. |
| INSERT | Add a new data record to a table. |
| DELETE | Remove a data record from a table. |
| UPDATE | Modify data within an existing record in a table. |
SQL command identifiers
define the database objects used in a command. This is most often
either a database name, table name, or the names of data fields. The
SQL identifiers help us select which data elements to retrieve from the
database and which table to select them from.
Finally, SQL command literals
define specific data values referenced by the keyword. These are
constant values, such as data values to insert into a table or data
values used to search within the table data. You must enclose string
literals in quotes (either double or single quotes), but you can use
numerical values without quotes.
A query is an SQL SELECT statement that searches the database for specific data records. The basic format of a SELECT statement is:
SELECT datafields FROM table
The datafields
parameter is a comma separated list of the data field names you want
the query to return. When MySQL returns records that match the query,
you can determine which data fields are returned. If you want to
receive all of the data field values, you can use an asterisk as a
wildcard character.
You must also specify the specific table you want the query to search. It obviously wouldn't do any good to look for recipe data in the comments table. To get meaningful results, you must match your query data fields with the proper table.
 Note:
SQL keywords are often identified with all capital letters in an SQL
statement. MySQL allows you to use either uppercase or lowercase for
keywords. I'll be using all capitals in the course documentation to
help you identify the keywords within the SQL statements. Note:
SQL keywords are often identified with all capital letters in an SQL
statement. MySQL allows you to use either uppercase or lowercase for
keywords. I'll be using all capitals in the course documentation to
help you identify the keywords within the SQL statements.
|
By default, the SELECT statement returns all of the data records in the specified table. You can use one or more modifiers
to define how MySQL returns the data requested by the query. Here's a
table of the modifiers we'll be using in our SQL statements:
| SQL SELECT statement modifiers |
| Modifier | Description |
| WHERE | Display a subset of records that meet a specified condition |
| ORDER BY | Display records in a specified order |
| LIMIT | Display only a subset of records |
The
WHERE clause is the most common SELECT statement modifier. It allows
you to specify conditions to filter data from the result set. Here's an
example of using the WHERE clause:
SELECT recipeid, title FROM recipes WHERE recipeid = 3
This SQL statement returns the recipeid and title data values from the recipes table records where the recipeid
data field is equal to the numeric value 3. We'll be using the WHERE
clause throughout the application to restrict which data elements MySQL
returns to our application (such as only returning comments pertinent
to a specific recipeid).
The
ORDER BY clause allows you to specify the data field (or fields) by
which you want MySQL to sort returned data. You can also specify ASC or
DESC for ascending or descending order.
SELECT commentid, comment FROM comments ORDER BY commentid DESC
The
LIMIT clause allows you to specify a starting record number and the
number of records to return. The starting record number is an offset
within the returned result set, not the actual data records. The offset
value starts at 0 and goes to however many records are returned in the
result set. For example the SQL statement:
SELECT recipeid, title FROM recipes ORDER BY recipeid DESC LIMIT 0, 5
returns the last five recipeids and titles from the table.
Before
diving in and creating PHP code to send your SQL queries to the MySQL
server, it's best to manually test your queries against your database
data. This helps prevent query errors from within the application code,
which are often hard to debug.
The WAMP64 server provides two tools that you can use to send SQL queries to the MySQL database server:
- The MySQL Console tool
- The phpMyAdmin tool
The
MySQL Console provides a text-based interface to the MySQL server. You
can manually enter SQL commands at the command prompt and view the
results in the command window. The phpMyAdmin tool provides a graphical
tool that allows you to enter SQL commands, view the returned records,
and also edit any data contained in the returned records.
Here's how to submit SQL queries using phpMyAdmin:
- Start the WAMP64 server (if it's not already running).
- Left-click the control icon in the system tray, and select phpMyAdmin.
- Select the database to use from the left-side drop-down box. Select the recipe(4) entry to get to the recipe database.
- Select the SQL tab at the top of the window.
- Enter this SQL query in the text box at the top of the window:
SELECT recipeid, title, shortdesc FROM recipes WHERE recipeid = 1
- Click the Go button to submit your query.
After
selecting the Go button, phpMyAdmin sends the query to the MySQL
database server, then returns to the database window and displays the
results, as shown.
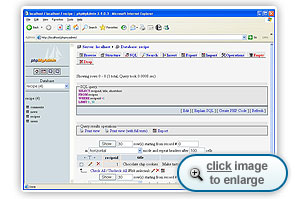
The phpMyAdmin SQL results window
Obviously,
your results should reflect the sample data you placed in your recipes
table. If you didn't put any sample data into the table, you'll get a
message that the query returned no rows of data.
Once you become familiar with SQL, you're ready to use it in your PHP
programs to return data to your Web page.
That's what we'll talk about in Chapter 3.
The
PHP programming language includes specific modules to accommodate
retrieving information from database servers. There are different
modules for different database servers. The WAMP64 server includes
modules for communicating with the MySQL server and a product called
SQLite, a simple file-based database system. If you're working with an
ISP hosted system, you'll have to ensure that their PHP implementation
includes the MySQL server modules.
The
PHP database modules include special functions for connecting to a
database server, sending SQL statements, and processing the returned
results. The process of retrieving data from a MySQL server involves
four separate functions:
- mysqli_connect() to connect to the server
- mysqli_select_db() to select a specific database to access
- mysqli_query() to send an SQL statement to the server
- mysqli_fetch_array() to retrieve the result set returned by the server
The
Recipe Center application uses the main.inc.php include file to
retrieve a list of recipe titles, posters, and short descriptions to
list on the home Web page, as shown in the image below.
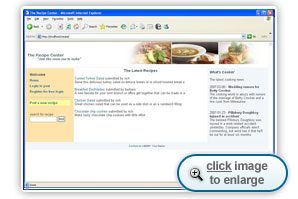
The Recipe Center home page listing recipes in the database
The recipe title is formatted as an HTML link, which links to the index.php Web page, but references the showrecipe
include file, which displays the full version of the recipe. When a
visitor clicks the link, the full recipe text will appear on the Web
page.
Here are the steps for creating the main.inc.php file:
- Open
the main.inc.php template file that you created in the last lesson. It
should be in the recipe folder under your WAMP64 www folder.
- Type the following code into the file:
main.inc
<h2 align="center">The Recipe Center</h2><br>

<?php
	include("connectselect.inc.php");

	$query = "SELECT count(recipeid) from recipes";
	$result = mysqli_query($conn, $query) or die('Could not find recipe');

	$row = mysqli_fetch_array($result);

	if (!isset($_GET['page']))
		$thispage = 1;
	else
		$thispage = $_GET['page'];
	$recordsperpage = 5;
	$offset = ($thispage - 1) * $recordsperpage;
	$totpages = ceil($row [0] / $recordsperpage);

	$query = "SELECT recipeid,title,poster,shortdesc,ingredients,directions from recipes order by recipeid desc limit $offset,$recordsperpage";
	$result = mysqli_query($conn, $query) or die('Could not retrieve recipes: ' . mysqli_error());

	while($row = mysqli_fetch_array($result, MYSQLI_ASSOC))
	{
		$recipeid = $row['recipeid'];
		$title = $row['title'];
		$poster = $row['poster'];
		$shortdesc = $row['shortdesc'];
		echo "<a href=\"index.php?content=showrecipe&id=$recipeid\">$title submitted by $poster<br>\n";
		echo"$shortdesc<br><br>\n";
	}

	if ($thispage > 1)
	{
		$page = $thispage - 1;
		$prevpage = "<a href=\"index.php?content=main&id=$recipeid&page=$page>">Prev/a>";
	}
	else
	{
		$prevpage = " ";
	}
	if ($totpages > 1)
	{
		$bar = '';
		for($page = 1; $page <= $totpages; $page++)
		{
			if ($page == $thispage)
			{
				$bar .= " $page ";
			}
			else
			{
				$bar .= " <a href=\"index.php?content=main&id=$recipeid&page=$page\">$page</a>";
			}
		}
	}
	if ($thispage < $totpages)
	{
		$page = $thispage + 1;
		$nextpage = " <a href=\"index.php?content=main&id=$recipeid&page=$page\">Next</a>";
	}
	else
	{
		$nextpage = " ";
	}
	if ($totpages > 1)
	{
		echo "GoTo: " . $prevpage . $bar . $nextpage;
	}

?>
- Save the main.inc.php text file.
Let's
walk through the main.inc.php code and see what's going on. First, you
may be wondering why it doesn't start out with an <html> or
<body> tag. Remember, the index.php code uses the include()
function to include the main.inc.php code, so you don't need to worry
about using standard HTML tags in the main.inc.php code. It starts off
with a simple <h2> tag to display the heading for the section,
then dives into the PHP code.
After the opening PHP tag to indicate that we're using PHP code, the program uses the mysqli_connect PHP function to connect to the MySQL server:
	$db_server = "localhost";
	$db_user = "test";
	$db_pass = "test";
	$db_name = "recipe";

	$conn =  new mysqli($db_server, $db_user, $db_pass, $db_name);
The three parameters specified are the hostname of the MySQL server, the userid used to log in to the server, and the password required for the userid.
The hostname value is set to the special hostname localhost
if the Apache Web server and the MySQL database server are running on
the same server (this is the case if you're using the WAMP64 server).
The userid specified is the test user account you created earlier in the course.
PHP includes a nifty little feature called or die.
While this sounds ominous, it's really a lifesaver. The die() function
provides a way to stop the program and produce a message if a function
fails. If the connection attempt fails, rather than displaying an ugly
MySQL error message to your visitors, the or die feature
allows you to specify a much nicer message that PHP displays instead
(also, the PHP program stops processing statements if the or die feature is activated). We'll be using this feature throughout the application to help make things a little more user-friendly.
The result of the mysqli_connect function is assigned to a PHP variable called $mysqli. That variable represents the connection, which PHP uses to reference the connection throughout the program.
The next step is to request access to the recipe database through the connection. MySQL allows you to access only one database at a time per connection. Use the mysqli_select_db
function to specify the database name, along with the PHP variable
representing the opened connection. This result doesn't need to be
saved in a variable, as PHP remembers the connected database for all
future database functions.
After
creating the connection and specifying a database, you'll need to
create your SQL query. Then you'll assign the query to a PHP variable
as a text string.
$query = "SELECT recipeid,title,poster,shortdesc FROM recipes ORDER BY recipeid DESC LIMIT 0,5";
Since
we're not looking for specific recipes to display on the home page, we
won't use a WHERE clause to restrict the returned rows. We will,
however, use the ORDER BY clause with the DESC parameter so recipes are
listed as the most recent first. I also threw in the LIMIT clause so
that the Web page only displays links for the last 5 posted recipes.
Once you create the query string, it's time to send it to the MySQL server. You do this with the mysqli_query function:
$result = mysqli_query($mysqli, $query) or die('Sorry, could not get recipes at this time ');
Again, we use the or die function to display a simple error message if the query fails. If the query is successful, the $result variable contains information about the result set returned by the query (but not the actual data yet).
You can perform several functions with the information contained in the $result variable. The program uses the mysqli_num_rows()
PHP function to check how many rows of data the server will return from
the query. If no rows are returned, then there's no data in the query
result.
If there's data in the result set, you need to perform another step to extract it. The mysqli_fetch_array() function retrieves the result set from the query and places it into an array variable.
This
function uses two parameters: the variable that contains the result set
information, and a constant value that defines how the array is
referenced:
$row = mysqli_fetch_array($result, MYSQLI_ASSOC);
The constant values are:
- MYSQLI_ASSOC references data fields by name
- MYSQLI_NUM references data fields by number, starting with 0
It's
much easier to use the MYSQLI_ASSOC method, which allows you to
reference array elements by their data field name. Thus, the variable $row
['recipeid']
contains the value of the recipeid data field for the record.
The
mysql_fetch_array function steps through the result set one record at a
time each time the program calls it. When it reaches the end of the
returned data, it produces a False value. This is a perfect scenario
for using the while() function.
We
use the while() function to loop through all of the data records in the
result set. When you've reached the end of the result set, the
mysqli_fetch_array function returns a False value, which ends the while
loop.
Within
the loop, each data field from the record is assigned to a PHP variable
(this isn't required, but it helps make handling data easier within the
program). Each PHP variable is named according to the data field value
it holds.
The program displays data in the Web page using two echo statements:
echo "<a href=\"index.php?content=showrecipe&id=$recipeid\">$title</a> submitted by $poster<br>\n";

echo"$shortdesc<br><br>\n";
The
first echo statement creates an HTML link tag on the Web page. It uses
the content HTML variable from the index.php page to point to the
showrecipe.inc.php page as the next page to display in the main cell.
It also adds an HTML variable called id, which points to the
recipeid value of the data record. This trick allows us to pass the
recipeid value to the showrecipe Web page. It uses the title value of
the data record as the actual link text.
The
first echo statement also displays the poster value in the data record
to identify who posted the recipe. The second echo statement displays
the shortdesc value of the data record, so a brief description appears
under the HTML link.
The while() loop that contains the echo statements iterates through the data records until the mysqli_fetch_array function returns a False
value, displaying the information within the main cell of the index.php
Web page.
If visitors click any of these links, they are taken to the showrecipe.inc.php page, which we'll work on next.
The
main.inc.php program generates a Web page that displays a list of the
last five recipes in the database along with an HTML link for each
recipe. Now we need to create the PHP include file that will query the
recipe database for the specific recipe the visitor requests and then
display that recipe on the Web page.
In our application, every Web page is displayed within the index.php file. Since the recipe link passes the showrecipe
content value, index.php attempts to include the showrecipe.inc.php
file to display recipe data in its main table cell. Here's how this
looks:

The Recipe Center displaying a recipe
The Web page displays all of the data fields from the recipes table, along with two links at the end of the recipe (one to add a comment and one to print the recipe).
Following
that, the Web page displays any comments that visitors post related to
the recipe. The PHP program retrieves this data from the comments table.
Here are the steps to create the showrecipe.inc.php include file:
- Create a text file in the recipe folder called showrecipe.inc.php
- In the text file, type the following code:
showrecipe.inc.nopaging.php
<?php

// MySQLi connection

include("connectselect.inc.php");

$recipeid = $_GET['id'];

$query = "SELECT title,poster,shortdesc,ingredients,directions from recipes where recipeid = $recipeid";
$result = mysqli_query($conn, $query) or die('Sorry, could not find recipe requested');

$row = mysqli_fetch_array($result, MYSQLI_ASSOC) or die('No records retrieved');
$title = $row['title'];
$poster = $row['poster'];
$shortdesc = $row['shortdesc'];
$ingredients = $row['ingredients'];
$directions = $row['directions'];

$ingredients = nl2br($ingredients);
$directions = nl2br($directions);

echo "<h2>$title</h2>\n";

echo "by $poster <br><br>\n";
echo $shortdesc . "<br><br>\n";
echo "<h3>Ingredients:</h3>\n";
echo $ingredients . "<br><br>\n";

echo "<h3>Directions:</h3>\n";
echo $directions . "\n";
echo "<br><br>\n";

$query = "SELECT count(commentid) from comments where recipeid = $recipeid";
$result = mysql_query($conn, $query);
$row=mysql_fetch_array($result);
if ($row[0] == 0)
{
   echo "No comments posted yet.  \n";
   echo "<a href=\"index.php?content=newcomment&id=$recipeid\">Add a comment</a>\n";
   echo "   <a href=\"print.php?id=$recipeid\" target=\"_blank\">Print recipe</a>\n";
   echo "<hr>\n";
} else
{
   echo $row[0] . "\n";
   echo " comments posted.  \n";
   echo "<a href=\"index.php?content=newcomment&id=$recipeid\">Add a comment</a>\n";
   echo "   <a href=\"print.php?id=$recipeid\" target=\"_blank\">Print recipe</a>\n";
   echo "<hr>\n";
   echo "<h2>Comments:</h2>\n";

   $query = "SELECT date,poster,comment from comments where recipeid = $recipeid order by commentid desc";

   $result = mysqli_query($conn, $query) or die('Could not retrieve comments');
   while($row = mysqli_fetch_array($result, MYSQL_ASSOC))
   {
       $date = $row['date'];
       $poster = $row['poster'];
       $comment = $row['comment'];
       $comment = nl2br($comment);

       echo $date . " - posted by " . $poster . "\n";
       echo "<br>\n";
       echo $comment . "\n";
       echo "<br><br>\n";
   }
}
?>
- Save the text file.
The next line of code uses the $_GET [] PHP function.
This function retrieves the value of the id HTML variable that the main.inc.php program passes within the URL.
It then assigns the value to the PHP variable $recipeid.
You could reference the $_GET
['id'] function throughout the program as a variable, but I find it
much easier to just go ahead and assign the retrieved HTML variables to
PHP variables at the start, and then just use the PHP variables in the
program.
Next, the program creates an SQL query string to retrieve all of the data fields from the recipes table for the specified recipe number:
$query = "SELECT title,poster,shortdesc,ingredients,directions FROM recipes WHERE recipeid = $recipeid";
This
query uses the WHERE clause to return only the data record with a
recipeid data field equal to the recipeid value specified in the HTML
link variable. This ensures that we'll only retrieve the data for the
specific data record in the table.
After
that, you should recognize the mysqli_query and mysqli_fetch_array
functions. Since we know that we're only going to retrieve a single
record, we don't need to use a while() loop to look through the
mysql_fetch_array data. Just one call will do.
Like
the main.inc.php program, this program assigns each of the retrieved
data field values to PHP variables. You may notice something different
with how the $ingredient and $directions variables are assigned:
$ingredients = nl2br($ingredients);

$directions = nl2br($directions);
Both the ingredients and directions
data fields are text data types. They may include characters that are
used to format the data (such as carriage returns to list a single
ingredient per line). Unfortunately, if we use the echo statement to
display that data directly, HTML will ignore the carriage returns
embedded in the data, and things won't look right.
To solve this problem, PHP provides the nl2br()
function. This function converts any newline characters (carriage
returns) in the string to <br> HTML tags. The client's browser
will interpret the <br> tags as carriage returns and properly
format the data for us. Neat!
After
displaying the recipe, the program performs another query to see if
there are any comments for the recipe. It creates another query string,
which may look somewhat odd to you:
$query = "SELECT count(commentid) FROM comments WHERE recipeid = $recipeid";
The SQL count()
function counts the number of occurrences of the specified data field
in the result set. The query uses a filter to return only comments with
the recipeid data field value equal to the $recipeid PHP variable.
Since the count()
function doesn't return a column name, we have to use the positional
array value to retrieve the value returned ($row
[0]
). If there aren't any comments posted, we just display a message and
then provide links for the visitor to either post a comment or print
the recipe (you'll find out how to do both of these things later in the
course).
If
there are comments posted for the recipe, the program creates another
SQL query, sends it off to the server, then displays the returned data.
Once again, we've had an action-packed lesson.
Let's head to Chapter 5 and finish up.
We
covered a major part of the Recipe Center application today. First, we
discussed how to use standard SQL statements with MySQL to perform
simple database actions. We use the SQL SELECT statement to query the
database for specific data elements, such as all comments related to
recipe number 1. We saw how to use the phpMyAdmin tool to submit SQL
queries and view the returned results.
After
that, we wrote the main.inc.php include file. This file queries the
recipe database for the title, poster, short description, and recipe
number of the last five posted recipes. Then it builds a simple Web
page that shows this information to the visitor and includes links to
display the full recipes.
Next,
we worked on creating the showrecipe.inc.php file. This include file
first retrieves the recipe number a visitor selects, and then it
retrieves all the information for that recipe from the database. After
getting the recipe information, it formats the data into the main cell
on the Web page.
Now
that you know how to display data and create HTML links to Web pages,
it's time to start letting your visitors add content to your system. In
our next lesson, you'll find out how to produce Web pages that allow
visitors to post data and how to use PHP and SQL to push that data into
your MySQL database.
 Important:
In this lesson's assignment, you'll build the news.inc.php include file
which is integral to the Recipe Center application. Therefore, it's crucial that you do the Lesson 5 assignment (at least if you want the news section to work properly in your application). Important:
In this lesson's assignment, you'll build the news.inc.php include file
which is integral to the Recipe Center application. Therefore, it's crucial that you do the Lesson 5 assignment (at least if you want the news section to work properly in your application).
|
SQL Statement Syntax
http://dev.mysql.com/doc/refman/5.0/en/sql-syntax.html
|
|
This is the official manual on what SQL statements MySQL supports and
the syntax you need to use them. If you look at the SELECT SQL
statement, you'll see that there are lots more options available than
the few we covered.
|
Q:
Can you use the mysqli_query() function to submit an INSERT or UPDATE SQL statement?
A:
Yes, the mysqli_query() function can be used to send any type of SQL statement to the MySQL server.
Q:
If a PHP mysqli function produces an error, can I display the error from within the die() function?
A:
Yes. You can add the mysql_error() to the end of your text string. This
function displays the last MySQL error message produced in a more
user-friendly manner. It would look like this:
	$db_server = "localhost";
	$db_user = "test";
	$db_pass = "test";
	$db_name = "recipe";

	$conn =  new mysqli($db_server, $db_user, $db_pass, $db_name);
The key to good database programming is being comfortable with creating SQL
queries. So try playing around with various SQL queries using the
phpMyAdmin SQL tool. Watch how data is returned, especially when you
incorporate the WHERE, ORDER BY, and LIMIT modifiers in your SELECT
statements.
After you're comfortable with SQL queries, there's
still one more PHP include file you need to create for the Recipe
Center application. The news.inc.php include file displays
the last two news articles posted in the news table in the news cell on the Web page.
You should have created a template for the news.inc.php file in the
previous lesson. Now you should know how to create the PHP code to
query the news table, retrieve the last two posted news articles, and
display them in the Web page.
Go ahead and try to create this program yourself. Here's the code that I came up with:
<?php

    // MySQLi connection
	include("connectselect.inc.php");

	$result = $mysqli->query
        ("SELECT date,title,article from news order by date desc limit 0,2")
        or die($mysqli->error);

    while($row=mysqli_fetch_array($result, MYSQLI_ASSOC))
    {
    $date = $row['date'];
    $title = $row['title'];
    $article = $row['article'];
    echo "<br>$date - <b>$title</b><br>$article<br><br>";
    }

?>
news.inc.php


