Glad
you're back! We've been moving along well, and by now you should have a
pretty good understanding of how to create dynamic pages by querying a
MySQL/MariaDB database and host to present database content on your Web page.
Today,
we're going to explore how to allow your visitors to post their own
data on your Web site. This feature has lots of practical applications
such as bulletin-board systems in which visitors can post messages for
others to view and respond to and themed content management systems
like our Recipe Center.
First,
we'll discuss the SQL INSERT statement and how to use it to insert data
into our database. Then we'll review how HTML forms can help us
retrieve data from our visitors. And finally, we'll put these two
things together by using PHP code to take the data our visitors submit
on our forms and push it into our database.
Hold on, here we go.
So far in our Recipe Center application, we
control all of the data presented on the dynamic Web page. We used
phpMyAdmin to manually enter recipes and news articles into the
database. The application uses that data to display information on
screen. Now it's time to implement another aspect of dynamic Web
pages—allowing visitors to post data.
 Note:
While the thought of visitor postings can strike fear in the heart of
any Web administrator, it's really not all that bad as long as you have
the proper controls. Later in the course, we'll discuss how to apply
controls that ensure only registered users can post data. Note:
While the thought of visitor postings can strike fear in the heart of
any Web administrator, it's really not all that bad as long as you have
the proper controls. Later in the course, we'll discuss how to apply
controls that ensure only registered users can post data.
|
As
you saw in the last lesson, all interaction with the MySQL/MariaDB database is
done via SQL statements. The SQL statement responsible for putting new
data records into a table is the INSERT statement. The basic format of an INSERT command is:
INSERT INTO table

[(data field list)]

 VALUES (valuelist)
In
the INSERT statement, you must specify the table you're going to insert
data into. Optionally, you can provide a subset of the data fields
you're going to insert (enclosed in parentheses). If you're inserting
values for all of the data fields, you don't need to use this. After
the VALUES modifier, you must list the data values to insert in the
order the data fields are listed in the data field list (or in the
order they appear in the table if you insert values for all of the data
fields).
The valuelist
literal is a comma separated list of constant data values. String
values must be enclosed in either single or double quotes. Here's an
example of inserting data into the comments table:
INSERT
INTO comments (recipeid, poster, date, comment) VALUES (3, 'rich',
'2007-01-01', 'This recipe makes the best cookies ever!')
The
INSERT statement example lists the four data fields that the statement
provides values for. Remember that when we created the comments table,
we specified the commentid data value with the auto increment
feature. This means we don't need to supply a value for that data
field. MySQL/MariaDB will automatically insert the next available value into
that data field when we add the new record.
After
you've formulated the INSERT SQL statement, you'll want to send it to
the MySQL/MariaDB server from your PHP code. Remarkably, this process is the
same as the process we used to send a query:
connectselect.inc.php
// MySQLi connection
$db_server = "localhost";
$db_user = "test";
$db_pass = "test";
$db_name = "recipe";

$conn = new mysqli($db_server, $db_user, $db_pass, $db_name);
After
sending the INSERT statement to the MySQL/MariaDB server, you'll get a
response, but not the same one as when you send a SELECT statement. The
mysqli_query function will set the $result variable to a value
of either 0 or 1. If the INSERT statement was successful, the value of
$result will be 1. If the INSERT statement was unsuccessful, the value
of $result will be 0. You can easily check this using a standard
if-then statement, as shown in the code example.
If you really want to get fancy, you can also use the mysqli_affected_rows()
PHP function. This function returns the number of rows that were the
result of an INSERT or DELETE statement. Obviously, for a successful
INSERT statement, the returned value should be 1.
When
you're creating Web applications, it's easy to overlook the user
account permissions your PHP code will use. When we inserted data using
the phpMyAdmin tool, we were logged in to the MySQL/MariaDB server as the root
user, who has full permissions on all databases.
In
a PHP program, the permissions are based on the userid you specify in
the mysqli_connect() function. That user must have INSERT privileges for
the table you're trying to insert data into. There are a couple of
different ways to handle this situation in Web applications.
You
can create a single MySQL/MariaDB user account that all queries in the PHP
application will use to log in to the server. This user account must
have the necessary permissions for performing all the database actions
used in the application, such as accessing, inserting, and, if
necessary, deleting data from the application database.
Alternately,
you can create individual MySQL/MariaDB user accounts for each person who will
use the application. Then you give each user account permission to
perform only the database tasks the individual needs to perform.
If
you're implementing a Web application where some users are restricted
from updating or deleting database data, you'll need to track each user
as he or she uses the system. To do that, you'll have to use each
individual user's account in the mysqli_connect() function when you
connect to the MySQL/MariaDB server. Each user will log in to the MySQL/MariaDB
database using his or her own user account.
In
our application, we allow users to query the database without logging
in to the application. Since this is the case, we created a single user
account (called test) that we use to log in to the MySQL/MariaDB server.
Of
course this can be dangerous, as now any person using the application
has access to insert data into the database. But don't worry: Later in
the course we'll learn a method for controlling who uses different
features of the application even though we only use one MySQL/MariaDB user
account.
That's enough about permissions for now. Meet me in Chapter 3.
Before
you can start pushing data from your application to the MySQL/MariaDB database,
you need to get the data from your visitors. The most common method to
do this is using HTML forms.
HTML forms
provide many methods for allowing visitors to enter information. Once
the information is entered, the page containing the form passes that
information to another Web page for processing, using the GET or POST
methods we discussed in an earlier lesson.
This
system requires two Web pages—one to present the HTML form for user
input, and another to process the data the user enters. First, let's
look at the input form Web page.
The core of an HTML form is the <form>
tag. This tag defines the beginning and the end of the form elements.
The form tag includes several attributes that identify the behavior of
the form. The following table shows you the three that we'll be using.
| Form attributes |
| Attribute | Description |
| name | Specifies a unique name for the form. |
| method | Specifies the HTML method used for passing variables (either "get" or "post"). |
| action | Specifies the Web page URL to pass the data to. |
Within
the form tags you can include normal HTML elements, such as headings
and text labels that identify the tags, to present a text form for the
visitor to complete. In addition to the text labels, forms have areas
for the Web page visitor to enter or select information. These are
called controls.
HTML provides various types of controls for various types of data. Most of the standard controls use the input HTML tag:
<input name="variable name" type="input type" value="default value">
HTML provides many different types of controls, as shown in the following table:
| HTML control types |
| Type | Description |
| button | A single push button with a label. |
| check box | A square box that can be set or unset. |
| file | An area for selecting a filename. The contents of the file are submitted to the form. |
| hidden | A hidden input field that passes a default value. |
| image | A graphical submit button. |
| password | A text box that hides the text as it is typed. |
| radio button | A group of circles that allow only one circle to be set in the group at any time. |
| reset | A button that, when pushed, resets all of the fields to their default values. |
| submit | A special purpose button. When selected it calls the URL specified in the action. |
| text | A single line text box for entering text. |
In addition to input fields, there are a few other types of elements available in the forms area. The one we'll be using is the textarea
control. The textarea control provides a multiline text box area where
the Web page visitor can enter large quantities of multilined text.
We'll be using this feature to create the input areas for the recipe
ingredients and directions, as well as the comment area.
The submit
control type has a special meaning. It produces a button that, when the
visitor clicks it, sends the data contained in all of the other form
input fields to the URL specified in the action attribute. Every form
should contain a submit control.
Now
that you have an idea of what we're going to do, let's take a look at
the actual application code used to get data from our Web page
visitors. For the Recipe Center application, we have two forms for user
input:
- Posting a new recipe
- Posting a comment
To post a new recipe, the visitor will click the Post a new recipe
link in the navigation section on the index.php page. (The content of
this section of the page is provided by the nav.inc.php include file we
discussed in an earlier lesson). The link then references the
newrecipe.inc.php include file, which will display as the main cell
content on the index.php page.
The
newrecipe.inc.php file produces the HTML form for adding a new recipe.
In a later lesson, we'll make the form a little fancier, but for now,
we'll just keep things simple.
Here's how to create the newrecipe.inc.php include file:
- Create a text file in the recipe folder under your WAMP64 www folder.
Name the text file newrecipe.inc.php, and enter the following code into the file:
newrecipe.inc
if (!isset($_SESSION['valid_recipe_user']))
{
	echo "<h2>Sorry, you do not have permission to post recipes</h2>\n";
	echo "<a href=\"index.php?content=login\">Please login to post recipes</a>\n";
}
else
{
	$userid = $_SESSION['valid_recipe_user'];
    echo <form action=index.php method=post>
    echo <h2>Enter your new recipe</h2><br>
    echo Title:<input type="text" size="40" name="title"><br>
    echo Poster:<input type="text" size="40" name="poster"><br>
    echo Short Description:<br>
    echo <textarea rows="5" cols="50" name="shortdesc"></textarea><br>
    echo <h3>Ingredients (one item per line)</h3>
    echo <textarea rows="10" cols="50" name="ingredients"></textarea><br>
    echo <h3>Directions</h3>

    echo <textarea rows="10" cols="50" name="directions"></textarea><br>
    echo <input type="submit" value="Submit">
    echo <input type="hidden" name="content" value="addrecipe">
	echo </form>
}
- Save the new text file.
The newrecipe.inc.php file provides input fields for all of the data fields in the recipes table (except for the recipeid data field, which the MySQL/MariaDB server will supply for us using the autoincrement feature).
Notice
that there is one additional input field specified. The content input
field uses the hidden input field type. This field allows us to pass
along the content variable value to the index.php program without visitors seeing the value in the form (tricky).
Since
the ingredients and directions fields are large data areas, this form
uses the POST method to pass the variable values to the
addrecipe.inc.php Web page. This allows the visitor to post larger text
values for these fields.
Notice
that we include a hidden input field to assign the content HTML
variable the value of the next include file. The addrecipe.inc.php
include file will process the form and push the data into the database.
Finally, we must include a submit input field button so visitors can submit new recipe data.
Here's how the newrecipe.inc.php form looks when a visitor selects to post a new recipe:
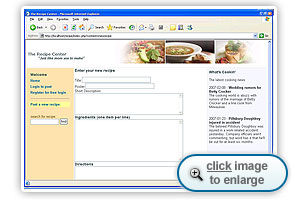
Input form for posting a new recipe
If
you remember from Lesson 5, when the application includes the
showrecipe.inc.php include file to display a recipe, it provides a link
for visitors to post a comment. That link points to the
newcomment.inc.php include file. This file produces another form for
entering a comment related to the recipe that appears on the Web page.
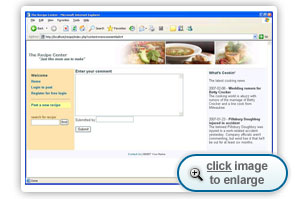
Input form for posting a new comment
We'll need to create this include file as well:
Create a text file called newcomment.inc.php in your recipe folder, and enter the following code:
newcomment.inc
<?php

$recipeid = $_GET['id'];
if (!isset($_SESSION['valid_recipe_user']))
{
    echo "<h2>Sorry, you do not have permission to post comments</h2><br>\n";
    echo "<a href=\"index.php?content=login\">Please login to post comments</a><br>\n";
    echo "<a href=\"index.php?content=showrecipe&id=$recipeid\">Go back to recipe</a>\n";
}
else
{
    $userid = $_SESSION['valid_recipe_user'];
    echo "<form action=\"index.php\" method=\"post\">\n";
    echo "<h2>Enter your comment</h2>";
    echo "<textarea rows=\"10\" cols=\"50\" name=\"comment\"></textarea><br>\n";

    echo "<input type=\"hidden\" name=\"poster\" value=\"$userid\"><br>\n";
    echo "<input type=\"hidden\" name=\"recipeid\" value=\"$recipeid\">\n";
    echo "<input type=\"hidden\" name=\"content\" value=\"addcomment\">\n";
    echo "<br><input type=\"submit\" value=\"Submit\">\n";
    echo "</form>\n";
}

?>
The newcomment.inc.php include file is somewhat different from the
newrecipe.inc.php file we used. When a visitor posts a comment for a
specific recipe, we must pass along the value of the recipeid variable that identifies the recipe the comment pertains to.
To
do that, we need to use some PHP code. Because of this, we need to use
PHP to create the HTML form itself. You'll notice that the first line
in the program uses the $_GET
[] PHP function to retrieve the id HTML value passed by the link that calls the program. This HTML value must contain the recipeid
value of the recipe displayed by the showrecipe.inc.php file. To
refresh your memory, here's how that link is created in the
showrecipe.inc.php file:
echo "<a href=\"index.php?content=newcomment&id=$recipeid\">Add a comment</a>\n";
The
recipeid value also needs to be passed along to the include file that
processes the form. Again, we can use a hidden input field to pass this
value to the next include file, which is also specified as a hidden
input field value.
After creating the forms necessary to gather our input data, we need to
write the PHP programs to send the data to the MySQL/MariaDB server.
That's what we'll be doing in Chapter 4.
Where we left off in our story, our friendly Web page visitor had just clicked the Submit button on one of our HTML forms. Now we have to get to work and process the form data.
Let's first take a look at the PHP code required to post a new recipe:
- Create a new text file called addrecipe.inc.php in your recipe folder.
- Enter this code to the file:
addrecipe.inc
<?php

    $title = $_POST['title'];
    $poster = $_POST['poster'];
    $shortdesc = $_POST['shortdesc'];
    $ingredients = htmlspecialchars($_POST['ingredients']);
    $directions = htmlspecialchars($_POST['directions']);

    if (trim($poster == ''))
    {
        echo "<h2>Sorry, each recipe must have a poster </h2>\n";
    }
    else
    {

    // MySQLi connection
	include("connectselect.inc.php");

    $query = "INSERT INTO recipes (title, shortdesc, poster, ingredients, directions) " .
          "VALUES ('$title', '$shortdesc', '$poster', '$ingredients', '$directions')";

    $result = mysqli_query($conn, $query) or die('Sorry, we could not post your recipe to the database at this time');

    if ($result)
		echo "<h2>Recipe posted</h2>\n";
    else
		echo "<h2>Sorry, there was a problem posting your recipe</h2>\n";
	}

?>
Let's look at this code and see what's happening. First we retrieve all of the HTML variables from the form Web page. Since the form tag in the newrecipe.inc.php file uses the POST method, we need to use the $_POST
[]
PHP function to assign the values from each HTML variable to the PHP variables.
Notice that we're doing something a little different with the ingredients and directions data values:
$ingredients = htmlspecialchars($_POST['ingredients']);

$directions = htmlspecialchars($_POST['directions']);
Because
these two variables are long text fields, the Web page visitor can
place any type of data in them. We need to take a special precaution
about that.
The htmlspecialchars()
function converts HTML code characters into text values that the Web
browser will display but not interpret as HTML code. This prevents
visitors from entering HTML code within the text areas. This is most
often abused by people trying to insert HTML links to their own Web
sites within comment areas on Web pages.
 Note:
There's one additional oddity that you may have to deal with when
working with text strings—quotes. Before we can insert a text string
into the MySQL/MariaDB database we need to ensure that we escape (precede with
a backslash) all single or double quotes in the string so as not to
confuse the MySQL/MariaDB SQL command (which uses quotes itself). Note:
There's one additional oddity that you may have to deal with when
working with text strings—quotes. Before we can insert a text string
into the MySQL/MariaDB database we need to ensure that we escape (precede with
a backslash) all single or double quotes in the string so as not to
confuse the MySQL/MariaDB SQL command (which uses quotes itself).
Fortunately, PHP provides a method to automatically do this for us. The PHP processor in Apache uses the magic_quotes_gpc
feature to automatically add backslashes to all quotes used in strings
received from HTML forms. The WAMP64 server enables this feature by
default, but not all LAMP or WAMP servers do that. If your LAMP or WAMP server doesn't use this feature, you'll have to add the backslashes yourself, using the PHP addslashes()
function. If you're unsure if your server supports this feature, you
can easily test for it in your PHP code, and add the backslashes if
necessary:
if (!get_magic_quotes_gpc())
{
$ingredients = addslashes($ingredients);
$directions = addslashes($directions);
}
|
After assigning the HTML variables to PHP variables, the next step is to check whether the poster placed a name in the Poster input field. The trim()
PHP function removes any leading or trailing spaces from a string
value. If the string is empty, this leaves nothing in the string. There
is also an ltrim() function, which only removes leading spaces, and an
rtrim() function, which only removes trailing spaces.
After
the trim() function removes the leading and trailing spaces, an if-then
statement is used to check whether there's anything left over in the
string. If the string is empty, that means the visitor didn't enter any
data into the input field. The program then displays a message
indicating that the visitor must enter a data value in the Poster field.
You
should recognize the rest of the code in the addrecipe.inc.php program.
It's just the standard code to connect to the MySQL/MariaDB server, select the
recipe database, then build and send the INSERT SQL statement to the
server. Remember that since we set the recipeid data field to
auto-increment, we don't need to provide a value for that data field in
the INSERT statement.
At
the end, the program checks the $result value to determine if the
INSERT command was successful. The Web page displays a message to the
visitor indicating whether the posting was successful or not.
Next, let's look at the PHP code for adding a new comment:
- Create another text file in the recipe folder called addcomment.inc.php.
- Enter the following code in that file:
addcomment.inc
<?php

    $recipeid = $_POST['recipeid'];
    $poster = $_POST['poster'];
    $comment = htmlspecialchars($_POST['comment']);
    $date = date("Y-m-d");

    // MySQLi connection
	include("connectselect.inc.php");

	$query = "INSERT INTO comments (recipeid, poster, date, comment) " .
		" VALUES ($recipeid, '$poster', '$date', '$comment')";

	$result = mysqli_query($conn, $query);

    if ($result)
		echo "<h2>Comment posted</h2>\n";
    else
        echo "<h2>Sorry, there was a problem posting your comment</h2>\n";

        echo "<a href=\"index.php?content=showrecipe&id=$recipeid\">Return to recipe</a>\n";
?>
Just like the addrecipe.inc.php program, this one starts by retrieving the form data using the $_POST
[]
function (and checks the comment field for HTML code).
You
may notice that instead of making the comment poster provide the date
on which he or she submits the comment, the code uses the PHP date() function to obtain the current date and time from the system. The format of the date function is:
date(textformat)
Here, textformat
defines how the function displays the date. The date() function uses
symbols to represent the day, month, year, hour, minute, and second
values. The format used in the code ("Y-m-d") matches the format that
the MySQL date data type uses:
- a four-digit year
- a two-digit month
- a two-digit day
If
you don't use this format (including the dashes between the codes),
MySQL won't recognize the value as a date and will reject the INSERT
attempt.
After building the INSERT statement, the code sends it off to the MySQL/MariaDB server and then displays the results for the visitor.
Okay, I think that's plenty for today. Let's go to Chapter 5 and finish up.
Today,
we discussed how to allow visitors to post data into the content
management system database. This enables them to interact with the
application while still allowing you to control the data organization
of the Web pages.
First
we discussed the SQL INSERT statement and found out how to use it to
add new data records to an existing database table. Next, we saw how
PHP sends INSERT SQL statements to the MySQL/MariaDB server using the same
mysqli_query() function that we used to send SELECT statements. The
result of the INSERT statement is then checked to determine whether it
was successful.
We
then looked at how to use standard HTML forms to allow visitors to
enter data into the application. We built forms that give visitors the
ability to post new recipes and comment on existing ones. We then built
the PHP code necessary to extract the data from the HTML forms, create
the INSERT SQL statement, and pass the data on to the MySQL/MariaDB server.
In
our next lesson, we'll dig a little deeper into the SELECT statement.
No good content management system is complete if it doesn't allow
visitors to search through the content. So we'll see how to use the
wildcard features of the SELECT statement to easily format SQL queries
to search for content and then display the search results for visitors
to choose from.
W3C Recommendation—Forms
http://www.w3.org/TR/html4/interact/forms.html
|
|
This is the official manual describing the different types of controls
available in HTML forms and how to use them.
|
Q:
What can I do if I accidentally post a bad data record?
A:
You can use the phpMyAdmin tool to browse through the data records for
a table. In the browser, you can edit individual data fields to make
corrections or even delete an entire data record.
Q:
Using the DELETE SQL statement, can you create PHP code that will remove data records for you?
A:
Yes, you can, but be extremely careful. The DELETE SQL statement
deletes all records that match the WHERE clause. A common database
programming mistake is to forget the WHERE clause in the DELETE
statement, which then deletes all of the records!
The key to inserting new data into your database is knowing how to write
good INSERT statements. So, for today's assignment, use the phpMyAdmin
tool to create SQL statements to manually insert data records into the
news and recipes tables. Remember that the news table doesn't use the
autoincrement feature to create a unique news article id.
While the official Recipe Center application doesn't provide this feature, if
you feel adventurous, you can create another link in your navigation
include file (nav.inc.php) to allow visitors to post news articles.
You'll need to make an HTML form so they can enter them. You'll also
need to create another PHP include file to add the form data to the
database.

