Print Preview of a recipe in Recipe Center application
Lesson 08 - Producing Attractive Printer-friendly Pages
Chapter 1:
Introduction
Congratulations! You've made it to Lesson 8, and our application is looking good. Today we'll look at another piece of the puzzle: What happens when a visitor decides to print information contained on the Web page.
Printing Web pages has been a problem for many years. I'm sure you've experienced trying to print a Web page and getting cutoff text, missing pictures, and fonts the size of Texas that take up the whole sheet of paper. Over the years, lots of smart and creative people have worked to solve this issue. They've proposed lots of different solutions, some good, some not so good.
We're going to explore a couple of the better solutions for printing Web pages. We'll add a couple of features to the Recipe Center application to help our visitors print those tasty recipes we're storing for them.
Before we delve into solutions though, we'll examine the problem we're facing more closely. Let's get started.
Chapter 2:
Problems With Printing
The goal of every Web designer is to make an attractive Web page. We usually accomplish this by adding fancy fonts, pretty pictures, and, of course, elegant background colors. This is all well and good while visitors view our creations on their computer monitors, but what do these decorative elements do for those who want a more permanent copy of the Web page?
Printing fancy Web pages is often a problem. The things that make Web pages look great on screen are just the things that turn printing into a nightmare. For example, it doesn't take long for those fancy Web page backgrounds to drain an inkjet cartridge dry.
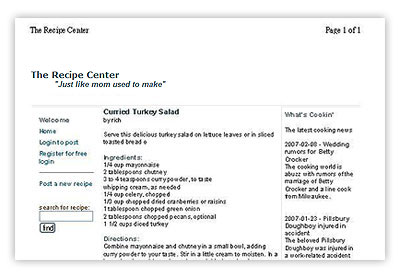
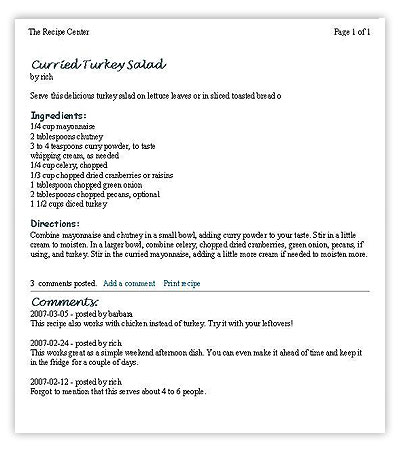
Currently, visitors to our Recipe Center don't have any printing options. To print a recipe, they'd have to use the Web browser's Print feature. And since we've used PHP include files to embed the recipe text within the Web page, they'll end up printing the header, navigation, news, and footer areas, too, like this:
Print Preview of a recipe in Recipe Center
application
That's a lot of useless information to waste ink and paper on. Wouldn't it be nice to be able to print just the recipe information, all by itself, without the extraneous Web page stuff? Fortunately for us, there are several different techniques we can use to accomplish just that. Let's first take a look at a simple solution to this problem.
Starting With a Blank Slate
One solution to the printing problem is to generate a new Web page that contains only the recipe text. Once the application creates this new Web page, the visitor can easily use the browser's print function to print the recipe by itself.
The trick is in creating the new blank Web page with just the recipe text. To do this, we'll need to create an HTML link that uses a special attribute of the a (anchor) tag, which you may already be familiar with:
<a href="print.php?id=3" target="_blank">Print recipe</a>
By default, when you click an embedded HTML link, the new location appears within the same browser page. The target attribute defines where the target link should be opened. The _blank value directs the browser to open the link Web page in a new window. This enables us to keep the original Recipe Center Web page active and open a brand new Web window to display the recipe text for printing.
Once you open a new browser window, you have a clean slate to work with. You can put whatever data you need into the new window's Web page. Of course, we'll use PHP code to put the recipe information into it.
Printing With a New Window
To implement this method for printing, we'll need two things:
If you remember from way back in an earlier lesson when we created the showrecipe.inc.php include file, we already added a Print recipe link that looks like this:
echo " <a href=\"print.php?id=$recipeid\" target=\"_blank\">Print recipe</a>\n";
Since this is PHP code, we need to use the echo statement to write the HTML code to the Web page. The link references the print.php file (which we'll create next) and passes the recipeid variable number as an HTML variable. The target attribute is set to _blank so that the browser opens the Web page in a new window.
That takes care of the HTML link. Now let's create the print.php file to display the recipe data in the new Web page:
<!DOCTYPE html PUBLIC "-//W3C//DTD XHTML 1.0 Transitional//EN"

"http://www.w3.org/TR/xhtml1/DTD/xhtml1-transitional.dtd">
<html xmlns="http://www.w3.org/1999/xhtml">
<body>

<?php
	// MySQLi connection
	$db_server = "localhost";
	$db_user = "test";
	$db_pass = "test";
	$db_name = "recipe";

	$mysqli =  new mysqli($db_server, $db_user, $db_pass, $db_name);

	$result = $mysqli->query
		("SELECT count(recipeid) from recipes")
		or die($mysqli->error);

	$recipeid = $_GET['id'];

	$query = "SELECT title,poster,shortdesc,ingredients,directions from recipes where recipeid = $recipeid";
	$result = mysqli_query($mysqli, $query) or die('Could not find recipe');
	$row = mysqli_fetch_array($result, MYSQLI_ASSOC) or die('No records retrieved');

	$title = $row['title'];
	$poster = $row['poster'];
	$shortdesc = $row['shortdesc'];
	$ingredients = $row['ingredients'];
	$directions = $row['directions'];

	$ingredients = nl2br($ingredients);
	$directions = nl2br($directions);

    echo "<h2>$title</h2>\n";

    echo "posted by $poster <br>\n";
    echo $shortdesc . "\n";
    echo "<h3>Ingredients:</h3>\n";
    echo $ingredients . "<br>\n";

    echo "<h3>Directions:</h3>\n";
    echo $directions . "\n";
?>
</body>
</html>
By now you should be able to recognize all of the PHP code. It performs the standard steps of connecting to the MySQL server, retrieving the desired recipeid number value from the HTML variable, building the SQL query, sending the SQL query to the server, retrieving the data returned by the server, and, finally, displaying the data on a simple, printer-friendly Web page. Since we know we're only working with one record, we don't need to worry about looping through the query results. Just one pass is all we need.
I also took the liberty of not including the recipe comments on the printer-friendly recipe Web page. All that's there is the recipe information. I'm assuming that our visitors will want to print just the recipe and not the associated comments. But you should be able to easily add the required PHP code to the print.php file to include the comments if you so choose. (Hint: look at how that was done in the showrecipe.inc.php include file.)
Okay, so now when you display a recipe in the Recipe Center application, you'll see a Print Recipe link between the recipe and the comments sections. Clicking that link will open a new browser window containing only the recipe data.
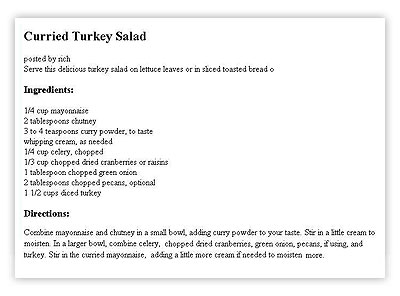
The recipe data window
On the new browser window that contains the recipe, click File > Print Preview. You'll see what the recipe page would look like if you print it out:
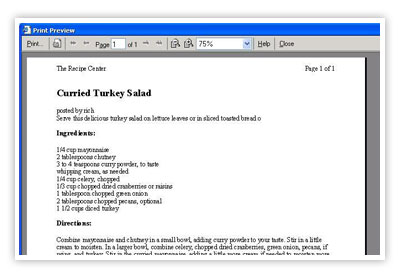
Print Preview of the standard recipe Web page
Congratulations, you've taken the first step to solving your printing problem! If you notice though, now we've gone a little too far in the opposite direction. We stripped off all of the fancy Web page graphics and formatting and have produced a pretty generic-looking print document.
There must be a middle ground between running inkjet cartridges in overdrive and producing a dull, boring page for print.
Join me in Chapter 3 to see what more we can do!
Chapter 3:
Spicing Up the Print Page
Our new printer-friendly Web page contains all of the data we're interested in, but in a pretty boring layout. Fortunately, since it's a Web page, we can use a standard Cascading Style Sheet (CSS) to give it some life.
You had some practice with CSS back when we created mystyle.css for the index.php file. We don't want to use the same CSS file for our print page, though, since we don't want visitors to have to print fancy colors or graphics. Instead, we'll create another CSS file just for our printer-friendly page: print.css.
The print.css file needs to contain directives for how we want the individual elements to appear on our printed page. Again, we don't want to get too carried away here. So we'll just use simple h2 and h3 header tags and create standard body text. We'll create sections in our style sheet to define special fonts and font sizes for these elements.
Creating the Print Style Sheet
Let's create the print.css file now:
body
{
    background-color: #ffffff;
    color: #000000;
    font-family: "Times New Roman", serif;
    font-size: 12pt;
}

h2
{
    font-family: "Lucida Handwriting", serif;
    font-size: 16pt;
}

h3
{
    font-family: "Comic Sans MS", serif;
    font-size: 14pt;
}
Let's look at a section of the print.css file. The body section defines the background and character colors the browser should use to display the Web page. The colors are defined using a three-value RGB system. You may already know how this system works, but let's quickly review it here.
The color value is a combination of shades of red, green, and blue. The intensity of each of the three colors is defined by a two-digit hexadecimal value. Full on for a color is the hexadecimal value FF. Full off for a color is the hexadecimal value 00. Thus, to produce the color black, all of the colors are turned off, resulting in the value 000000. To produce the color white, all of the colors are turned to full intensity, resulting in the value FFFFFF.
The print.css file defines the background color for the body section as plain white. This will save printer ink since none will be used to produce the background color. The text color is also set to plain black. You can experiment with different color schemes to determine what works best for your artistic needs without overtaxing a visitor's inkjet cartridge.
After defining the body colors, the style sheet defines the font and size for text displayed in the Web page's body section (where your data will be). The font-family property sets the font the Web browser will attempt to use to display the text. This property consists of two elements:
The font family name describes the type of font, such as Courier, Arial, or Times. You can use exotic fonts here as well, although you should be careful since not all Web browsers support all of the different types of fonts. We used the Times New Roman font, which is pretty standard on all Web browsers.
The generic family name describes the category the font belongs to, such as serif, sans serif, or cursive. Serif fonts are those fancy letters that contain extra details (called nonstructural elements) at the ends of some strokes (like the bottom feet that stick out of a capital letter A). Sans serif fonts remove all nonstructural details from strokes and just have the strokes necessary to create the basic letters (like we learned how to write letters in kindergarten).
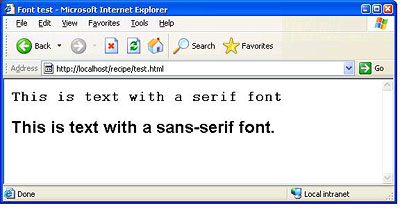
Comparing serif and sans serif fonts on a Web page
It's often debated which generic font families are best for what situation. Some studies have concluded that people can read sans serif fonts easier on a computer monitor but can read serif fonts easier on a printed page, especially when there's lots of text.
Nevertheless, many commercial Web sites use serif fonts instead of sans serif ones, even for their printer-friendly pages. Our print.css style sheet uses serif fonts but, again, feel free to experiment with different fonts and font sizes to see what you like best.
The font size property allows you to control how large the individual text elements are within your page. You can do that using relative terms, such as x-small, small, medium, large, and so on. You can also use specific font sizes, specified in points, which is what our print.css style sheet does. By defining precise point font sizes, you can control exactly how large the text appears on the printed page.
After defining the body section attributes, the style sheet defines attributes for each of the h2 and h3 header tags (our PHP code didn't use any h1 headers, but feel free to experiment with that as well). I chose to make the header fonts different mostly just to demonstrate our point. You'll see the difference once we display the new recipe Web page.
After creating and saving the print.css file, we need to make a modification to the print.php file so it uses the new style sheet:
<!DOCTYPE html PUBLIC "-//W3C//DTD XHTML 1.0 Transitional//EN"
"http://www.w3.org/TR/xhtml1/DTD/xhtml1-transitional.dtd">
<html xmlns="http://www.w3.org/1999/xhtml">
<head>
<link rel="stylesheet" type="text/css" href="print.css" />
<title>The Recipe Center</title>
</head>

<body>
We added a head section that defines the print.css style sheet (much like what we did in the index.php file to define the mystyle.css style sheet). Now, when you display a recipe in the Recipe Center and select the Print recipe link, you'll get something that looks like this:
The styled printer-friendly recipe Web page
When you print this page, the fonts appear on paper exactly as they did on screen. Things are starting to look better!
Now let's move on to Chapter 4 and see what else we can do to help our visitors.
Chapter 4:
The Print Media
Now we have a way for our visitors to print just the recipe information in a styled manner. But what about those visitors who insist on just printing from the main Web page? Well, there's a trick we can use to take care of them.
In the Recipe Center Web pages, we use the link tag to specify which CSS style sheet the Web page should use. The format of the link tag we used in the index.php file is:
<link rel="stylesheet"
type="text/css" href="mystyle.css" />
This tag specifies the mystyle.css style sheet for the Web page. It would be nice if there was a way to specify one style sheet for displaying data in the Web browser and another style sheet for when visitors print the data. Guess what—there is!
In the link tag, you can include a media attribute. This attribute specifies when the browser should use the style sheet by specifying a specific type of device. This enables us to include one style sheet for displaying a page on-screen and another style sheet for printing it. Here are the possible values for the media attribute:
Media Attribute Values | |
Value | Description |
| all | Apply to all devices. |
| aural | Apply to speech synthesizer devices. |
| Braille | Apply to Braille tactile feedback devices. |
| handheld | Apply to small-screen handheld devices. |
| Apply to print and print preview modes. | |
| projection | Apply to projector devices. |
| screen | Apply to nonpaged computer monitors. |
| tty | Apply to devices with fixed-pitch character grids such as terminals. |
| tv | For low-resolution TV-type devices. |
As you can see from the table, we can specify one media attribute that applies only to print devices and another that applies only to computer monitors. Thus, we can specify two separate style sheets in our HTML code:
<link rel="stylesheet"
media="screen" type="text/css" href="mystyle.css" />

<link rel="stylesheet" media="print" type="text/css" href="print.css"
 />
But that only solves part of the problem of printing the main Web page. Remember, we still have to deal with the header, navigation, news, and footer sections that we don't want to appear on the printed page.
Fortunately, CSS provides a solution for that problem as well. In the CSS style sheet, any tag or section can be set to not display. The display property determines how (or if) an HTML element appears on the Web page. Setting the display property to none hides the Web page element.
Since each of the sections we want to hide is identified by a section tag, we can easily specify those sections in the print.css style sheet and disable them. Here's the code we need:
#header, #nav, #news,
#footer {

display: none;

}
That's all there is to it! Now when we print the Web page, none of these sections appear. Let's add this code to our print.css style sheet, which we created in the last chapter:
body {

background-color: #fff;

color: #000;

font-family: "Times New Roman", serif;

font-size: 12pt;

}


h2 {

font-family: "Lucida Handwriting", serif;

font-size: 16pt;

}


h3 {

font-family: "Comic Sans MS", serif;

font-size: 14pt;

}


#header, #nav, #news, #footer {

display: none;

}
Now we need to specify the new style sheet in the index.php file.
<html
xmlns="http://www.w3.org/1999/xhtml">

<head>

<link rel="stylesheet" type="text/css" href="mystyle.css" />

<link rel="stylesheet" media="print"
type="text/css" href="print.css" />

<title>The Recipe Center</title>

</head>


<body>
The first link tag doesn't specify a media type, so it's used by default. The second link tag specifies the print media type, and it overrides the default link for print media (such as printing and print preview mode).
That's all there is to it! Let's test our creation. Open the Recipe Center application Web page, select a recipe to display, and then look at the print preview by clicking File > Print Preview. Your print preview should look something like this:
Print preview of the new, improved recipe page
As you can see, the header, navigation, news, and footer sections don't appear on the printed page! But the entire content of the main cell does appear—both the recipe and the posted comments—using the fonts and font sizes we specified in the style sheet. How cool is that?
This is a great trick that many commercial Web sites use to make their Web pages more user-friendly. Now you can use it in your Web applications, too.
Chapter 5:
Summary
Today, we investigated how to make attractive, printer-friendly Web pages. This is important because if visitors try to print a fancy Web page designed to be attractive on-screen, they will typically get lots of extraneous information that wastes both paper and ink. The solution is to enable visitors to print just the information they want.
The first method we discussed used the target attribute within the HTML link a tag. By specifying a target value of _blank, we can force the visitor's Web browser to open a new browser window to display our data. This ensures that we can put only the data we need in the Web page for printing.
After creating a separate Web page in a new window, we saw how to add a CSS style sheet to fancy up the fonts for our printer-friendly recipe text. We used the font-family and font-size properties to control exactly what fonts and sizes the browser uses to display the recipe data.
Finally, we looked at the media attribute of the link tag. This attribute allows us to specify a different style sheet just for printing, separate from the one used to display the Web page on the computer monitor. We also saw how we can prevent extraneous Web page sections from printing when a visitor prints the page directly.
In the next lesson, we'll revisit the subject of allowing visitors to post data.
We'll create a system that forces them to log in and be identified before they can post anything. This will greatly reduce the potential for abuse of our new Web site.
Supplementary Material
|
The Anatomy of Web Fonts http://www.sitepoint.com/article/anatomy-web-fonts |
| Here's an in-depth article explaining the different fonts available and their history of use. |
|
Safe Web Fonts http://web.mit.edu/jmorzins/www/fonts.html |
| This is an interesting discussion about what fonts are currently available for Windows, Mac, and Unix computers, along with examples of different font families. |
FAQs
Q: Does the type of printer visitors use to print a Web page impact what font families are available?
A: No, not anymore. In the old days, computers were limited to the fonts that a printer could print. But printers now use graphics to print any font that is supported by the host computer.
Q: What happens if I select a font that is not supported by a visitor's Web browser?
A: The Web browser will display the text in either a similar font or a default font. Don't worry, the text should still appear on the Web page (or print on paper).
Assignment
The easiest way to figure out what works best in your printing environment is to experiment. So for today's assignment, try experimenting with different font families and font sizes. See how they impact the look and layout of your pages on screen and in print. Experiment with both serif and sans serif fonts and see if you have a preference.