The Recipe Center user registration Web page
Lesson 09 - Controlling User Access
Chapter 1: Introduction
Today, we're going to focus on user access control. This is a topic that can cause even the most seasoned Web administrator to wake up in the middle of the night screaming. But don't worry; we're going to keep things simple and painless.
First we'll review the different options available for transferring data between Web pages. We'll discuss how we can use Web sessions to keep track of an individual visitor in the application. You'll see the basic tools PHP provides to help us initiate and manage Web session data.
Next we'll create a standard Web page form to allow our visitors to register a user name and password in the Recipe Center database. We'll write PHP code to incorporate some basic controls to help manage our user accounts and talk about some ways of controlling who can use the application.
Finally, we'll cover how to use the Web session data PHP code to limit specific functions (such as posting recipes and comments) so that only authorized visitors can access them.
That should be enough to keep us busy today, so let's get started.
Chapter 2:
Web Sessions
In the mainframe computer world, individuals who need to access programs running on the system must first log in to the system. This usually requires entering some type of data that uniquely identifies you, such as typing a user ID, placing your finger on a scanner, or inserting a smart ID card that includes a unique encrypted key. Once the system authenticates that you are who you say you are, it allows you to access the system and your data. This process starts a session.
A computer session tracks every transaction you perform with the system, and it relates those transactions to the user account used to start the session. A system administrator can look through the log files and identify the user who performed any transaction.
When you've finished entering transactions, you must log off of the system to stop the session. If you forget to log out, another user can come in and enter new transactions that the mainframe credits to your session.
On a mainframe computer, keeping track of a user session is easy because each user logs in from a device (a directly connected terminal or a persistent network connection), performs transactions, and then logs out. Unfortunately, it's not as easy on a Web application.
Programmers originally created the Web interface to allow clients to anonymously connect to a remote server and retrieve information. This meant not having to mess with the formalities of a session. In essence, a Web session consists of a single transaction, and it doesn't even necessarily require a user ID to identify the visitor.
Allowing only one transaction per session poses a problem for Web applications that must produce several pages of information. It would be impractical to ask users to enter an ID and password for every Web page they visit. Fortunately, there's a solution for us.
Passing Web Data
We've already seen that the HTML GET and POST methods allow us to pass data between Web pages. You can use these methods to track a single visitor throughout multiple pages. One way to do this is to produce a login page at the start of the Web session. Once the application obtains the user ID from the visitor, it authenticates the ID and then passes that value to every other Web page the person visits in the application as either a GET or POST HTML variable.
While this method can work just fine, it requires passing user account information through easily viewable HTML data. (In fact, the GET method even includes the data in the URL.) There's a better method available that provides a simpler, more secure way of tracking Web sessions.
Session Cookies
If you've done any Internet surfing, I'm sure you've heard of cookies. They're small bits of information that get stored in a user's Web browser. Over the years, cookies have gotten a bad reputation, mostly because of a general misunderstanding about their capabilities and limitations.
Despite what you might have heard, Web applications can't use cookies to track where you've been on the Internet. Each Web page can only read the cookies that it places in your browser. (Of course, this means they can track where you've been in their particular Web application.) They also can't use cookies to dig into any of your personal data on your PC. Despite their negative reputation, cookies are a vital piece of the Web application session puzzle.
A cookie consists of three pieces of information:
The expiration date and time information is a key element in how we use cookies. The value assigned determines how long the Web browser should hold on to the cookie data. If you set an expiration time to a few days, the Web browser must store the cookie in a file on the PC so it can be retrieved if the visitor returns to the Web site within that time (these are the temporary cookie files you see in your browser's cache). After the expiration time, the cookie file will still be on the PC, but the Web site won't process it.
The key to Web application sessions, though, is cookies that expire as soon as the visitor closes the Web browser software. The Web browser never writes temporary cookies to a temporary file—they remain within memory on the client computer.
These types of cookies are referred to as session cookies because they define a specific session with the Web application. When the visitor closes the Web browser, the session cookies disappear. If the visitor returns to the Web application, the application starts a new session with a new session cookie. This is exactly what we need to track session information in a Web application.
Session cookies allow us to store unique user information in the visitor's Web browser, and then retrieve it in later Web pages to verify that the visitor is still the same person with the same session.
This is how the commercial Web sites implement things like shopping carts, which can remember what items you've clicked no matter how many Web pages you've visited on the site. We'll use this feature to track a registered Recipe Center user so we know when a visitor has permission to post new recipes or comments.
Creating a Session
PHP provides an easy way for us to declare sessions in our Web pages. The PHP function session_start() automatically sends the required HTML code to the remote Web browser to store a session cookie. The session cookie is assigned a unique ID number. When the browser closes, the session cookie is deleted.
For the data element, PHP provides an array variable that can store as much data as we want to associate with the unique session ID number. This allows us to store all sorts of data in the session cookie and then refer back to that data within other Web pages.
In the PHP file (the code for your Web pages), the session_start() function must come before any HTML code, including the html tag. Usually, the session PHP code looks something like this:
<?php

session_start();

?>

<!DOCTYPE html PUBLIC "-//W3C//DTD XHTML 1.0 Transitional//EN"
"http://www.w3.org/TR/xhtml1/DTD/xhtml1-transitional.dtd">

<html xmlns="http://www.w3.org/1999/xhtml">

<head>
You must add the session_start() PHP function to the start of every Web page in the application that requires session information. If the session_start() function is not present, the Web page can't access data in the session array variable.
In the Recipe Center application, that's easy because the index.php file is the only Web page we use—everything else is a PHP include file. So all we need to do is specify the session_start() function at the start of the index.php file and we're ready for Web sessions.
Let's prepare our Recipe Center application for handling session cookies. Just follow these steps:
<?php

session_start();

?>

<!DOCTYPE html PUBLIC "-//W3C//DTD XHTML 1.0 Transitional//EN"
"http://www.w3.org/TR/xhtml1/DTD/xhtml1-transitional.dtd">

<html xmlns="http://www.w3.org/1999/xhtml">
Now we can track session cookie data in all of our Web pages in the Recipe Center application. This is the start of the user log in feature.
Follow me to Chapter 3 to see how to get our visitors to register a user account.
Chapter 3:
Creating User Accounts
Before we can track visitors in our application, we need to provide a way for them to log in. Remember, though, that we're not going to require all of our visitors to log in, because we want anyone to be able to view recipes from our database. We'll only require a login from visitors who want to post a new recipe or comment on an existing one.
Because of this, we don't need to install a front door that requires everyone to log in. We just need to have a link in the navigation area of our home page to provide a simple login form for registered users. Once a visitor logs in, we'll set a session cookie with the person's login information and then use that cookie to validate that user every time he or she wants to post anything.
Of course, before visitors can log in, they must have a valid user account. Here are two different ways we could provide user accounts:
The method you choose depends mostly on how secure you want your Web application to be. For the Recipe Center application, we'll be nice and provide a Web page for any potential visitor to create his or her own login account.
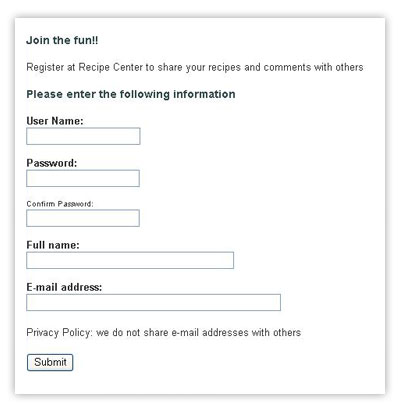
The navigation area PHP include file (nav.inc.php) we created back in Lesson 4 contains a link called Register for a free log in. That link takes the visitor to the register.inc.php include file, which produces our registration form, as shown here.
The Recipe Center user registration Web page
To create the register.inc.php file, follow these steps:
<h3>Join the fun!!</h3>
<p>Register at Recipe Center to share your recipes and comments with others</p>
<h3>Please enter the following information</h3>
<form action="index.php" method="post" target="_self">
<b>User Name:</b><br><input type="text" name="userid"><br>
<br />
<b>Password:</b><br><input type="password" name="password"><br>
<br />
<font size="1">Confirm Password:</font><br />
<input type="password" name="password2"><br>
<br />
<b>Full name:</b><br><input type="text" size="40" name="fullname"><br>
<br />
<b>E-mail address:</b><br><input type="text" size="50" name="email">
<p>Privacy Policy: we do not share e-mail addresses with others</p>
<input type="submit" value="Submit">
<input type="hidden" name="content" value="adduser">
<hr size="1" noshade="noshade">
</form>
The register.inc.php include file uses HTML to create a standard HTML form. The form includes text boxes for the visitor to type a user name, a password, his or her full name, and an e-mail address. The password text box uses the password type form feature. This feature obscures whatever text is typed in the text box so others can't read the password as it's typed. Since visitors can't see what they're typing, a second password text box is added to ensure the visitor types the password correctly.
The form's action attribute points to the standard index.php file, so we need to also include the hidden content HTML variable and set it to the include file we want to use next. We'll use the adduser.inc.php include file to do the work of creating the user account from the form data.
Let's create the adduser.inc.php include file now:
<?php

    $userid = $_POST['userid'];
    $password = $_POST['password'];
    $password2 = $_POST['password2'];
    $fullname = $_POST['fullname'];
    $email = $_POST['email'];

	include("connectselect.inc.php");
    $baduser = 0;

    // Check if userid was entered
    if (trim($userid) == '')
    {
       echo "<h2>Sorry, you must enter a user name.</h2><br>\n";
       echo "<a href=\"index.php?content=register\">Try again</a><br>\n";
       echo "<a href=\"index.php\">Return to Home</a>\n";
       $baduser = 1;
    }

    //Check if password was entered
    if (trim($password) == '')
    {
       echo "<h2>Sorry, you must enter a password.</h2><br>\n";
       echo "<a href=\"index.php?content=register\">Try again</a><br>\n";
       echo "<a href=\"index.php\">Return to Home</a>\n";
       $baduser = 1;
    }

    //Check if password and confirm password match
    if ($password != $password2)
    {
       echo "<h2>Sorry, the passwords you entered did not match.</h2><br>\n";
       echo "<a href=\"index.php?content=register\">Try again</a><br>\n";
       echo "<a href=\"index.php\">Return to Home</a>\n";
       $baduser = 1;
    }

	//Check if userid is already in database
	$query = "SELECT userid from users where userid = '$userid'";
	$result = mysqli_query($conn, $query);
	$count = mysqli_num_rows($result);

	if ($count > 0)
    {
       echo "<h2>Sorry, that user name is already taken.</h2><br>\n";
       echo "<a href=\"index.php?content=register\">Try again</a><br>\n";
       echo "<a href=\"index.php\">Return to Home</a>\n";
       $baduser = 1;
    }
    if ($baduser != 1)
    {
       //Everything passed, enter userid in database
		$stmt = $conn->prepare("INSERT into users(userid, password, fullname, email) VALUES(?, ?, ?, ?)");
		$stmt->bind_param("ssss", $userid, $password, $fullname, $email);
		$stmt->execute();

		$_SESSION['valid_recipe_user'] = $userid;
		echo "<h2>Your registration request has been approved and you are now logged in!</h2>\n";
		echo "<a href=\"index.php\">Return to Home</a>\n";
		exit;
	}
	else
	{
		echo "<h2>Sorry, there was a problem processing your login request</h2><br>\n";
		echo "<a href=\"index.php?content=register\">Try again</a><br>\n";
		echo "<a href=\"index.php\">Return to Home</a>\n";
	}
}

?>
I hope that by now you recognize most (if not all) of the PHP code here. The first section connects to the MySQL/MariaDB server and selects the recipe database. Following that, the HTML variables from the registration form are assigned to PHP variables. With all of the new user data in hand, it's time to do some data checking.
The code performs four different checks on the data the visitor enters into the form before attempting to create the new user account. It:
If all of these checks pass, the user name is added to the users database (that we created way back in Lesson 3) using a standard SQL INSERT statement. You can add code to perform whatever checks you desire in this section (such as validating the e-mail address provided). These just check some basic things to validate the data.
When adding the new user name to the database, you might notice something odd about the SQL INSERT statement the code uses:
$query = "INSERT into
users VALUES ('$userid', PASSWORD('$password'), '$fullname', '$email')";
The password value is stored using the PHP PASSWORD() function. This is a special function that encrypts the text password value into a 41-byte hexadecimal value. That is the reason we created the password field as a 41-character text value.
If the INSERT statement is successful, the program creates a new variable in the session cookie using the code:
$_SESSION

['valid_recipe_user']

 = $userid;
The $_SESSION [] array variable contains the data values stored using the session ID.
This code creates a session cookie variable called valid_recipe_user and sets its value to the actual user account name.
You'll see in Chapter 4 how to retrieve this information and use it in your PHP code.
Chapter 4:
Checking for a Logged In User
So now we have a way for visitors to register user accounts on the system. All we need is a way for visitors with existing user accounts to log in and a way for the Web application to detect whether or not a visitor is logged in. Let's start by tackling the first issue.
Creating a Login Form
The registration form we created in the previous chapter automatically logged in visitors after their user account was created. Visitors who are already registered won't be using this form, though—they'll need another way to log in to the application.
The navigation bar includes a link pointing to our login form:
<td><a
href="index.php?content=login"><strong>Login to
post</strong></a></td>
The login.inc.php PHP include file creates the login HTML form for us, as shown here.
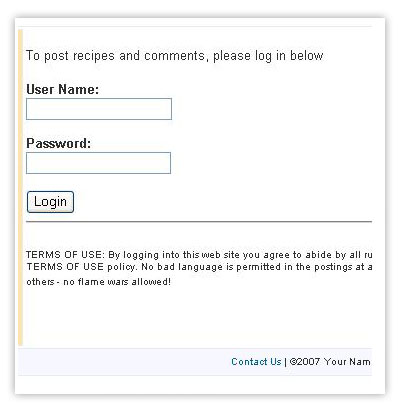
The Recipe Center's user login page
Let's go ahead and build the login.inc.php file:
<br />
<p>To post recipes and comments, please log in below</p>
<form action="index.php" method="post" target="_self">
<b>User Name:</b><br>
<input type="text" size="20" name="userid"><br>
<br />
<b>Password:</b><br><input type="password" size="20" name="password"><br>
<br />
<input type="submit" value="Login">
<input type="hidden" value="validate" name="content">
<hr>
<p><font size="1"><strong>TERMS OF USE:</strong> By logging in to this Web site you agree to abide by all rules and regulations set forth in the TERMS OF USE policy. No bad language is permitted in the postings at any time. Respect the opinions of others—no flame wars allowed!</font>
<p>
That's not too complicated. All we need is a user name and password text box, a submit button, and a hidden value to point the content variable to the next Web page. We'll create the validate.inc.php PHP include file to validate the user account and set the session cookie data.
To create the validate.inc.php file, do the following:
<?php

	// MySQLi connection
	include("connectselect.inc.php");

	$userid = $_POST['userid'];
	$password = $_POST['password'];

	$query = "SELECT userid from users where userid = '$userid' and password = '$password'";
	$result = mysql_query($conn, $query);

	if (mysqli_num_rows($result) == 0)
    {
        echo "<h2>Sorry, your user account was not validated.</h2><br>\n";
        echo "<a href=\"index.php?content=login\">Try again</a><br>\n";
        echo "<a href=\"index.php\">Return to Home</a>\n";
    }
    else
    {
       $_SESSION['valid_recipe_user'] = $userid;
       echo "<h2>Your user account has been validated, you can now post recipes and comments</h2><br>\n";
       echo "<a href=\"index.php\">Return to Home</a>\n";
    }

?>
There's not all that much required for this. We start the connection to the MySQL/MariaDB server and the database, retrieve the HTML variables from the form and save them to PHP variables, then create an SQL query to check the userid and password values (note that we need to use the PASSWORD() function again to compare the encrypted version of the password to the one stored in the database).
If no records are returned from the query, we know that either the typed user ID wasn't in the database or the typed password was invalid. An error message is displayed to the visitor, and a link is provided for them to try to log in again.
If you want to give a more specific error message back to the visitor (such as an invalid user name or an invalid password), you'll have to break this up into two separate queries—one to check if the user name exists and another to check if the password is valid. Be careful with this, though, as it could help the bad guys guess valid user names and passwords.
If the userid and password values are in the database and match the data entered, the session cookie variable valid_recipe_user is set, and the program stores the user name in the cookie data.
Using Session Cookies
Now we can easily find out whether a visitor has logged in to the session or not simply by checking the $_SESSION['valid_recipe_user'] array variable:
if
(!isset($_SESSION['valid_recipe_user']))

{

    echo "Sorry, you're not logged in";

} else

{

    echo "Welcome to the application";

}
The isset() PHP function is used to determine whether the valid_recipe_user array variable has been set. If the value has been set, we can extract the user name value from the session cookie data and find out the visitor who owns the session.
We only need to check the session information in two locations in the application—when a visitor wants to post a new recipe and when a visitor wants to post a new comment. As an example, let's work with posting a new comment. The newcomment.inc.php include file handles this function. Modify the newcomment.inc.php file to incorporate our session information:
<?php
$recipeid = $_GET['id'];
if (!isset($_SESSION['valid_recipe_user']))
{
    echo "<h2>Sorry, you do not have permission to post comments</h2><br>\n";
    echo "<a href=\"index.php?content=login\">Please login to post comments</a><br>\n";
    echo "<a href=\"index.php?content=showrecipe&id=$recipeid\">Go back to recipe</a>\n";
} else
{
    $userid = $_SESSION['valid_recipe_user'];
    echo "<form action=\"index.php\" method=\"post\">\n";
    echo "<h2>Enter your comment</h2>";
    echo "<textarea rows=\"10\" cols=\"50\" name=\"comment\"></textarea><br>\n";

    echo "<input type=\"hidden\" name=\"poster\" value=\"$userid\"><br>\n";
    echo "<input type=\"hidden\" name=\"recipeid\" value=\"$recipeid\">\n";
    echo "<input type=\"hidden\" name=\"content\" value=\"addcomment\">\n";
    echo "<br><input type=\"submit\" value=\"Submit\">\n";
    echo "</form>\n";
}
?>
The new code first checks to see if the valid_recipe_user variable has been set. If it hasn't, the visitor hasn't logged in yet, and the code displays a message with a couple of links to point the visitor back to the recipe or to the login form.
If the valid_recipe_user variable is set, the user name is extracted from the session cookie and used as a hidden value in the new comment form. Now the visitor doesn't need to enter a name in the form because it's already provided by the session cookie. This means one less form text box to deal with. All that's needed is a comment textarea and a Submit button.
After saving the newcomment.inc.php file, test out the application. Try posting a comment without logging in to the session. You should receive the error message. After you register a user account, try to post a comment. Hopefully, you'll be allowed to post your comment and then see it listed with the recipe.
If you aren't able to do this, please come to this lesson's Discussion Area and describe what's happening.
If everything works fine, meet me in Chapter 5 where we'll wrap things up.
Chapter 5:
Summary
Today, we discussed how to incorporate user access control in our Recipe Center application. We saw how using HTML session cookies allows us to pass persistent user data between Web pages within an application. PHP provides the session_start() function to easily add a session cookie to our pages.
Once a session cookie is set in an application, Web pages can store persistent data within the cookie using the $_SESSION [] PHP array variable. The Web page stores any data element within this array in the session cookie. This is an excellent way to store user session information.
We also examined how PHP code uses the isset()function to determine if an active session is available. If an active session is available, the $_SESSION [] array variable is available, too, and the code can retrieve any variable data stored in the session cookie.
Now that your MySQL/MariaDB database contains all your application's data, you'll need to know how to back up the data in case of a catastrophe and, of course, how to restore the data if necessary. Believe me, this can save you lots of headaches down the road.
So, in our next lesson, we'll take a break from PHP coding and look at the maintenance of our application.
Supplementary Material
|
Six Apart Guide to Comment Spam http://www.sixapart.com/pronet/comment_spam |
| Comment spam has become a huge problem for Web sites that allow visitors to enter comments. Here's a good tutorial that discusses the different types of comment spam and gives suggestions for preventing it. |
Supplementary Material
Q: Does requiring visitors to register and log in help prevent comment spam?
A:
Yes,
but not completely. Unscrupulous individuals and companies scour the
Internet looking for Web sites that allow comment posting. They then
post advertisements and links for their Web sites (you can probably
guess what type of Web sites I'm talking about). Forcing visitors to
register and log in helps prevent some of this, but not all of it.
A
better solution is to set up a manual validation system where you must
validate every registration before it's added to the database. Of
course, with high-volume Web sites this is much easier said than done.
Assignment
Use your newfound knowledge of session cookies to modify the PHP code for
posting a new recipe so that only logged in visitors can post a one. The
code for posting a new recipe is in the newrecipe.inc.php include file.
Remember that if a visitor is logged in, his or her user account name
will be in the valid_recipe_user session cookie variable.
After
checking if the visitor is logged in, extract the user name from the
session cookie and use it to automatically provide the user name in the
form data as a hidden value (similar to what we did with the
newcomment.inc.php file in Chapter 4).
Here's the code that I
used to do this:
<?php
if
(!isset($_SESSION['valid_recipe_user']))
{
   echo
"<h2>Sorry, you do not have permission to post
recipes</h2>\n";
   echo "<a
href=\"index.php?content=login.inc.php\">Please login to post
recipes</a>\n";
} else
{
   $userid =
$_SESSION['valid_recipe_user'];
   echo "<form
action=\"index.php\" method=\"post\">\n";
   echo "<h2>Enter
 your new recipe</h2><br>\n";
   echo "Title:<input
type=\"text\" size=\"40\" name=\"title\"><br>\n";
   echo
"Short Description:<br><textarea rows=\"5\" cols=\"50\"
name=\"shortdesc\"></textarea><br>\n";
   echo
"<h3>Ingredients (one item per line)</h3>\n";
   echo
"<textarea rows=\"10\" cols=\"50\"
name=\"ingredients\"></textarea><br>\n";
   echo
"<h3>Directions</h3>\n";
   echo "<textarea
rows=\"10\" cols=\"50\"
name=\"directions\"></textarea><br>\n";
   echo
"<input type=\"submit\" value=\"Submit\">\n";

   echo
"<input type=\"hidden\" name=\"poster\"
value=\"$userid\"><br>\n";
   echo "<input
type=\"hidden\" name=\"content\" value=\"addrecipe\">\n";
   echo
"</form>\n";
}
?>